The instrumentation of the VAZ 2110 has remained virtually unchanged. The board displays basic information about the status of on-board systems to the driver in real time. Depending on the configuration, the old-style dashboard has a simplified design than the versions on new cars. The differences in configurations are also minimal. Cars with engines with 8 valves or 16 are identical. The only difference will be on engines such as injector or carburetor.
The most common “tens” device has only 19 indicators and gauges. Each element is responsible for its own part of the on-board equipment.
Indication symbols
As you know, all the lights on the control panel come on when the ignition is turned on, and then, when the engine is already running, most of them go out. But when one remains on or blinks, this cannot but be alarming, because not everyone can immediately figure out what malfunctions this indicates, which of the systems needs urgent repairs.
Let's look at the designations of the instrument panel of the VAZ 2110. You should know that regardless of whether the panel is new or old on your car, the designations are almost the same, but the indicators may be located slightly differently.
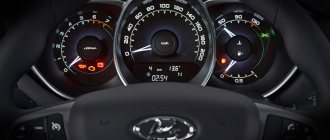
Instrument panel VAZ 2110
How does the on-board computer affect engine performance?
- Registration
- Entrance
- To the beginning of the forum
- Forum Rules
- Old design
- FAQ
- Search
- Users
I’ve been using the VAZ 2110 BK STAT for four years. 2 years ago I ordered an updated version 4.0 with expanded diagnostic capabilities from the manufacturer in Tolyatti. I gave the old one to a friend. The new version sometimes froze in the cold and showed total fuel consumption 2 times higher than real. Well, oh well, the interior is warming up and operation is restored, dividing by 2 is also not difficult
And now I noticed that after replacing the battery the CE lamp does not light up, the BC does not register fault code 1602. I turned off the sensors one by one
No fault indication. Disabled BC STATE. The CE lamp responded to the battery disconnection. Subjective with off. BC car and drove faster. Conclusion: this instance of BC STATE not only did not diagnose, but on the contrary blocked the indication of faults, and possibly caused more damage to the operation of the controller and engine.
BUT THE MEN DON'T KNOW!
Oh, of course I had to enter my login and password.
Okay uh. I will answer.
In short: the whole point is that new BCs very often enter the ECU into diagnostic mode in order to remove or assign certain parameters. For example, change the temperature on/off the fan. I repeat. This can only be done when the ECU is in diagnostic mode. But at the same time the car is driving and the diagnostic mode INTERFERES, I note, INTERFERES with the normal operation of the controller.
Source
Top part
So let's start from left to right. First, the top part of the control panel:
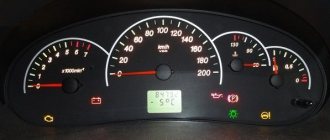
- Side scale from 50 to 130 and arrow. Shows the temperature of antifreeze (antifreeze) in the engine cooling system;
- Almost round scale (0 – 80) and arrow. Tachometer showing engine speed;
- Two arrows at the top, almost in the middle of the control panel - turn signals (right, left);
- Speedometer. Well, this device, probably everyone knows, shows the speed at which the car is moving;
- A side scale with an arrow and, most often, two images of a filling column (white and red). Instead of a red column there may be a yellow light. This is an indicator of the fuel level in the tank. If the red column (yellow light) lights up, it means that there is very little fuel left in the tank - no more than 7 liters, urgent refueling is required.
Bottom part
Let's look at the indicators at the bottom of the control panel. If they don’t light up, it means the machine is working normally, and when any of them lights up, this indicates a malfunction in certain components. Most often, this is a signal that repairs are needed, and the sooner the better. From left to right:
- The indicator on the far left at the bottom is the air damper light (if you have a carburetor engine);
- Icon in the form of an oil can. If this light comes on, it means there is insufficient oil pressure in the engine. An alarming signal. You need to stop, find the reason;
- A round icon with the letter P inside on the control panel indicates that you have the parking brake on, which, as you know, should be turned off when moving away;
- Indicator of a fault related to the generator or battery (a symbolic image of the battery is shown on the indicator). Perhaps the battery is not charging from the generator, there is an open circuit, or the generator belt is loose or broken. In any case, your intervention and repairs are needed, otherwise troubles cannot be avoided;
- If the engine is running and the Check Engine indicator is on on the control panel, this is the most unpleasant thing for the driver, since it indicates serious malfunctions in the engine. In general, when this indicator lights up, it is recommended to stop driving and turn off the engine. Most likely it needs repairs;
- Typically there is a red triangle above the Check Engine. It lights up when the “hazard light” is on - an emergency signal sign;
- The headlight light indicates that the high beam is on. Designed to control headlights: when an oncoming car appears, do not forget to switch to low beam;
- A very important indication icon on the front panel (in a red circle) is a signal that there is not enough brake fluid. Perhaps it is leaking somewhere, which it is advisable to find out as soon as possible and, if necessary, carry out urgent repairs and replenish the level;
- The icon of a burning light is a control for turning on the dimensions;
- In addition to the indicated lights, the front control panel has time indicators (and a button for setting hours and minutes) as well as a display that shows the total and daily mileage. On the new panel, this display may be narrow.
Installation of on-board computer.
A type of ECU, or as it is also called, the main control unit. The first IBM computer was installed on BMW cars back in 1981. Such a computer has its own independent sensors and actuators, but most often, it is used in close interaction with the car controller. Such a computer can affect the operation of the following systems and devices:
ABS Block designed to control an automatic transmission Control of electromagnetic valves (injectors) System responsible for the position of the ignition timing Systems responsible for climatic conditions Cruise control
And this is not the entire list of functions. In addition to them, the computer can control and display other equally important parameters. These include:
Driving a car with an unfastened seat belt Amount of air consumed Oil pressure Engine speed Coolant temperature Adjustment of electrical systems, for example, changing the voltage of the on-board network and battery charging current Alarm indicating engine overheating Exceeding the speed limit
Additional panel
The additional front panel of the new-style BSK control has indicators:
- An oil can is shown. If the light works, check the oil level;
- An icon lights up, which, with some imagination, can be “identified” as working wipers. This indicates that there is not enough windshield washer fluid in the tank;
- Conventional image of a thermometer over a container with liquid - high temperature of antifreeze;
- A crossed out light, which the arrow points to, is a sign that the brake light or parking lights are not working;
- If the light with the image of a wheel with brake pads lights up, it is quite possible that the pads are worn out and require replacement;
- The sign of a man with a seat belt indicates that the seat belt should be fastened.
Panel BSK VAZ 2110
Fuse failure
The electrical circuit for charging the battery is protected by a fuse. This element is located in the vehicle’s mounting block and is marked as F10. However, before checking for a malfunction in this place, it is better to first read the vehicle’s operating instructions, in which you will find out the exact designation of the required element.
If the fuse fails, the battery is not charged at all. However, there are times when the warning light comes on, but there is charging.
You can check the element using a tester (the part is removed from the mounting block). If the multimeter shows that the fuse is bad, all you have to do is replace it.
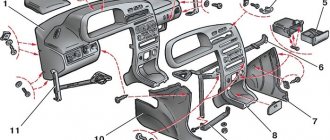
Removal and modification
Here's a quick look at the device and control panel icons. If for some reason she refuses, don’t immediately panic. Most often, the reason is the absence of contacts in some place in the wiring. But of course, if you wish, you can completely change or tune the panel.
For example, remove the cover and replace the light bulbs with brighter LEDs. Such a panel works brighter and the signals sent by the car will be more noticeable to the driver. If desired, you can install a more solid europanel, which will transform the interior.
To remove the panel you need:
- Disconnect the “-” wire from the battery;
- Remove the shield by unscrewing the screws;
- Remove the fastenings of the control panel to the trim, remove the instrument cluster from the socket;
- Remove the glass mask;
- Disconnect the wires from the block;
- Make changes to the instrument panel or replace it with a new one. Reassemble everything in reverse order.
The instrument panel of the VAZ 2110, as in any car, both imported and Russian, must determine the general condition of the car, and must show all information about: the amount of fuel, engine temperature and the presence (quantity) of engine lubricants.
In addition to the above data, the VAZ instrument panel displays all the errors (current malfunctions) of the car.
Further in the article, I will give you a complete description of the VAZ 2110 dashboard and tell you about the description of buttons, lamps, light indicators, and tell you about common errors that may appear on your display while on the road.
Vibrant variety of colors
Instrument panel Lada Priora: general information on symbols
Today, the fashion for changing the dashboard lighting is gaining fantastic momentum. Almost everywhere cars have neon lighting or internal LED illumination. However, all these innovations are not a cheap pleasure, which not everyone can afford. The situation is different when replacing the factory backlight with a multi-colored one.
You can, no doubt, use ready-made tuning options, but this will also cost a lot. It is best to do it yourself. In this situation, the main thing is to have the necessary materials and patience. First you have to disassemble the “tidy”. The protective glass must be removed. Next we remove the arrows. To do this, you need to use a screwdriver and hard cardboard.
It should be placed under the arrow, and then pry it off with a screwdriver. Then you need to carefully and slowly lift it to the top. Next, remove the backing. A utility knife will be useful for this. It must be inserted between the panel and the substrate and a layer of sealant must be cut in a circle. Then remove the backing. Let's disassemble the panel and get started.
1. Remove the filter layer using a utility knife. A filter is a colored layer of paint. It is applied from the back of the substrate and gives color illumination to the speedometer numbers and other sensors. To completely get rid of the filter, you can use acetone or another liquid that contains alcohol.
2. Next, change the backlight color. First, you can change the odometer backlight. To do this, you will need to dismantle the odometer screen, and then remove the blue film and remove the backlight bulb. It should be replaced with a multi-color universal LED. He can change colors. We connect the LED to the socket of a standard light bulb. Reinstall the odometer screen.
3. Now you can start completely replacing the backlight. We attach the LEDs to the “tidy” frame. Such LEDs can be purchased complete with a color switch. We install them in place and attach them to the standard dashboard backlight contacts.
4. Let's move on. Now we need to make sure that the arrows have the ability to change the backlight. To do this, remove the layer of red paint from the arrows. For this operation, you can use a stationery knife and acetone. Once the arrow is clean, it can be painted using white nail polish. The main thing is that the arrow is white, since this color conveys the color scheme of the LEDs.
5. Before the final stage, you need to attach the LED color switch to the panel. Such a switch can be installed, for example, in the lower right corner of the dashboard. After this, you can install everything in place. First, the substrate is installed. For greater reliability, you can use a sealant. After this, we put the arrows in place. We insert the protective glass. After that we admire the result.
Description of the VAZ 2110 dashboard buttons
Well, let’s immediately move on to the description of the buttons on the dashboard of the VAZ 2110.
Instrument panel of a VAZ 2110 car - the buttons located on it are marked on the arrows
As you can see from the screenshot, there are only 4 buttons on the instrument panel of the VAZ 2110 - let's move on to their description.
- Button to turn on/off the front fog lights.
- Turn on/off outdoor lighting.
- Heated rear window
- Button for turning on/off the rear fog lights.
In addition to the buttons located on the dashboard, there are others that are located under the stove, next to the radio in the cabin. Let's find out their functions:
Instrument panel VAZ 2110 - description of the buttons next to the stove
Many VAZ 2110 owners wonder why these 4 buttons, which are located on the dashboard under the stove, are needed. The answer will seem rather banal to you:
These buttons actually do not play any function; I think the engineers working on the ten wanted to add electric windows to the car, but for some reason they forgot to do this.
Okay, it was a joke! In fact, these buttons are responsible for the following:
- Turning recirculation on/off
- Button for installing additional equipment (for example, power windows)
- Turning the hazard warning lights on/off
- Button for installing additional equipment (for example, power windows)
Noise Removal
Controls, dashboard and interior equipment of VAZ / Bogdan / 2110 / 2111 / 2112
Basically, the panel rattles both due to improper installation and because the three parts that make it up touch each other, which causes creaks and rattles in the cabin.
https://youtube.com/watch?v=e2j62cWAmXs
That is why sound insulation is necessary, which the manufacturers did not take care of properly, and it is up to the owner to finalize it. Modelin can be used as sound insulation. They can paste over:
- All places where three parts of the panel touch;
- Those parts of the panel where it comes into contact with the radio, on-board computer, etc.;
- All bolt holes are also covered with modelling. It won’t hurt to screw them in, but there will be additional sound insulation, as well as protection against heat loss;
- Sides of the glove compartment;
- "Black box" in those places where it comes into contact with the panel.
https://youtube.com/watch?v=p_CpOs64yas
It is better to cover the back of the panel with bitoplast. There is advice - also use vibration material, but this is not necessary.
https://youtube.com/watch?v=bkIhzZ8048U
The remainder of the bitoplast can be placed at the bottom of the glove compartment. Now, sound insulation done by yourself will eliminate squeaks, and replacing the lining will be pleasing to the eye.
https://youtube.com/watch?v=A7qR0tUVgYA
Description of indicators and lamps on the instrument panel of the VAZ 2110
Well, we laughed, now let's move on to the main thing: a description of the indicators and lamps on the instrument panel of the VAZ 2110.
Description of instrument panel indicators BA3 2110
- Oil in fuel indicator
- Handbrake indicator
- Automatic battery charging indicator
- Engine health indicator
- Additional engine health indicator
- Enable left turn
- Enable right turn
- High beam indicator
- Brake fluid level indicator
- Fuel indicator
- Indicator of the warning lamp for turning on the dimensions
All of the indicators described above (except for the turn indicators and high beam headlights) are warning in nature. If they light up, then there is a problem in the car system.
The main differences between a BC injector and a carburetor
The main differences between the bk, depending on the type of power supply, are the on-board capabilities for the VAZ 2110. The carburetor type is the simplest. The main reason is that carburetors are largely controlled mechanically, and electronics play a secondary role. Therefore, its standard set of functions is extremely small. You can find out about:
- time of day or set an alarm;
- current and average fuel consumption, as well as power reserve;
- average speed and driving mode;
- engine or outside air temperature;
- diagnostic information that allows you to find out about an engine operation error and decode it.
Information indicators of the VAZ 2110 instrument panel
All information indicators of the VAZ 2110 car system are indicated by arrows, here they are in the photo:
Information indicators of the VAZ 2110 dashboard
- Availability and temperature of coolant
- Tachometer (shows the number of engine revolutions, remember to multiply by 100)
- Speedometer (shows the speed of the car. There is no need to multiply anything here.
- This display shows the vehicle's total/daily mileage.
- Engine oil indicator.
As you can see, the instrument panel of the VAZ 2110 is not that difficult to study. But very often situations arise when errors appear on the dashboard. Let's now look at these errors in more detail.
Alternative installation option for Lada Granta
Know that the on-board computer on the Lada Granta can be installed in a non-standard way. The idea is to “hide” the wires.
Second connection diagram
Let's implement the scheme shown in the photo. Let's take the power and ground from the emergency light button, and let everything else be standard. Connect to the button wires and use T-connectors for this - they can withstand a current of 100-200 mA (which is what is required).
So we had to remove the hazard warning button and connect to two wires. Then we run the cable to the OBD connector and use the terminals included in the kit.
The wires will be invisible
The standard connector (terminal block) had to be disassembled. But how great everything looks now!
Errors displayed on the dashboard of the VAZ 2110 and how to eliminate them.
As an example, I will take a screenshot of the dashboard indicators, which I have already shown in this article.
Errors and methods for eliminating them displayed on the dashboard of the VAZ 2110
- If the oil in fuel indicator lights up, we recommend that you check it. To do this, open the hood of the car and look at the horn. If it is in the oil level, then most likely a chip has come off in the instrument panel itself.
- Your parking brake indicator (manual) has come on, most likely the problem is a broken cable.
- The battery charging indicator shows you errors associated with the generator. If it catches fire, I recommend checking your alternator belt (for a break). In general, this icon on the instrument panel indicates a malfunction in the vehicle's electrical system circuit.
- An engine malfunction (Check Engine) tells you that the engine is unstable.
- Additional engine health indicator
- Turning on left turn - information indicator
- Activation of right turn – information indicator
- High beam indicator - information indicator
- This indicator shows the brake fluid level. If a malfunction occurs, check for the presence of a fuel tank in your vehicle.
- This indicator shows the presence of fuel. If it catches fire, you have approximately 5 liters of gasoline left in the tank. I recommend you refuel.
INSTRUMENT ERROR CODES
Standard errors in car self-diagnosis do not accurately indicate a breakdown. Due to the simplicity of the on-board computer, the device can only indicate the direction where to look for the problem. The decoding of standard errors looks like this:
- 0 – no errors detected – the system is in perfect order;
- 1-2 the voltage in the on-board network is exceeded or too low;
- 3 – malfunction of the float sensor in the gas tank;
- 4/5 malfunction in the antifreeze and ambient temperature sensor circuits, respectively;
- 6 – critical overheating of the power plant, it is necessary to wait for the antifreeze to cool down;
- 7 – not enough oil in the engine crankcase;
- 8 – the problem lies in the brake system;
- 9 – the battery is dead or the part is damaged;
- E – error in the firmware, EEPROM data packet is broken.
It should be taken into account that in some cases, the error code may be two-digit. For example, if 15 is displayed on the display, this may indicate the presence of breakdowns in circuits No. 7 and 8. Having found out what each error means, you can independently determine the source of the problem and correct the breakdown.