Domestic cars such as the Lada 2170 are extremely in demand among domestic consumers due to their low cost and budget maintenance. Among the benefits, one can also highlight its disadvantages - the Priora’s tidy is not the most reliable element of the car, which necessitates frequent intervention in the electrical part of the car. The dashboards of cars from different years of manufacture are almost identical. The symbols on the board of the 2013 version differ little from their 1st and 2nd generation counterparts. Here are signs indicating identical faults and corresponding to similar indicators.
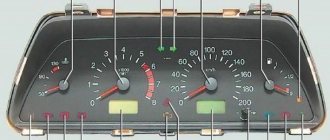
Priora dashboard indicators with interpretation
A separate category of indicators is mainly responsible for indicating the status of on-board systems and mechanisms. Such symbols do not indicate serious damage, they simply notify the driver.
The description and full explanation of the indicators looks like this.
| Visual Identification | Decoding |
| Fuel level indicator | Indicates the remaining gasoline in the fuel tank. When the supply is exhausted, the following sign lights up. |
| This indicator indicates that there are less than 10 liters of fuel left in the gas tank and the car needs to be refueled urgently. Initially, the red symbol of the gas station flashes, but when the fuel reaches 5-6 liters, it lights up constantly. | |
| On VAZ models, it indicates a low battery or a strong drop in voltage in the network. It usually appears after prolonged attempts to start the car in the cold. To fix it, just replace or charge the battery. | |
| The key against the background of the red car indicates that the immobilizer is turned on. This option is not available on 2008 models. Depending on the configuration, a green key may flash on the car’s dashboard. If the lamp blinks, the system is faulty. | |
| Standard turn signal activation indicators. The indicator lights light up for left or right turns respectively. If the indicator lights blink simultaneously, the hazard warning system is on (the red triangle lights up in parallel). | |
| A similar indicator lights up when the car is parked with the handbrake. It may also indicate a serious malfunction of the engine. | |
| The ABS system is not working correctly or the wheel is punctured. The system is present in cars optionally and is not directly related to the brake system. | |
| The red watering can is marked accordingly. The light indicates a critical drop in engine oil pressure. If the indicator goes out after the car warms up and the speed of the power plant is equalized, everything is in order. | |
| The green symbol indicates the activation of the side lights. | |
| The car's headlights are in long range mode. Lights up only when the mode is activated. | |
| Antifreeze temperature dial indicator | The indicator is installed on all machines without exception and displays the actual antifreeze temperature. |
Ideas for tuning and modifying the shield
How to tune the shield:
- Instead of a standard shield, install a more advanced one, with a navigator. In such devices, the arrangement of indicators and sensors will be different - the sensors are located on the right and left, and in the middle there is a navigator display. This tuning option is considered one of the most expensive.
- Install ready-made or develop your own scales for sensors. To implement this idea, you will need to completely remove the tidy and disassemble it, as well as disconnect the arrows from the sensors. The scales are installed on existing sensors and are securely fixed.
- Use of LEDs in lighting. The device will also have to be disassembled, but here the method is simpler. You don’t have to remove the arrows, you just need to turn off the light bulbs on the device and dismantle them, and then replace them with new ones. If the base of the light sources does not match, the lamps will have to be soldered. Alternatively, instead of light bulbs, you can solder an LED strip.
- Paint the dials and gauges of the instrument panel with fluorescent paint, but for greater effect, again, you will need to install diode lamps. With this combination, the tidy will glow brightly, but keep in mind that the implementation of this method requires care and painstakingness from the car owner.
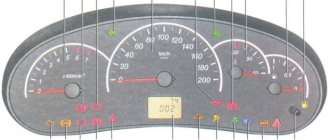
What do the icons on the Priora dashboard mean?
There is a separate group of icons indicating the presence of breakdowns and malfunctions within the vehicle’s on-board systems. The emblems are displayed in the space surrounding the main instruments. The following is a transcript of the signs with photo accompaniment.
| Icon | Decoding |
| If the car with the key is flashing, this indicates a malfunction or lack of response from the immobilizer. To fix the problem you need to check the block. | |
| An exclamation mark surrounded by brackets blinks on the dashboard, indicating a malfunction in the brake system or ABS. A similar indicator located slightly higher may indicate an incorrectly pumped brake system. | |
| The electric power steering is faulty or defects have been detected in the operation of the mechanism. Mostly installed on cars after 2011 model year. | |
| Failure in the wiring or units responsible for controlling the airbags. If the icon lights up after starting the engine, the specified element may not work under shock load. | |
| Seat belts are not fastened. Can also be red. At the same time, it is accompanied by a sound signal. | |
| The passenger airbag is not activated or is faulty. Usually lights up when the engine starts. | |
| If the indicator blinks constantly, this indicates a battery failure or critical discharge. | |
| An urgent check of all engine systems is necessary - a critical malfunction has been detected. |
The reasons why these icons may light up always require driver intervention. Ignoring machine signals can cause serious damage.
Depending on the year of manufacture and configuration, the interpretation of the instrument panel indicators may differ. The exact definition can be found in the vehicle's service manual.
Installation
Replacing the old instrument panel without CAN with a dashboard with navigation without CAN (2170-3801010-50) is carried out without modifications. We remove the old panel and install a new one in its place, insert the connector with wires, connect the antenna (we fix it on the roof) and, if necessary, change the right steering column switch.
If the old instrument cluster without navigation, but with CAN, and instead of it it is planned to install a new dashboard with navigation with CAN (2170-3801010-60), then you need to rearrange contacts 10-11 to 28-29 (if after connecting it still does not work, change 28 and 29 places). See instrument cluster pinout.
After installing the new instrument panel, the mileage will be reset to zero.
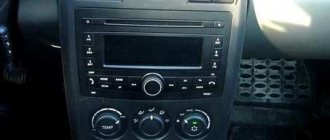
Navigation in the instrument panel runs on Windows CE 6.0 along with Navitel software. It is possible to update the software and download navigation maps from a USB card via a special USB input. Operating the car will become much more pleasant, the only drawback is the high price.
Have you ever had to install a new type of instrument panel with navigation on a Priora or Kalina? What difficulties did you encounter during this revision? Let us remind you that on the Lada.online website you can find other instructions on tuning and modifying Lada Priora or Kalina cars, for example, how to adjust the electronic gas pedal or improve the brakes without modifications.
Keywords: instrument panel Lada Priora | dashboard of Lada Kalina | torpedo Lada Priora | Lada Kalina torpedo
11
Found an error? Select it and press Ctrl+Enter..
The near future of the Chevrolet Niva has become known
Pros and cons of Lada Vesta Sport
Connecting an amplifier and subwoofer to the standard radio of a Lada Granta, Kalina, Priora or Vesta
How to find out the exact release date of a car
How to enable autotesting on Priora
Self-diagnosis of the VAZ Priora dashboard is necessary to be able to detect hidden problems or defects in on-board systems. To complete the procedure, you will need to perform a certain sequence of actions.
- Get into the car and insert the key into the ignition lock.
- Press and hold the daily mileage reset button.
- At the same time, turn on the car's ignition.
- If everything is done correctly, the instrument arrows will make several full revolutions and return back. All indicators will also flash.
The problem will be identified if any signal does not respond to manipulation.
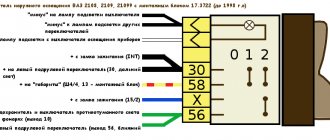
When is pinout required (device chips) and how to do it
All car parts fail sooner or later. There are times when they need to not only be repaired, but replaced. The instrument panel may also break, causing it to be removed and a new one installed in its place. This work is easy to do with your own hands if you have at least the slightest knowledge of mechanics. If you are well versed in your Priora (sedan), then you need to perform the pinout in this way:
- First, the dial hands are removed using a regular knife.
- Next, the gasket in the speedometer is scraped out to replace the backlight.
- If there is no need to change the sensors, you can simply remove them and clean them.
Very often, motorists cover the panel with a special LED strip to achieve even lighting. You can also use CMD diodes, which can be easily fused into glass with a soldering iron. To do this, you need to disassemble the dial and solder diodes directly under the base of the hands.
If you understand the purpose of all the contacts, and also know the purpose of a particular connector on the panel, then you can easily do the pinout yourself. The main thing is to carry out everything strictly according to the instructions so that the connection is successful and the panel continues to function efficiently. If you know which is better to install a tidy: with a canbus or a regular one, then it’s better to ask professionals who understand this. If you have no experience in such work, and you do not understand the purpose of certain wires, then the technical service will help you improve the operation of the instrument panel. Of course, you will have to pay for this, but you will not waste your time, and the work will be done efficiently.
Error codes on the Priora dashboard
When entering self-test mode, combinations of numbers and letters may appear on the display indicating the part of the circuit where a malfunction is detected.
Usually, after entering the service mode, one or more numbers appear on the device:
- 2 – a critical overvoltage was detected in the on-board network, caused by a short circuit or breakdown of the unit;
- 3 – an error has been detected in the fuel level sensor, a circuit break is possible;
- 4 – there is overheating of the cooling system, or the corresponding sensor is broken;
- 5 – the thermometer that determines the temperature outside is broken or there is an open circuit in versions before 2012, mounted optionally;
- 6 – the engine has boiled, you need to wait for cooling or check the serviceability of the sensors;
- 7 – the oil pressure in the crankcase of the power plant is too low, the sump may leak or the lubricant level has dropped significantly;
- 8 – breakdown of the brake line or units of the corresponding system;
- 9 – the battery is discharged or the element is faulty; it can also appear after the car has been idle for a long time in the cold;
- E – the firmware has failed or there is a critical error in the EEPROM data packet.
Possible faults
What instrument panel malfunctions may Lad Prior car owners encounter:
- The speedometer or tachometer needle does not work; when the speed increases, the needles continue to lie in place. In this case, first of all, it is necessary to check the signal that comes from the speedometer regulator; perhaps there is a break somewhere in the circuit or the sensor itself has failed. There is a possibility that the sensor will have to be replaced.
- The daily mileage or fuel level sensor does not work. Yes, these components are different, but they are both closely related to the speedometer, so follow all the instructions above. Checking the signal from the sensor will be relevant if power is supplied to the panel. It would also be a good idea to check fuses F10 and F20; they may need to be replaced.
- The device generally does not work correctly, the sensors show incorrect data. The problem may be with the processor itself or with a short in the circuit; this needs to be checked by an electrician. There is a possibility that the cause of the problem is a bad mass.
- Coolant temperature sensor. Check your contacts.
When do you need dashboard repair or replacement?
The Priora tidy does not have a large number of parts that are subject to frequent breakdowns. Typically, repair of the indicator unit comes down to replacing light bulbs and individual elements of the device. Users resort to replacing the board only when there is a malfunction of the contact group, connectors, or the board is damaged.
In case of serious damage (major short circuit leading to burnout of the main structural elements), repair may not be cost-effective. The cost of labor and materials often exceeds the price of a new module.
Possible malfunctions and ways to eliminate them
When operating a vehicle, individual components of the instrument panel may fail. Among the most common breakdowns are factors.
- Burnt out contact of one of the indicator lamps. Usually resolved by replacing the light bulb.
- Failure of the contact group can be eliminated by completely replacing the module - resoldering the part is not economically profitable.
- Malfunction of arrow indicators. It can be fixed by replacing the block.
If you know how to disassemble the panel, you can completely change the backlight
What are the errors on the instrument panel of the Lada Priora?
Tuning the instrument panel on a Lada Priora car usually does not end there, because car enthusiasts want to get more uniform lighting, which requires replacing the light bulbs. To do this, pieces of LED strip are glued around the perimeter of the panel, which need to be connected using thin wires and connected to the contacts of the standard backlight (plus to plus, minus to minus).
Replacing light bulbs is often accompanied by replacing the green filter in the display; for this purpose, you need to disassemble it and install a filter of a different color or leave the backlight on white.
Tuning of devices on Priora can be effectively complemented by a new way of illuminating the arrows. For this, red CMD diodes are used, three each for the tachometer and speedometer and two each for the engine temperature and fuel level scales. They need to be melted into the plexiglass from the instrument panel (you can use a soldering iron) under the base of the arrows, and resistances must be soldered on the reverse side (130 Ohms for three CMDs and 300 Ohms for two CMDs).
Tuning the center console often comes down to the fact that the driver seeks to eliminate unpleasant creaking. To do this, you need to remove the console lining, cover the edges of the lining, the place of contact with the panel, and the edges of the lining of the area under and above the stove control with madeline or polyurethane foam insulation. It will not be superfluous to tape the pocket, because it will become a little heavier and will not rattle.
How to dismantle and install the Priora dashboard
To dismantle the module, you will need to prepare two screwdrivers – a Phillips and a flathead one. A complete replacement of the Priora tidy looks like this.
- Disconnect the wires from the battery.
- Pull the steering column all the way down and remove the steering wheel from the pin.
- You will also need to remove the cover covering the fuse box.
- Unscrew the 4 bolts holding the instrument panel and remove it.
- Loosen the two mounting bolts of the trim panel and remove it.
- Disconnect the wiring harnesses from the contact groups and completely remove the board from the machine.
Installation is performed in reverse order.
Instructions for replacing the tidy yourself
The procedure for removing, disassembling and replacing the control panel can be carried out on your own; there is nothing complicated about it.
How to remove the PP:
- First of all, turn off the ignition, and then disconnect the battery from the power supply.
- For greater convenience, you should remove the steering column cover, and also dismantle the steering wheel itself.
- After this, using a screwdriver, you need to unscrew the two screws that secure the upper part of the tidy.
- Next, two more screws are unscrewed, only now from the bottom.
- There are two more screws on the sides of the control panel; they also need to be unscrewed.
- After this, you can pull the tidy towards you, but do not remove it completely. Since wires are connected to the device, you need to disconnect the connectors on the back side, and then release the latch.
- The PP is removed and replaced with a new one. Assembly steps are carried out in reverse order.