How to remove the instrument panel on a VAZ 2107
Sometimes you still have to do it. Harnesses of wires, unimaginable poses, the feeling that you have been possessed by an octopus and one tentacle is always enough. Yes, we are talking about the instrument panel of a VAZ 2107 car. Fortunately, you have to remove it not so often, but you shouldn’t go to a service station if a light bulb has burned out or the needle on the ammeter scale has fallen off. You have to shoot it yourself.
Zaerel=0;controls=0;showinfo=0;iv_load_policy=3;" frameborder=”0″ allowfullscreen>
How to remove the instrument panel of a VAZ 2107 Mutual subscription to your channel
Hello, I'm tired of advertising on video clips on YouTube, and do you know why there are advertisements on them, for this advertising...
Replacing light bulbs on the VAZ instrument panel
In this video I will show you how to correctly change the light bulbs in the instrument
to LED! The classic is sick...
When to remove the tidy
Repairing the dashboard can be useful in the case when any of the control lamps simply burns out, and this is extremely undesirable, since the car no longer has any means of monitoring such systems as, for example, the state of the injection engine control unit (naturally, in the latest 2107 models years with an injector). The Check Engine lamp appeared only in sevens with these motors, and if it burns out or loses contact with the circuit board due to vibration or moisture, then one can only guess at the reasons for the unstable operation of the engine.
Well, the instruments themselves, the tachometer, speedometer and sensor status indicators in the systems, rarely fail, if ever.
By the way, you should pay attention to the tidy at the moment when the ignition key is turned and all the lamps flash in test mode, so to speak.
It is this moment that will make it clear that the control lamp of a particular system does not work and explanatory measures need to be carried out with it.
How to remove the tidy on the seven
The algorithm for dismantling the 2107 instrument panel is simple and here are the steps you need to perform in order, with patience:
- The stove control knobs - the antifreeze supply lever to the heating system and the ventilation system control lever - will interfere. They should snap off using a screwdriver of a suitable diameter.
- Resetting the odometer readings. This button is located to the right, where the emergency light button is installed. A nut is screwed onto the top of the button body. You need to unscrew it and push the button itself into the panel.
- Now we find the thinnest slotted screwdriver and remove the plug on the right, under which the fastening screw is hidden, we unscrew it too.
- The panel on the right is free, you can apply it to yourself, but it’s too early to rejoice. All that remains is to remove the speedometer cable, the econometer vacuum tube and unclip the wiring harnesses.
- Now, with an effort of will and sleight of hand, you need to unscrew the cable nut. It's not hard to do, it's hard to get there. It might be faster if you try on the right.
- The econometer hose is also easy to remove. But you need to be able to get to it. Let's take it off too.
- We disconnect the pads from the harnesses by touch and remember where each one was, although you need to have a special talent to mix them up.
Actually, that's all. Now you can take out the device and do whatever you want and need with it. Since we have the tidy in our hands, maybe it makes sense to think about installing LEDs instead of incandescent lamps? In any case, good work and smooth roads!
Source: https://5net.ru/kak-snjat-shhitok-priborov-na-vaz-2107/
How to properly remove the dashboard on a VAZ-2107
The dashboard in a car should be understood as a whole group of measuring instruments that are combined in one design. It is these devices that can sometimes fail. And to repair or replace them, you have to remove the dashboard. How to do this correctly on a VAZ-2107?
The control devices stopped working or they began to “confuse” the readings, the control lamps and lights do not light up - in this case the panel will have to be removed.
Preparing for work
Before starting work, you need to buy replacement light bulbs. You can choose standard ones with or without sockets, as well as LED ones. If it is necessary to replace the incandescent lighting elements responsible for the backlight, then you will need light bulbs of the AMN 12-3-1 (T3W) type. These are ordinary filament bulbs that are installed in the dashboard of VAZs from the factory. If it is necessary to replace indicator lights, then type A 12-1.2 elements are used. Are you choosing LED?
You don't need a lot of tools:
- flat screwdriver;
- Phillips screwdriver;
- pliers.
If you are going to disassemble the panel and repair it, you will additionally need:
- multimeter or probe;
- soldering iron from 40 Watt;
- solder and rosin;
- side cutters;
- small screwdrivers.
Removing the panel from the car
Using a slotted screwdriver, remove the plastic plug on which the heating sign is depicted. This plug is on the right, and under it there is a Phillips screw that needs to be unscrewed. (There are 2 screws under the plug, but only one needs to be unscrewed - the top one, which secures the right side of the dashboard).
Next to the hazard warning button, there is an odometer reset button, which is secured with a plastic nut. The nut must be unscrewed and removed with the washer located behind it. The button is recessed inside the panel.
The right side of the tidy is weakened at this stage, and it remains to perform several additional manipulations in order to completely dismantle the device. To do this, pull out the right side of the device, thereby freeing access to its rear part. Here you need to disconnect all the chips and wires to perform dismantling.
Initially, the power chips for the stove button are disconnected. Be sure to remember the location of the wires. It is recommended to take photos so as not to be confused when assembly is carried out. Next you need to disconnect the speedometer cable. It is secured with a special nut, which can be unscrewed by hand.
All chips connected to the dashboard are disconnected. It is almost impossible to confuse their locations, since they have different fastenings and differ in size.
The supply hose is removed from the economizer fitting. This cable is located on the left side of the device. After all the chips, cables and wires are disconnected from the device, you can dismantle it.
Determining what doesn't work
If the backlight of the VAZ 2107 dashboard does not light up, this may be due to the following factors:
Faulty incandescent lamps
This rarely happens, however, due to the fact that from the factory the lighting of the panel is realized through the use of incandescent lamps, their burnout periodically occurs. The problem can be fixed by replacing the lighting elements, or better yet, installing LEDs. To make a replacement, you will need to dismantle the instrument panel. This is not difficult to do, but it will take a lot of time to disassemble the shield. The panel contains lighting elements, which must be replaced in order to restore the functionality of the VAZ 2107 instrument panel lighting. Before replacing, you should first check the serviceability of each lamp. The design of the shield uses 4 main lighting elements, which are responsible for lighting, as well as additional ones that act as an indication. If you had to disassemble the panel, it is recommended to immediately change them to LED ones.
Brightness control
The malfunction may be hidden in the part that is responsible for adjusting the backlight intensity. Although this part fails extremely rarely, its malfunction cannot be ruled out, especially if it has been established that the incandescent lamps are in good working order and do not need to be replaced. The light brightness control is located directly on the right side of the steering wheel near the headlight range control. If diagnostics have shown that this particular part is the reason that the backlight does not light, then it should be replaced.
Circuit breakers
The search for the reason why there is no instrument lighting on the seven should begin directly with the fuses. These elements protect the circuit from voltage surges, and as soon as a large current flows in the circuit or a short circuit occurs, the fuse link blows. If such a malfunction occurs, replace the fuse and check the power circuit.
Absence or poor contact at the point where the chip connects to the power wire
The reason for the lack of contact may be that the chip is not tightly pressed to the terminal block of the instrument panel. Poor contact occurs when contacts become oxidized. You can fix such breakdowns yourself by cleaning the contacts from oxides.
In addition to the main faults, there are additional ones, for example, damage to the power cable. If you have a multimeter in your arsenal, then identifying such a malfunction will not be difficult. Even if you don’t have a multimeter, it’s not at all necessary to contact a car service to fix the problem; you can use a probe with a light bulb.
Tidy wiring diagram
Dashboard repair video
Tuning the instrument panel of a VAZ 2107, how to remove and disassemble the panel
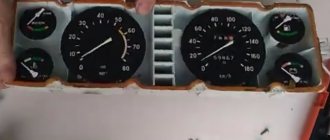
The dashboard is an integral and important part of any car. Not only driving comfort but also safety directly depends on the ease of reading information. During the production of the model, the appearance of the dashboard on this model changed slightly.
The latest version of the execution contained the following information:
- Tachometer - shows the number of crankshaft revolutions per minute. This feature appeared on the dashboard in the late 80s;
- Speedometer – accordingly shows the current speed;
- An econometer is a rare option even for modern cars. This sensor shows what speed is best to drive at the current moment to effectively save fuel;
- Oil pressure sensor (warning light). The sensor shows the engine oil level, and the warning light starts blinking if a malfunction occurs;
- Fuel level – the arrow indicates the amount of gasoline in the tank;
- Battery charge sensor – shows the device charge level;
How to Remove the Dashboard of a VAZ 2107 Video ~ AUTOTEXNIKA.RU
Home page » How to Remove the Dashboard of a VAZ 2107 Video
14.09.2018
We independently remove the dashboard of a VAZ 2107
For a novice car enthusiast, removing the toolbar may not seem too difficult. But this impression is deceptive. Before the dashboard
The VAZ 2107 will be completely removed; we will have to do a lot of manipulations, which we will tell the reader about in this article.
The most common reasons for dismantling
- One or more devices failed.
- The panel joints began to creak during the trip, and the car owner decided to glue them from the inside to eliminate this annoying creak.
- Several light bulbs burned out on the panel.
- The speedometer cable has become unusable and requires urgent replacement.
Required Tools
- Set of car keys.
- Flat blade screwdriver (medium size).
- Cross screwdriver (medium size).
- Pliers.
How to remove the instrument panel and shield VAZ 2107
- The car hood opens and the negative terminal is removed from the battery.
- Using a screwdriver, the dashboard
and glove box housing are unscrewed and removed. - The two connectors that supply the glove lights in the glove box are now disconnected.
Light bulb power connectors are disconnected - The sub-instrument panel is carefully clamped with a flathead screwdriver on the lower right edge and its clips are removed from the grooves, after which they are removed along with all devices.
Additional panelcan be removed with a screwdriver
- Behind this panel there are connectors from which the lighting of devices, clocks, warning lights and the cigarette lighter are activated. All this is disabled. Additional connectors are disabled manually
- Use a flathead screwdriver to push out all the switches located near the gear shift lever.
Switch connectors are disabled. - There are two screws under the switches. They are unscrewed with a screwdriver. The screws are tightened with a Phillips screwdriver
- Using a 10 wrench, the top bolts holding the center console are unscrewed.
After this it is deleted. The center console is removed manually - A Phillips-head screwdriver is unscrewed using the self-tapping screws that hold the lower protective cover of the steering column, after which it is removed along with the upper half of the column housing.
- The tips on the stove sticks are pierced with a screwdriver and then removed by hand.
The deflector channels are located next to them; they are also removed manually. After this, the 4 screws that hold the cover on the heating system are removed and it is removed. - A Phillips head screwdriver is used to remove the screws holding the furnace control unit to the dashboard.
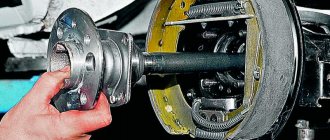
This opens up access to the screws that hold the screen with the devices. The right edge of the flap is pulled out so that an arm that passes through the gap is formed. After this, the fastening nut of the speedometer cable is unscrewed behind the valve, all other wires are disconnected. The instrument panel has been removed. The shield is removed from its original position - Provides access to the upper mounting nuts of the instrument panel. They are unscrewed with a 10 mm carabiner wrench. The panel is then removed. The instrument panel has been completely removed
- Reassemble in reverse order.
How to remove the instrument panel of a VAZ 2107
Removing the instrument panel of a VAZ 2107
.
Replacing light bulbs on the VAZ instrument panel
In this video
I will show you how to correctly change the light bulbs in
the instrument panel
to LED ones! The classic is sick.
Video of removing the instrument panel on seven
Important points
- It is recommended to label wires and connectors before disconnecting them to make assembly easier. These marks are easy to apply with a black marker or felt-tip pen (since most of the connectors are located under the white dashboard).
- To remove
the upper part of the steering column protective cover, it is necessary to be precise, since you can damage the rubber ring on the ignition switch (it gets caught on the edge of the housing and breaks easily). - When removing the optional panel, do not tilt the screwdriver too far; the latches that hold this panel in place are plastic and break very easily.
As can be seen from this article, removing the dashboard for the VAZ 2107 task is both labor-intensive, but feasible. Main.
Follow the instructions above and do not use too much force when removing: the panel material, despite its apparent strength, breaks quite easily.
Source: https://autotexnika.ru/kak-snjat-panel-priborov-vaz-2107-video/
How to remove the instrument panel on a VAZ 2107 (photo and video)
Removing the instrument panel (or dashboard) is required for many purposes: changing light bulbs, the panel itself, and control devices. You need to remove the panel in order to tune it, and some unscrupulous “specialists” get to the meter this way and “twist” the mileage. Regardless of whether it is a carburetor VAZ 2107 or an injector, the removal diagram is the same.
Below is the instrument cluster for the VAZ 2107 injector:
The difference in the combination is insignificant: if you have an injector, then an engine management system malfunction indicator is added:
The symbol lights up when ignited, and goes out after a stable start. Constantly lights up or flashes if the injector is faulty or the engine is not working properly.
Let's look at the sequence of actions to remove the panel.
- Remember: almost all work on servicing electrical circuits in a VAZ 2107 car, and in any other car, begins with “de-energizing the mass,” or opening the negative part of the circuit, which serves as the body. To do this, you need to remove the negative terminal from the battery.
- Using a straight-blade screwdriver, carefully remove the three caps from the interior heater control levers. Any scheme for the removal order.
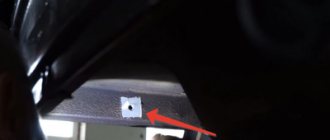
- To the right of the levers you can see a plug with a heating symbol. Use the same screwdriver to pry it off. Removing the plug is easy. Under it there is a screw - a self-tapping screw that secures the right side of the dashboard. We unscrew it.
- To the right of the alarm button there is a recessed handle that “resets” the daily mileage. You need to unscrew and pull out the nut along with the washer, and push the handle itself inside the panel.
- Carefully pull the right side of the panel towards you, next to the heater levers.
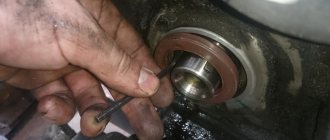
- Now you need to disconnect the speedometer drive cable. We put on cotton gloves so as not to stain our hands with oil, and unscrew the nut on the cable. It has a grooved rim and is shown with an arrow.
- Remove the vacuum supply hose from the economizer fitting. For VAZ 2107 it is located on the left side of the dashboard. Sometimes it resists, so you can gently apply force.
- Important point! Before disconnecting different colored pads, remember the markings and joint locations, or write down where they are connected. Only after this can the connectors be opened. If the connection diagram is broken during assembly, you will have to disassemble everything again.
- The final stage: we remove the shield. The operation is completed.
When installing the shield, all steps are performed in reverse order. Before installing the panel, do not forget to connect all contacts, place the negative terminal on the battery and turn on the ignition. Because if you forget to connect something, you will need to completely remove the panel again.
Once you have removed the panel, you can do its tuning. For example, change the appearance of the dials. To do this, first carefully remove the arrows, while trying not to bend them or the pins. The movement is only “pulling” perpendicular to the plane of the dial (do not forget to mark the place where the hand “lies” in the zero position before removing it).
The next step is to glue on the new dial; for good quality of the sticker, the surface needs to be degreased and the sticker carefully rolled.
You can also tune the dashboard lighting by setting the LEDs to 12 V, current 350 mA. The main thing when soldering is not to forget to put a resistor in the series circuit to protect against overload.
LEDs can be installed instead of standard lamps, and a rheostat can be included in the circuit.
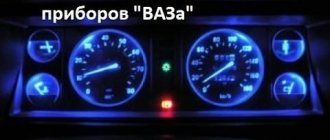
The photo shows a decent tuning of the VAZ 2107 dashboard in day and night lighting options.
Source: https://7vaz.ru/remont/panel-priborov.html
Tuning the instrument panel of VAZ 2107
Perhaps, everyone has a moment when the instrument panel in their VAZ car begins to seem dull and inconspicuous. In order to “revive” it, no expensive changes will be required, just make the backlight brighter and install a decorative sticker, which can be found in almost any car store, and replace the inserts on the dials. So, armed with a screwdriver and a soldering iron, we begin tuning the instrument panel of the VAZ 2107.
Removing the VAZ instrument panel.
The first step is to remove the sliders that control the operation of the heater (stove) using a flat-head screwdriver. Then, to the right of the emergency light button, unscrew and remove the nut and washer that secure the speedometer reset button. To the right of the removed sliders there is a small round plug that needs to be removed and the screw located behind it unscrewed. Then you need to carefully remove the instrument panel and release the speedometer cable by unscrewing the nut that tightens it. We disconnect all the wires, and the freed instrument panel remains in our hands.
The next step is to remove the arrows. This must be done extremely carefully so as not to bend either the arrow or the pin on which it sits. It is quite possible that you will have to apply force, but carefully, pulling the arrow in a direction parallel to the pin.
Instrument panel tuning.
Before all work, align the speedometer needle with the limiter, and make a mark on the back side so that you know in which position the needle “lies.” This will greatly simplify the installation of the speedometer and eliminate unnecessary work.
First of all, we remove the old VAZ 2107 shields (this is done quite simply) and install new ones in their place. Then carefully install the arrows, again, so as not to bend the pins. In this case, it is important to align the marks on the back side of the speedometer and, with the marks aligned, set the arrow in the “lying” position. We also carefully apply the sticker you like, having previously degreased the surface. In this case, it is especially important to ensure that it lies flat and without distortions.
Installing LED lighting.
There are two options for installing LED backlighting on a VAZ - directly behind the scale numbers, or as a general backlight for the entire instrument panel. Naturally, all this remains at your discretion, the main thing to consider is that in the first case the backlight will be quite bright and you will have to spend quite a lot of time soldering and gluing the LEDs.
The LEDs should be designed for an operating voltage of 12 Volts, and it is best to increase their contacts by 2-3 cm. For the first option, we remove all the standard light bulbs and solder LEDs in their place. After this, connect the power (it is best to dim the light and adjust the position and direction of the LEDs).
For the second option, if you want to illuminate the entire panel, you can install either four LEDs located in twos at the top and bottom of the instrument panel (choose the distance yourself, it depends on which part of the instrument panel you want to illuminate more), or six - three up and down. In this case, you will need to solder additional wires to connect the LEDs to power and drill out the mounting points. One option is to glue the LEDs with glue if they do not coincide in location with the power points. In this case, it is recommended to use only good glue, and be sure to degrease the installation sites.
In addition, with this arrangement of LEDs, there is a little trick to increase the strength of the backlight. Along the inner perimeter, you can cover the side surface of the instrument panel with foil - it will reflect light from the walls inward, enhancing the backlight. To decide how much you need it, it is better to assemble the panel, connect the power and think carefully about whether the backlight of such power will suit you.
Assembling the VAZ 2107 dashboard is done in the reverse order, there is nothing complicated about it. The main thing is that you achieved the desired result!