Purpose and principle of operation of the VAZ-2107 heater radiator
The source of heat in the heating system of the VAZ-2107 car is the liquid with which the cooling system is filled. The cooling system is designed in such a way that the heater radiator is part of its overall circuit. The principle of operation of the radiator is that air flows, penetrating into the car through the air intake on the hood, enter the heating compartment, where they are heated by the heater radiator and move further through the air ducts into the passenger compartment.
The VAZ-2107 heater radiator is a key element of the vehicle heating system
The degree of heating of the air directed into the car interior depends on the temperature of the coolant and the position of the heater valve damper. You can adjust the position of the faucet using the upper slider of the heating system control mechanism: the extreme left position of the slider means that the faucet is closed and the stove is not working, the extreme right position means the faucet is fully open.
The position of the tap can be adjusted using the upper slider of the heating system control mechanism
Initially, the heater radiators of the VAZ-2107 (and other “classic” models) were made exclusively of copper. Currently, many car owners, in order to save money, install aluminum heater radiators, which, although they are cheaper than copper ones, have worse heat transfer rates. The aluminum radiator does not always cope with the large flow of frosty air entering the air intake when driving on the highway, and in this case the interior does not warm up enough.
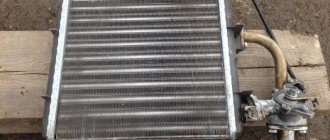
The heater radiator can be two or three rows . The heat exchanger has a horizontal position and is housed in a special plastic housing. The radiator is attached to the body with two self-tapping screws, the tap is mounted in the supply pipe. Structurally, the radiator consists of:
- systems of tubes located in honeycomb ribs that improve heat transfer;
- inlet and return tanks;
- inlet and outlet pipes.
Video: recommendations for choosing a VAZ-2107 heater radiator
The cross-section of the tubes can be round or square . Round tubes are easier to manufacture, but the heat transfer of such products is lower than that of square ones, so so-called turbulators are placed inside the round tubes - spiral-shaped plastic strips that help increase heat transfer rates due to turbulence and mixing of the refrigerant. In flat tubes, turbulence is created due to their shape, so additional elements are not required.
The dimensions of the three-row copper radiator SHAAZ are:
- length - 254 mm;
- width - 67 mm;
- height - 184 mm.
Product weight - 2.2 kg.
A double-row aluminum radiator may have other dimensions.
see also
Comments 41
How do you like the radiator? Are there any problems with him?
So far everything is fine, no worse than factory. Although, as they say, these are installed at the factory.
I recently bought a radiator for a DaAZ stove, and when I tried to install it in the stove, I learned something new, it turns out that older cars have a narrower stove, which is designed for a copper radiator, while newer cars have a stove designed for an aluminum body, it is wider. I visited all the stores, the sellers were all so happy, I said, if this radiator fits into the stove body, I’ll buy it. everyone had the old type of hull... It was unlucky not for them, not for me. As a result, I went to the disassembly site, they tried on about 10 cases, not one of them fit, in the end the uncle from the disassembly sold me the complete stove from the six assembled for 700. I replaced the copper radiator from it, it became hot. All the same, I need to find a stove body for an aluminum radiator, since I planned to completely remake the stove, I bought a tens of thousands motor with a fan, a Chevy Niva thermostat, silicone hoses. I want to remodel the stove.
How to choose the best heater radiator for VAZ-2107
To optimize the operation of the stove, VAZ-2107 owners quite often replace the standard radiator with a heat exchanger from another domestic model or a foreign car.
Radiators of other VAZ models
An alternative to the factory radiator of the VAZ-2107 stove can be a similar product from the “five”. In general, for the “classics” there are two types of stove radiators - VAZ-2101 and VAZ-2105. Of course, the seventh model is suitable for a “five” heat exchanger. The standard size of a standard radiator from a “kopek” is 185x215x62 mm, from a “five” - 195x215x50 mm, i.e. the product from a VAZ-2101 will not fit into the plastic casing of a “seven” due to its thickness.
Read about the design of the VAZ 2105: https://bumper.guru/klassicheskie-modeli-vaz/poleznoe/vaz-2105-inzhektor.html
Video: which stove radiator is suitable for the “seven”
If the car owner decides to replace the entire stove, then the most acceptable option is a heater from a VAZ-2108.
From a foreign car
Instead of the “native” heater radiator on the VAZ-2107, you can install a “foreign” one, if it fits in size. Practice has shown that a copper heat exchanger from Mitsubishi turned out to be quite suitable for installation in the “seven”.
I had several classic VAZs, and different radiators in the stoves and in the cooling system. Based on operating experience, I can say one thing: the heat transfer is almost the same due to the metal tanks and an additional row of cassettes; it is almost not inferior in heat transfer to an aluminum radiator. But aluminum weighs less and is practically not subject to thermal expansion. Yes, its heat dissipation is better; when you open the heater tap, brass produces heat in almost a minute, and aluminum in a couple of seconds. The only negative is the strength, but in our country everyone is trying not to attract masters, but to do something themselves with crooked hands using a crowbar and a sledgehammer. And aluminum is a delicate metal, you need to be gentle with it, and then everything will be fine. And many say that the pressure in the cooling system is vomiting them. So, if you monitor the valves of the expansion caps and the cooling radiator, then there will be no excess pressure.
Madzh
https://otzovik.com/review_2636026.html
Heater removal
After the coolant has drained and the necessary tools have been prepared, you can begin disassembly. It is carried out in the following order:
- Remove the negative terminal from the battery.
- In the engine compartment, loosen the two clamps that secure the hoses to the heater pipes. When the hoses are pulled together, a small amount of antifreeze will leak out.
Unscrew the clamps and pull the hoses off the radiator tubes
- Unscrew the screws and remove the rubber seal.
Unscrew the screws and remove the rubber seal
- We move into the cabin, unscrew the fastening of the shelf under the glove compartment and remove it.
To remove the shelf located under the glove compartment, unscrew the fasteners in the form of screws
- Remove the panel with the clock and cigarette lighter by unscrewing the screws on the right, left and bottom.
To remove the panel with the clock and cigarette lighter, you will need to unscrew the corresponding screws
- Disconnect the wires from the cigarette lighter and the clock, and then move the panel to the side.
Disconnect the wires from the cigarette lighter and clock
- We dismantle the internal cavity of the glove compartment in order to move the right air duct aside and provide access to the heater valve. The left air duct is also dismantled (when the stove is completely removed).
It is necessary to disconnect the right and left air ducts from the heater
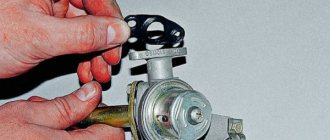
- Using a 7 key, unscrew the bolt that secures the crane control cable.
Using a 7 key, unscrew the cable fastener
- To partially disassemble the stove, you will need to dismantle the lower part of the housing. To do this, use a screwdriver to pry up the metal latches (2 on the right and 2 on the left).
To remove the lower part of the heater you will need to pry off 4 latches with a screwdriver
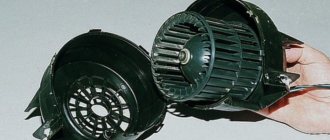
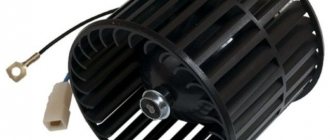
- After removing the latches, pull the lower part towards you and gain access to the motor. If repair or replacement work is required for this unit, we will carry it out.
After dismantling the lower part, access to the heater fan opens
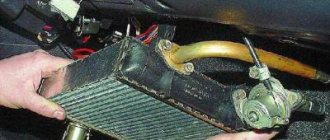
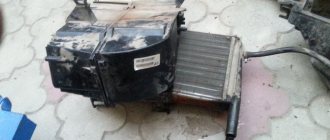
- To dismantle the radiator, we take it out of the housing along with the tap.
To remove the radiator, simply pull it towards you.
- To completely dismantle the stove, remove the upper part of the body, which is secured with four 10mm wrench bolts.
To completely remove the stove, you need to unscrew 4 10mm wrench bolts.
- We unscrew the 2 bolts securing the heater control bracket and loosen the screws that hold the rod mounting brackets.
- We remove the remaining part of the stove.
When the fasteners are unscrewed, remove the upper part of the stove body
Video: replacing the heater radiator on a VAZ 2107
In most cases, complete removal of the heater is not necessary. As a rule, the radiator, faucet or motor are replaced.
If you are only replacing the radiator, it would be a good idea to inspect the electric motor and lubricate it.
Let's go to the car interior
First you need to remove the shelf under the glove compartment; to do this, unscrew the screws in the places shown in the figure. The picture shows the glove box shelf of the VAZ 2106; the VAZ 2104 still has a central fastening screw (its approximate position is shown by the green arrow).
Next, remove the radio receiver mounting panel (beard) in the following sequence (operations 1-7 are indicated for the VAZ 2107).
- Using a screwdriver, bend the latches and pull out the additional panel.
- We disconnect the power wires of the devices; before removing, be sure to mark the wires with a marker or notches.
- Use a screwdriver to bend around the antennae of the switches and carefully remove them.
- Unfold the front cover latches and remove it.
- Unscrew the two screws securing the console.
- Just above the radio shaft, use a 10mm wrench to unscrew the 2 nuts securing the “beard”.
- Once again we carefully inspect the attachment points of the console to see if anything is preventing us from removing it, and carefully dismantle it.
When the front console is removed, we disconnect the right and left air ducts, they are also secured with latches.
In order to get to the screws securing the VAZ 2104 stove tubes, the right air duct and glove compartment must be removed, as shown in the figure below.
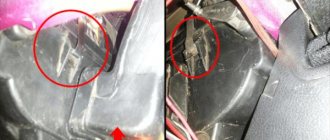
The figure below shows the same heater radiator pipes.
Use a 10mm wrench to tighten the 4th mounting screws (red arrows).
Remove the latches on the left and right sides (green arrow) of the bottom of the stove.
If your heater valve is controlled using a cable, then disconnect its fastening.
To remove the lower part of the stove, you still need to unscrew two fasteners, their location is shown in the figure below.
To get to these screws you need to remove the stove control panel, shown in the figure below.
After everything is unscrewed and disconnected, the lower part of the stove with the motor is carefully pulled out by hand. If necessary, we inspect and replace the fan and motor of the VAZ stove. At a minimum, the stove motor needs to be disassembled, cleaned and lubricated.
We removed the lower part of the stove, now you can remove the stove radiator from the upper part, shown in the figure below.
That's all, now you need to diagnose the heater radiator and decide to buy a new one or repair the old one, the first option is of course better.
Even a novice driver can handle replacing the stove on a 7 on his own, the main thing is the desire to work for a positive result. Carry out regular preventive diagnostics of your car's heating system at least once a year, before the onset of cold weather. This will provide you with comfort in the car at any time of the year.