Oxygen sensor VAZ 2107 injector
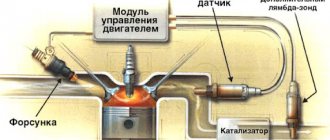
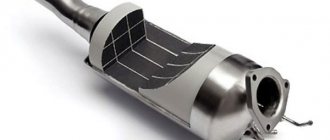
A large number of cars heavily pollute the environment, so the requirements for new cars regarding the content of harmful impurities in exhaust gases are becoming more stringent. They are achieved in different ways, but the most effective is the installation of a catalyst in the exhaust system, as well as adjustment to the optimal composition of the combustible mixture in the engine cylinders. The car’s on-board computer receives a signal from the VAZ 2107 lambda probe, and then, at its command, the composition of the combustible mixture changes.
Types of sensors and operating principle
The lambda probe is installed in the exhaust system. Sensors are divided into two types: two-point and broadband.
The two-point sensor consists of ceramics, the elements of which are coated with zirconium dioxide on both sides. Installed in front of or behind the catalytic converter.
The principle of operation is to measure the level of oxygen concentration in the environment and exhaust gases. If the level changes and becomes different, a voltage is created at the ends of the sensor elements, from low to high. Low voltage is created if there is excess oxygen in the system.
Otherwise, if the system does not have the required level of oxygen, high voltage will be created. These signals are sent to the engine control unit, which distinguishes them by current strength.
The wideband sensor is a more modern design. It also has two ceramic elements. One of them can be called “pumping”. It is responsible for activating the process of pumping or removing air from the system.
The second element can be conventionally called “two-point”. The principle of operation is based on the fact that as long as there is the required amount of oxygen in the mixture, the current strength on the “pumping” element does not change and is transferred to the “two-point” element.
It, in turn, receiving a constant current from the “pumping” element, maintains a constant voltage between its elements and is inactive.
As soon as the oxygen level changes, the "pumping" element supplies the changed voltage to the "two-point". This, in turn, ensures either pumping air into the system or pumping it back.
What is a probe
The oxygen sensor VAZ 2107 injector among car enthusiasts is called a lambda probe (λ probe).
On the VAZ “classic” such devices began to be installed after the appearance of an injector on the engine. The lambda probe monitors the presence of oxygen residues in the exhaust gases. This is necessary to reduce the amount of carbon monoxide in the exhaust of a running engine, which is possible after adjusting the composition of the air-fuel mixture in the power supply system of the power unit.
Replacing a lambda probe on a VAZ 2112
In domestic cars such as the VAZ 2112, electrochemical sensors are installed. Depending on the amount of oxygen in the exhaust gases, a different voltage appears in the sensor and is transmitted to the ECU. The normal operation of the fuel supply system is indicated by the lambda probe readings, which change several times per second.
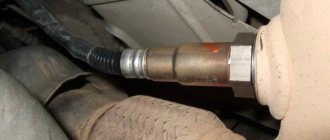
For VAZ 2112, the oxygen sensor is installed in the manifold closer to the engine. But in some cases there are two of them - on both sides of the catalyst. The lambda probe should only be installed with special tools. It is important to remember that during the installation process, under no circumstances should dirt or grease come into contact with its tip. When flushing the engine and underbody, the oxygen sensor connector must be insulated.
In order to function normally after starting the engine, a heating element is built into the lambda probe for a high heating rate. The lambda probe is installed on the manifold. It must be screwed in in front of the resonator or, if there is no resonator, in front of the spacer.
Why do sensor failures occur?
Most often, the oxygen sensor in the VAZ 2107 fails after using low-quality fuel; leaded gasoline is especially harmful to it. Other reasons for probe failure may be:
- Presence of fluid in the exhaust system.
- Severely dirty fuel filter.
- Development of the device resource.
Lambda operates in an environment of hot gases, so the ingress of any liquid into its working area will lead to the appearance of cracks and subsequent failure of the device. The on-board computer will not be able to correctly determine the composition of the working mixture. High gasoline consumption will become noticeable, and interruptions in engine operation will occur. Impurities in the fuel do not burn and end up in the exhaust manifold, then on to the lambda, which leads to distortion of its readings.
It is also important to set the ignition correctly, otherwise overheating will damage the device, and pops in the exhaust system will destroy the oxygen sensor and its ceramics. There are cases when “skilled” mechanics break the sensor.
Signs of sensor failure
There is a whole range of different signs of malfunctions, when they appear it is advisable to immediately replace them. The standard list includes:
- increase in fuel consumption – 1.5 and even 2 times;
- “choking” engine;
- interruptions in idling;
- check engine light on;
- extraneous sounds in the catalyst.
If jerks occur during movement, this may also be a sign of a sensor malfunction. It is advisable to carry out a diagnosis. By connecting a special diagnostic device via the CAN bus, you can get a complete list of error codes.
It is important to remember: this sensor reacts to the amount of oxygen in the mixture. If there is air leakage, the sensor will definitely give the command to enrich the mixture. As a result, consumption will increase significantly.
About symptoms of malfunctions
The lambda probe cannot last forever; there comes a time when it becomes unusable. The following signs of malfunction indicate this to the driver:
- Fuel consumption has increased.
- Interruptions in engine operation.
- The car begins to move jerkily.
- Idle speed changes
- The Check Engine light comes on on the dashboard.
The indicator appears when the sensor completely fails. The listed symptoms should alert the driver; they indicate that it is necessary to urgently diagnose the power unit.
Symptoms of malfunction
The main signs indicating a breakdown of the oxygen sensor are:
- Increased toxicity of exhaust gases;
- Unstable, intermittent acceleration dynamics;
- Short-term activation of the “CHECK ENGINE” lamp with a sharp increase in speed;
- Unstable, constantly changing idle speed;
- Increased fuel consumption;
- Overheating of the catalyst, accompanied by crackling sounds in its area when the engine is turned off;
- Constantly lit “CHECK ENGINE” indicator;
- Unreasonable alarm from the on-board computer about an over-enriched fuel assembly.
About checking the oxygen sensor
Check the oxygen sensor with a multimeter. The test can be performed as follows: one probe is connected to a white wire, the other probe provides contact with the machine ground. With the ignition on, the multimeter should show a voltage of no more than 0.45 volts. If its readings are greater than this value, the oxygen probe is broken and needs to be replaced. You can also check the resistance of the sensor. To do this, the multimeter should be set to the “resistance measurement” position. Modern sensors have 4 wires for connection. Two white ones are the voltage supply to the heater, blue (may be gray in some models) and black are the signal circuit.
Measure the resistance between the white wires, which must be at least 10 ohms. When it is higher, this indicates a faulty oxygen probe. If you have the necessary equipment, look for the error code. P0131 indicates the presence of a low signal level from the lambda, this occurs due to a lean mixture. To check, you should inject gasoline into the intake tract; if the sensor is working, it will show an enriched mixture. If the error does not disappear, provide air suction. The lambda reaction indicates the serviceability of the device. Signs of malfunctions of the VAZ 2107 injector oxygen sensor have been discussed, now we should talk about replacing it.
Checking the lambda probe with a tester:
We take an electronic constant voltage millivoltmeter and connect it in parallel with the LZ (“+” “-” to the LZ, - to ground), and the lambda probe must be connected to the controller.
When the engine warms up (5-10 minutes), then you need to look at the voltmeter needle. It should periodically move between 0.2 and 0.8 V (i.e. 200 and 800 mV, and if less than 8 cycles occur in 10 seconds, it’s time to change the LZ. Also replace if the voltage “stands” at 0 .45 V.
When the voltage is always 0.2 or 0.9 V, then there is something wrong with the injection - the mixture is too lean or too rich. Since the oxygen sensor voltage should change all the time and jump from ≈0.2 to 0.9V.
There is another quick way to check the lambda probe . You should do this:
Carefully pierce the positive contact of the tester (black lambda wire), the other contact to ground. With the engine running, the readings should range from 0.1 to 0.9V. Constant readings (for example, 0.2 all the time) or readings that go beyond this range, or fluctuations with a smaller amplitude indicate a malfunction of the probe.
If you have the time and desire to bother, you can conduct several tests on a rich and lean mixture and additionally check the lambda probe sensor .
Checking the voltage in the heating circuit
To check the presence of voltage in the circuit, you need a voltmeter. We turn on the ignition and connect it with probes to the heater wires (you cannot disconnect the connector, it is better to pierce it with sharp needles). Their voltage should be equal to what the battery produces when the engine is not running (about 12V).
If there is no plus, you need to go through the battery-fuse-sensor circuit, since it always goes directly, but the minus comes from the ECU, so if there is no minus, look at the circuit to the block.
Checking the lambda probe heater
In addition to measuring voltages with a multimeter, you can also measure resistances to check the serviceability of the heater (two white wires), but you will need to switch the tester to Ohms. The documentation for a particular sensor must indicate the nominal resistance (usually it is about 2-10 Ohms), your task is only to check it and draw a conclusion. The video shows this method:
Checking the oxygen sensor reference voltage
We switch the tester to voltmeter mode, then turn on the ignition and measure the voltage between the signal and ground wires. In most cases, the lambda probe reference voltage should be 0.45V.
How to use tables?
Look at the colors of the cable wires coming from the lambda probe. In the columns of the tables there are available color combination options. If the color combination of your sensor matches the color combination of one of the columns of the proposed tables, then your sensor has one design or another. To determine the purpose of each wire, refer to the left column of the selected table.
Example.
Your sensor has 4 wires with the following color combination: 2 brown, 1 purple and 1 beige. The fourth column of the Zirconium Sensor Pinout Table has the same color combination, which means your sensor is zirconium. Next, we turn to the left column of the same table and find out the purpose of each wire: both brown - heating element purple - beige signal - ground (minus) Then we connect the wires by color.
How to replace a faulty oxygen sensor
Vehicle diagnostics confirmed that the oxygen sensor is faulty and needs to be replaced. The driver can perform this operation independently. You should purchase a new spare part, prepare the tools, and the place where the faulty oxygen sensor will be replaced. In addition to the new spare part, the driver will need:
- Inspection hole in a garage, overpass or lift.
- Wheel chocks for vehicle wheels.
- Set of tools.
- Liquid WD40.
- Wire brush.
- Rags.
- Work gloves.
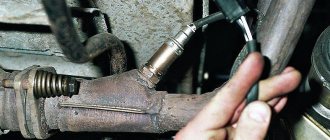
You can find out where the oxygen sensor is located on the VAZ 2107 from the vehicle’s operating instructions. It is installed at the bottom of the car on the exhaust pipe. You should only work with the probe on a cold engine, otherwise you can burn your hands or break the sensor itself. The vehicle is installed at the selected work site and the power unit is allowed to cool. The car is braked with a hand brake; for safety, wheel chocks are installed under the wheels.
Next, the process of replacing a faulty probe will be carried out as follows:
- If the bottom of the engine compartment is covered with protection, it must be removed.
- The installation site of the lambda and the sensor itself are cleaned of contamination with a metal brush. Afterwards, the installation site is treated with WD40 liquid.
- While the lead is “working,” cut off the clamps securing the probe wires and disconnect the connector.
- The next step is to dismantle the faulty part. The key is set to “22”, but it may be a different size (depending on the type of lambda), and is turned out of the muffler pipe. You will have to apply some force, since the probe “sticks” in the threaded connection. It is best to use a spanner wrench to avoid tearing off the edges.
- Install a new spare part, connect the connector, secure the sensor wires with clamps.
- Replace previously removed parts in their place.
At this point, the process of replacing the faulty part is completed, you can start the engine and check operation in all modes.
How to choose a new oxygen sensor
Retail chains offer a large selection of oxygen sensors, which can be of both domestic and foreign production. The VAZ 2107 has been discontinued, so finding an original spare part is problematic. Finding a replacement for this part will not be difficult, you just need to be careful about your choice, since there are many fakes on the market. First of all, pay attention to the packaging; for fakes it is usually not of very high quality. You should also be wary of the low cost of the part. Spare parts from DENSO, Bosch, Stellox have proven themselves well. Their cost can range from 1500 to 3500 rubles.