Spark plugs are an essential element of a gasoline engine, creating a spark to ignite the mixture of fuel and air in the combustion chamber. As a rule, the service life of ordinary budget candles is limited to several tens of thousands of kilometers (15-25 thousand), that is, these elements are so-called consumables.
Experienced drivers know well that the stability of engine starting, engine power, fuel consumption and other characteristics directly depend on the quality of spark plugs. It is important to understand that after just a few thousand or even hundreds of kilometers (depending on the general condition of the internal combustion engine, fuel quality, etc.) the spark plugs begin to work less efficiently.
As a result, the engine begins to “pull” worse, the driver presses the gas harder, while more fuel in the cylinders still burns less fully. In other words, there is an increased consumption of gasoline. It is for this reason that many drivers practice modifying spark plugs to save fuel, which we will talk about next.
Why do you need to modify spark plugs?
Let's start with the fact that owners of old gasoline cars, mainly carburetor ones, should modify new spark plugs for good economy and increased power.
As a rule, it is on such a dosing system that the issue of gasoline consumption is most acute. In parallel with this, modifications can have a positive effect on the injector. At the same time, high-tech modern spark plugs with an extended service life (platinum, iridium) should not be modified. It turns out that changes and modifications are most relevant only in relation to ordinary candles. Now let's take a look at the practical benefits of upgrading candles.
- First of all, ease of starting and, as a result, less risk of flooding the spark plugs. This is especially true in winter, when fuel evaporates less easily in a cold engine, the battery charge naturally drops, the oil becomes sticky and the starter turns the engine weaker.
- Another advantage that “tuning” spark plugs promises is stable operation of the internal combustion engine in different modes, (especially at maximum loads and high speeds), even taking into account that the composition of the fuel-air mixture will not be optimal, that is, the working mixture is too lean or enriched.
- Note that under conditions of high pressure on modified spark plugs, less impact is exerted on the spark, which is simply blown away on a standard spark plug. As a result, the power unit not only starts well, but also burns the fuel charge more fully, delivering more power. This reduces fuel consumption and results in savings.
Maintaining tire pressure: Fuel savings up to 30,000 rubles per year
Driver surveys show that 60 percent of cars on the road have low tire pressure. On average, the pressure in most cars is 30 percent lower than it should be. This is approximately 0.62 bar lower than the manufacturer's recommendation. This leads to increased fuel consumption by 7 percent (per year you can overpay for gasoline by approximately 8,545 rubles or, in terms of a liter of gasoline, this is 60 kopecks).
In addition, low atmospheric pressure in tires leads to premature tire wear. This may cost you an extra 10,500 rubles over the entire life of the tire.
To constantly monitor tire pressure in accordance with the car manufacturer's recommendations, we recommend that you check the tire pressure every two days, using a separate pressure gauge or a pump with a built-in pressure sensor. Remember that changes in ambient temperature can significantly change tire pressure. Therefore, if there is a sudden change in temperature outside, it is necessary to check the pressure.
Why and when do you need to replace spark plugs?
Spark plug heat number
Spark plugs in a car are responsible for creating a spark, thereby igniting the fuel mixture in the cylinder. The power and starting of the engine and fuel consumption depend on their condition and serviceability. That is why it is necessary to know after what period it is necessary to replace spark plugs with your own hands, as well as how to do it.
The service life of spark plugs is given in the vehicle operating instructions. They are replaced as they wear out, and usually this is 50-60 thousand km. But in reality everything turns out a little differently. The service life of spark plugs also depends on the quality of the fuel supplied, the health of the engine, regular maintenance and many other factors.
The quality of the fuel greatly affects the life of the spark plugs. Therefore, in our reality, spark plugs are replaced at intervals of 25-30 thousand km.
Spark plugs are an important part of any gasoline engine, however, like any other part, they are also subject to wear.
- Poor engine starting.
- Increased fuel consumption.
- Reduced engine power.
- Unstable engine operation.
However, it is worth remembering that the above malfunctions can indicate not only a problem in the spark plugs, but also about breakdowns in other systems. To do this, you need to remove them and inspect them. Let's look at how to replace spark plugs with your own hands.
For this procedure, you will need a special spark plug wrench, a torque wrench, an extension socket, a ratchet, and a socket the size of your spark plug.
Before you begin removing the spark plugs, remove any sand or dirt that may have accumulated around them. It is done quite simply, using a regular brush. A compressor is also great for these purposes. Clean spark plug wells thoroughly.
This should not be neglected, because... sand can get through the spark plug hole into the cylinder.
The procedure for replacing spark plugs does not require special skills and does not take much time.
To replace, follow these steps:
1. First, disconnect the negative terminal on the battery. In addition, the engine must be cold to avoid possible burns from the spark plug.
2. If a plastic cover is installed on the engine, it must be removed. And determine where the spark plugs are. Easily, via high-voltage wires that are connected to the spark plug.
3. The next step is to disconnect the wires. Grasp the cap directly, do not pull the wires, as you may break them.
In order not to make mistakes in the wires, we recommend making them in order, one spark plug at a time. Or mark the wires with a marker.
4. Insert the spark plug wrench into the spark plug and unscrew it.
If necessary, use an extension cord if the spark plug is in a recess.
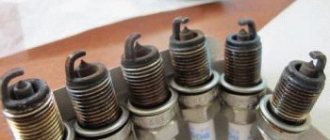
After unscrewing the spark plug, inspect it.
The fact that it is a little dark is quite normal. If it's in oil, then you have problems with the engine.
5. Take a new spark plug and insert it into the spark plug hole.
We recommend making the first couple of turns by hand, making sure you don't miss the thread.
When tightening, care must be taken; it must follow the thread; it must be tightened firmly, but without maximum force. Broken threads promise expensive repairs
It is best to use a torque wrench to tighten.
If you tighten it too much, you may damage the spark plug or threads. A weak one results in a loose spark plug.
Remember, do not lubricate the candle threads under any circumstances!
6. Put on the spark plug cap with the high-voltage wire.
The wire must be inserted exactly into the spark plug that it was in previously.
7. Start the engine. Listen to the sound to see if all cylinders are firing.
Replacing spark plugs yourself Mitsubishi:
Do-it-yourself replacement of spark plugs for Hyundai Solaris:
Constant maintenance of the car and timely replacement of spark plugs with your own hands contributes to long-term operation of the engine, extending its service life. Replace spark plugs as they wear out, or every 30 thousand km. Replacing spark plugs yourself will not only save money spent at a service station, but will also help keep the car in good condition.
Manufacturing a compression tester
Many car owners encounter problems with engine operation and insufficient pressure in the cylinders. This is often observed on worn-out engines, and the repair consists of a complete restoration of the engine. It is difficult to determine the pressure yourself without using special equipment. As a result, you have to take the car to a service center and perform expensive diagnostics.
At the same time, car owners can easily make simple devices for checking compression from a regular old spark plug. This will allow you to independently diagnose the engine in the future, saving on contacting specialists. For this work you will need a metal saw or grinder, a wheel nipple, plastic tubes, clamps, sealant and a pressure gauge.
Using a file or grinder, cut off the rolling of the core and the metal tongue. Using a grinder, the surface is processed so that later a nipple can be inserted into the candle. On the reverse side, a plastic tube is placed on the candle, the length of which is about 20 centimeters. It should be seated on a sealant; additional clamps are also used to ensure complete tightness and the ability to withstand high pressure.
A pressure gauge is placed on the spark plug through a tube, which can be purchased at any specialized stores. Such a pressure monitoring device will be quite accurate, so it can be used to easily measure compression in a car engine. At the same time, it will cost much less than ready-made devices, without losing at all to them in the quality and accuracy of the data obtained.
The most popular way to improve the performance of a car, with the help of which car enthusiasts prefer to improve their personal vehicles, is to add sound insulation to the car.
This work, like everything else, must be carried out with great responsibility and caution. In the next video, you will be told about the features of the VAZ 2110 after tuning.
This work should be divided into five stages:
- Prepare the car for the entire operation, select and calculate the necessary material for tuning.
- You definitely need to disassemble the trunk.
- Process the trunk and prepare it for the entire operation.
- Carry out all the work and soundproof the car.
- And the last stage is, of course, to assemble the trunk and bring it to its original condition.
Well, before you start disassembling the trunk, you should be well prepared for tuning. First of all, you should select a method and material for noise insulation.
Choosing a good and high-quality material for noise insulation is not an easy task, but the further result of the work depends on it. Select all the necessary tools to perform soundproofing structures.
It is also advisable to carry out this work not in winter, but in the warm season. Well, and most importantly, free yourself the whole day and devote yourself to the car. There are five materials that absorb noise:
- Vibration absorption material;
- Sound absorption material;
- Sound insulation material;
- Thermal insulation material;
- Material that prevents squeaking.
Car sound insulation diagram
Of course, all these materials are completely different in price, so you should choose the material that suits you in terms of money. For a real car enthusiast, disassembling the trunk will not be difficult.
To remove the casing, you just need to remove the fasteners or screws and ultimately only metal should remain. It is worth knowing that the body is treated with a special substance that kills corrosion; it will need to be removed. You don’t have to worry, the metal won’t start to rot, since the material for covering the soundproofing will not allow moisture to reach the metal.
Assembling the trunk will be a little more difficult than disassembling it, but it’s okay, you can handle it. With a radical change to the VAZ 2110, you should pay attention to the headlights. After all, the headlights that were produced at the factory do not fit into the beauty of this car.
It will be much more beautiful if these headlights are tinted in a dark color. One of the standard tinting methods is to simply paint the headlights. To do this, you need to carefully remove the headlight, disconnect the glass from the sealant; undoubtedly, its sharp edges will need to be processed.
To paint the headlights, you should use low-grease paint; you can find it in any building materials store. A great video from which you will learn how you can transform a VAZ 2110 beyond recognition. Go for it!
When painting headlights with this type of paint, the illumination of the road will not change at all. Any car enthusiast can modernize headlights, the main thing in this matter is desire. You can also change the electric lamps in the headlight, since many negative responses to car manufacturers are caused by uncomfortable and unattractive lighting of the lamps.
At the moment, there are three replacements for electric lamps for this type of car:
- Halogen electric lamps . One of the main advantages of this type of lamp is the many different types of sizes;
- Xenon electric lamps . Despite the fact that this type of lamp is quite popular and is considered the best, it also has a number of disadvantages. First of all, this is the high cost of production;
- "GT" type lamps . For the VAZ 2110, this type of lamp is the most relevant, since most of the advantages in these lamps are adjusted for tuning the lamps of this type of car. And also an excellent combination of price and quality.
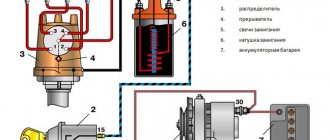
Spark plug
Selection of Denso iridium spark plugs by car
A spark plug is a device for igniting the fuel-air mixture in a wide variety of heat engines. There are spark, arc, incandescent, catalytic, semiconductor surface discharge, plasma igniters, etc.
Gasoline internal combustion engines use spark plugs. The fuel-air mixture is ignited by an electrical discharge with a voltage of several thousand or tens of thousands of volts that occurs between the electrodes of the spark plug. The spark plug fires every cycle, at a certain point in engine operation.
In rocket engines, the spark plug ignites the fuel mixture with an electrical discharge only at the moment of launch. Most often, during operation the candle is destroyed and is not suitable for reuse.
In gas turbine engines, the spark plug ignites the stream of fuel emerging from the fuel injector at startup with a series of powerful arc discharges. After this, the combustion of the fuel torch is maintained independently. As a rule, surface discharge spark plugs are used, powered by high-frequency high-voltage current from the ignition unit. There are most often two spark plugs (for reliability), each installed in an igniter with a special starting nozzle that works only when starting, which protects the spark plug from burning when the engine is running.
Glow and at the same time catalytic spark plugs are used in model internal combustion engines. The fuel mixture of engines specifically contains components that are easily ignited at the beginning of operation from the hot spark plug wire. Subsequently, the filament heat is maintained by the catalytic oxidation of alcohol vapor included in the mixture.
Story
The first spark plug in its modern form was developed by the German engineer and scientist Robert Bosch in 1902. For the first time, the spark plug was used with a high voltage magneto, also developed in the BOSCH workshop. BOSCH spark plugs began to be used in Karl Benz's internal combustion engines, replacing the open-flame glow tubes used at that time. From then to the present, almost all spark plugs use the same principle of operation and structure as in 1902; the evolution of this unit has been mainly along the path of improving the materials used (for insulators, conductors, etc.) and manufacturing technology ( cheaper).
Spark plug device
The spark plug consists of a metal body, an insulator and a center conductor. Modern spark plugs may have a built-in resistor between the contact terminal and the central electrode.
Contact pin
The contact terminal located at the top of the spark plug is designed to connect the spark plug to the high-voltage wires of the ignition system or directly to an individual high-voltage ignition coil. Several slightly different designs may occur. Most often the wire to the spark plug has a snap contact that
The influence of the correct clearance on engine performance
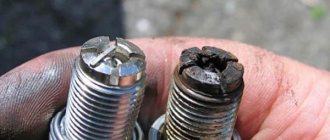
The gap is a really important parameter. It can either be big or too small.
Small gap
If small values are set between the electrodes, then misfires will occur in the ignition system. The thing is that the spark that forms between the electrodes, which are as close to each other as possible, is not enough to ignite the fuel mixture. The spark, although strong, is not sufficient. This is why many cars will really jerk when driving and not develop enough speed. The carburetors may have flooded spark plugs, which will only cause problems – it will generally cause problems. The gap needs to be increased!
How much is a small gap? If we talk about size, it is approximately from 0.1 to 0.4 mm. We definitely check the candles after purchase, I’ll give practical recommendations below, but for now let’s talk about long distances.
Big gap
You know, many manufacturers set the normal distance between the electrodes in advance. But over time, it can increase on its own.
It's all about spark plug wear, which manifests itself with high mileage - this is natural. After all, the electrodes are made of metal, which, under the influence of temperature and constant electrical discharges, begins to slowly burn out. Both the upper one, which resembles the letter “G”, and the lower one suffer. The top one becomes thin, instead of a rectangular shape, it begins to be rounded, because the sides burn out. The bottom one just sags down.
Due to this distance, the spark that passes between the contacts weakens. And significantly! It may also not be enough to ignite the fuel.
Often, because of this, the insulator of the lower contact is pierced; the whole point is that the spark tries to find the shortest path between the electrodes.
In winter, there is a high probability that the car simply will not start.
Another important aspect is that deposits in the form of soot may more often appear on distant electrodes; the spark “suffers” from the long distance, and so does deposits! It may not pass at all. Therefore, it is important after a certain mileage, with our fuel it can be already 15,000 km, to unscrew the spark plugs if necessary, change them, or clean them.
Fills spark plugs on a VAZ 2109 carburetor. You are not alone. The problem is solvable
What resistance should be on the spark plugs, how to make a tester for SZ with your own hands
- Hot: the insulator area is much larger than that of a cold one, so it is heated by gases in the combustion chamber. The transition zone to the outer shell is minimal;
- Cold: they have an elongated area for heat removal; accordingly, the working surface heats up much less.
- A combustible mixture in the form of gasoline and air enters the combustion chamber in the ratio through the passage channels of the valves;
- The valves opened due to the rotation of the starter;
- The spark plug supplies a spark that was supplied by the ignition coil through high-voltage wires;
- At this second, a micro explosion occurs in each cylinder in turn, which sets the engine in motion.
Replace the air filter: Fuel savings up to 12,250 rubles per year
Your engine sucks in 63,645,288 liters of air over the course of a year, which passes through the air filter. On older cars built before 1999, a dirty air filter increases fuel consumption by 10 percent (12,250 rubles per year or per liter of gasoline, you lose 2.75 rubles because you fill up more often than expected). On new cars, the computer engine control unit detects air filter contamination in a timely manner and makes adjustments to the fuel injection program, reducing increased fuel consumption. But this is reflected in the power of the car, which decreases. With a dirty filter, the loss of power will be noticeable when the car is loaded.
When changing engine oil, be sure to check the condition of the air filter. Change it at least once a year. If you operate your vehicle in dry and dirty conditions, we recommend changing the filter more often.
I tore off the thread for the candle and what should I do now?
That's what, but I never thought about this, and no one warned me - that you can break the thread for a candle. But one day this happened to me, and I realized that the situation was practically unsolvable. Well, I was faced with two problems: how to get to the service center and how to actually fix it.
Warm summer day. We gathered with our comrades in a garage cooperative to trick our swallows. One of them had a compression gauge with him and we set out to measure the compression of my car. They measured the compression and I started screwing the spark plugs back in. Three of the most awkward twists (I try to twist everything from the most difficult to the simplest).
When I removed the key (a special head with a rubber dome), take this very dome, but it gets caught on a spark plug and falls under the car. I was too lazy to get it out and I decided to screw in the last candle without this dome - what a fool! I started to tighten it, it seemed to go on easily, only the candle had a worn thread and was stuck at an angle, since there was no holding dome. As a result, the candle went on, but it was kind of tight. I thought it was time to put on the ratchet and call it a day. And the circus began.
I twist the candle, but she doesn’t even think about resisting. I'm trying to unscrew it - it's too easy. Well, that’s the end, I thought, and I was absolutely right. I took out the spark plug and saw that there were remnants of threads from the cylinder head on it. Moreover, these remains represented 80 percent of what used to be carvings. The thread on the candle was almost undamaged. The cooperative is located on the other side of the city and I need to somehow drag the car at least to the parking lot. First we tried sealing the threads with foil, but it didn't work. Then I found a spark plug with an excellent high thread in my trunk and we screwed it in. Without fanaticism and tension.
Let me back up a little - you can’t do this. Half a year later, a candle with a worn thread shot out in exactly this way. It turned out like a bullet that had not completely passed through the hood, that is, a dent and a small hole - it’s good that it hasn’t hit anyone in the eye yet.
As a result, I went home with a candle “on the snot”. I tried to turn the engine as low as possible so as not to shoot. I'm lucky. I drove home like this, and then to the service center.
Repairing threads in a spark plug well
I myself did not take on this work, because the cost of a mistake is quite high, but at least you can ask the service for something. Repairing threads in the cylinder head is as follows:
- A special thread tap is inserted into the well, 2mm larger than the former thread
- The tap is generously lubricated with grease so that all the resulting chips do not fly into the combustion chamber (this metal will not burn and is guaranteed to cause scuffing on the cylinder walls if it gets into the space between the piston and the cylinder wall), but remains on the grease.
- a new one, but of a larger size, is stamped on top of the old thread
- Further options are possible: either a spiral or a barrel, called a futor, is screwed in
- Both sit on a special thread locker
This repair cost me 1200 rubles. On the downside, the barrel constantly tried to get out of the way, but when I overhauled the motor, this issue was resolved by flattening the barrel on the reverse side.
Not all motors can be repaired, and even on one motor you can access part of the spark plug wells with a tap, but not part of it. I was also lucky in that if I had torn off the threads not on the first, but on the second cylinder, I would not have been able to repair the threads without removing the head.
Well, the method of repairing threads by removing the block head is applicable in most cases. However, it is worth remembering that when removing the head, it is necessary to change the cylinder head bolts and cylinder head gasket.
In general, be careful when unscrewing and tightening spark plugs. Don’t forget to read my article on this topic about the intricacies of replacing spark plugs.
Some practical tips
It is not recommended to clean spark plugs in a sandblaster, as this will destroy the surface of the insulator. It is better to dip it in solvent, gasoline, or use a special aerosol for a while. Then use a wooden stick to clean the insulator, electrodes, housing and blow them with compressed air.
When adjusting the spark gap of spark plugs, you should use only round probes, because due to uneven burnout of the electrodes or with a cylindrical surface of the electrodes from using flat probes, the actual gap may be larger than the measured one (Fig. 10).
Don't tighten the candle too much. For spark plugs with 14x1.25 threads installed in an aluminum cylinder head, the tightening torque should be in the range of 20–30 N•m (2–3 kgf•m) for a flat seat and 10–20 N•m for a conical seat. With a short thread (9.5–12.7 mm), the tightening torque is taken closer to the lower limit, with a thread length of 19 mm - closer to the upper limit. If you don’t have a torque wrench at hand, then screw the spark plug with a new gasket all the way without force, and then turn it with a force by 80–90 degrees. With an old gasket, the angle of rotation of the key with force should be less. For spark plugs with a conical seal, it is rotated with force only by 15 degrees. When tightening and unscrewing spark plugs, it is advisable to use wrenches that have devices for gripping them by the upper contact and a cardan joint that prevents damage to the insulator.
The thread length of the spark plug housing and the method of sealing it (at the end with a gasket or along a conical surface) must correspond to the design of the cylinder head.
When purchasing, you should be wary of candles produced “under license from leading companies” in other countries or simply counterfeits of well-known brands. As a rule, such spark plugs have a shorter service life and a large variation in heat ratings, which can lead to failure of the entire engine.
In appearance, you can distinguish a fake by poorly executed packaging, a blurred design on it, a poorly processed hexagon of a candle, or a slightly skewed inscription. But it is best to buy candles in “reputable” stores and always have a couple of reliable candles in stock.
Do-it-yourself modification of spark plugs. What and how to do for a good result
- In order for the spark plug to become effective again, we need to use a simple tool to make the electrode on the side shorter, and then start adjusting the gap. Moreover, the shortening must be done so that the central electrode does not overlap with the side one;
- We unscrew the candle on which you plan to perform these actions from its location (or, as an option, take a new one);
- Using a glass marker, mark on the desired candle the length to which the side electrode needs to be cut.
- We fix the spark plug in a small vice (the main thing is not to overtighten);
- Take a grinder (Dremel or any other company) with a cutting disc installed. Carefully shorten the electrode, which is located on the side. The result should be a smooth, parallel cut, not slanting to the sides;
- We clean the place of the cut with a file to remove burrs and irregularities;
- Next, set the specified gap. It is different on different brands of cars and trucks, domestic and foreign, turbocharged and not. So, in this case, it is better to navigate through a book or look on the Internet;
- A similar procedure must be performed with each candle separately. Then we screw them into place and try to start. I think you should like the effect produced.
Content
Do-it-yourself modification of spark plugs can be done according to the type of sports series products produced by some companies that develop spare parts. Such spark plugs significantly increase power and reduce consumption, and manufacturers provide guarantees of almost 100 thousand kilometers without any significant loss of quality functioning. But in practice everything looks much more modest.
The efficiency of these structures, despite their high cost, noticeably decreases after only 10 thousand km, and throwing them away and buying new ones is quite expensive. What can be done in such cases to preserve the candles longer and increase their intended effectiveness? Under no circumstances, do not throw it away! You need to try to modify them using simple procedures, which, according to the instructions, will not be so difficult even for an inexperienced driver. So, let's try to understand this process step by step.
Signs of faulty spark plugs. List
- 1. The starter turns for a very long time, but the engine does not start or starts, but after a long time;
- 2. Unpleasant noise made by the engine when the car warms up or during idling;
- 3. Increased gasoline consumption during vehicle operation;
- 4. The number of harmful substances from the exhaust pipe has increased;
- 5. Spark plugs are wet or filled with fuel;
- 6. Weakening of the car’s traction, lack of power and failure to gain the required speed.
- 1. Open the hood and secure it with a stand;
- 2. Blow compressed air through the engine to clear it of road dust. To do this, you can use a regular home vacuum cleaner, only by turning it on to “exhale” air, and not to suck it in;
- 3. Remove high-voltage wires or ignition coils, depending on the type of engine, to get to the spark plug wells;
- 4. Using a spark plug wrench, unscrew all the spark plugs and remove them using wires or a special head;
- 5. Check for the presence of oil and foreign objects in the wells using a flashlight, so as not to provoke rapid failure of new spark plugs;
- 6. Insert and tighten new spark plugs, connect the high-voltage wires and you can start the car engine;
- 7. After starting the engine, check for detonation, which may occur due to the installation of low-quality spark plugs.
Common situations
Next, we will look at several typical situations that arise for many VAZ 2110 owners who complain about the inability to start the engine of their car.
Situation
What do we have to do
The starter turns, the spark plugs fill. Replacing spark plugs leads to flooding again
The car can only be started 2-3 times
At negative air temperatures, the car does not start, although the starter turns. The battery is low, the oil warning light is on
After changing the ignition switch, the engine started, but after assembling the steering unit, the engine ran for a couple of minutes, slowly died out and will not start again.
Check the serviceability of the fuel pump:
The engine started with difficulty, a lamp with an exclamation mark appeared on the panel, and soon the engine stalled
This lamp indicates that there is still voltage going to the starter, although the engine has started. Most likely, the decoupling from the engine did not occur, and the starter failed. To fix the problem, you need to install a new starter.
Each of these reasons has its own methods of prevention and measures to prevent their recurrence. Therefore, be careful and respond in a timely manner to the signals that the car itself sends to you. Thanks to them, you can detect a malfunction in a timely manner and find ways to solve the problem on your own.
Another old-fashioned method of checking spark plugs on a car is to disconnect the wires from the spark plugs one by one. You just need to remove the wires one by one and listen to the engine. When the sound does not change, you have found the problematic element. Before changing the spark plug, try unscrewing it and thoroughly cleaning it from carbon deposits with a wire brush, and then screw it back into place and check again.
Do-it-yourself modification of spark plugs
The modernization is based on the task of bringing simple spark plugs closer in a number of parameters to the so-called sports spark plugs. Such products are offered by many well-known manufacturers, but they are significantly more expensive.
Sports spark plugs allow you to increase power and reduce consumption; the declared service life of such elements is 70-90 thousand km. mileage However, in practice, the efficiency of their work decreases, on average, after 15 thousand km, and such spark plugs do not last the entire stated period. Taking into account the high cost, buy these elements every 30-35 thousand km. it turns out to be expensive.
It is for this reason that many drivers do not strive to immediately change a set of spark plugs, since there are ways to extend the life of existing ones. The best way to solve the problem is to modify conventional or sports spark plugs.
The procedure is not complicated, so even beginners can handle it:
- to make the spark plug work as efficiently as possible, you will need to shorten the side electrode;
- the next step is to correctly adjust the gap on the spark plug;
Now let's take a closer look. Regarding the first point, shortening must be done in such a way that the central electrode is not blocked by the side electrode.
The whole process looks like this:
Used spark plugs are unscrewed from the engine or prepared in advance (you can work with new elements); Next, using a marker or another method (for example, a notch is made), a special mark is applied to the side electrode, which will indicate to what length the electrode should then be shortened. Next, the spark plug is carefully clamped in a vice (preferably with rubber “lips.”) It is important not to overtighten the vice so as not to damage the element. After this, you will need to take a grinding machine and install a cutting disc; Use a tool to shorten the side electrode. In this case, it is important to ensure that the cut is smooth, without bevel. Then the cut site is cleaned with a needle file, nicks are removed, edges are leveled, burrs and other defects are removed. Now you can start setting the desired gap
The value will depend on the type and model of the internal combustion engine. In this case, it is best to use the manual, get the necessary information on specialized automotive forums, etc. Shortening the electrode and setting the gap on the spark plugs must be done with each spark plug, and be sure to maintain the highest possible accuracy (how much is cut off from the electrode and what gap is set). After installing the modified spark plugs on the engine, it is necessary to perform a test run. As a rule, starting should be easier than with conventional spark plugs. Then you can take a trip, appreciating the stability of operation and improved throttle response of the internal combustion engine, as well as better traction at high speeds.
You can also visually evaluate the performance of the candles. To do this, it will be enough to make a test stand right in the garage. For manufacturing you need to have a distributor, a coil and a power source.
Next, the usual spark test is performed, which will demonstrate an increase in spark formation, a change in the color of the spark to a bright blue-red, etc. It is optimal to carry out the check in the form of a comparative analysis, that is, compare the spark, its power and color before starting work (on standard spark plugs) and after (on modernized spark plugs).
If we talk about the modification itself, the simple manipulations described above make it possible to expand and significantly increase the front of the electric spark. In other words, the spark, after removing part of the electrode, is not sandwiched between two electrodes (side and central), but is immediately directed into the combustion chamber.
As a result, the ignition efficiency of the fuel and air mixture in the engine cylinders improves, and subsequent charge combustion becomes more complete. The dependence of ignition on the quality and intensity of spark formation on the spark plug in relation to the composition of the working mixture is also reduced.
In other words, a more powerful spark more easily ignites a rich or lean mixture to varying degrees, which has a positive effect on the overall performance of the engine under load and in other modes. If the mixture is better ignited by a spark, then the flame front spreads more evenly and freely, gasoline burns fully in the cylinders, power increases, and fuel consumption decreases.
FakeHeader
Comments 141
If everything is ok with the engine, there is no need to clean it, I had an air leak, the ecu started leaking gasoline, the spark plugs were black, I changed the exhaust gasket, after 300 km I unscrewed it, there was no carbon deposits, a barely noticeable trace remained, it burned out!
Shilet is the best in this method - it finally contains hydrochloric acid
I cleaned mine with dimexide and the result is much better.
I cleaned it with dimexide:
Hi all! Personally, I think about spark plugs when problems begin with starting the engine, its unstable operation at idle, decreased acceleration dynamics and other symptoms. It is not necessary to unscrew them again without the need. Moreover, without a special stand (on the knee) it is not possible to check the spark plugs produce. A good and powerful spark outside the engine block can disappear under real operating conditions under pressure of 10 atmospheres or more. Any cleaning and soaking only gives a visual effect, and you may not objectively feel the difference “before and after”. Many years ago I I heated the spark plugs with a blowtorch to facilitate the cold start of a carburetor engine, but then at the first opportunity I replaced them with new ones. Due to the poor quality of fuel and the presence of a large number of counterfeits in the field of spare parts and consumables, parts and mechanisms, including spark plugs, do not last necessary resource.
The post is useful. But it’s better to have less “water” at the beginning - straight to the point, and not a journalistic note.
Once they recommended sulfuric acid (electrolyte) - it helped.
After chemical treatment, rinse with water (preferably distilled) and dry, then there will be less corrosion later.
I have to. Because then there are so many comments why why etc.
I'm talking about the introductory part of the video: there's carbon deposits, it's forming, it's bad... This is my opinion. If people like to listen to the intro for a quarter of the video, then that’s how it should be...
I'm talking about this too. I tried to say as quickly as possible what the soot was causing. because if not scientists appear with comments like fix the engine, although we are talking about, specifically, a method for cleaning microwaves. The experience was in previous videos about cleaning spark plugs
Okay then. But you can’t convince empty-headed people with anything - not with two words, not with a dissertation...
Oh, how I don’t like watching videos. And on topic: Dimexide rules! Cleans effectively and safer than any other chemical.
And inexpensive! There is also about dimexide
During the Soviet Union (and I still found myself working there), candles were sandblasted and tested at stand 514-2m, even on military equipment. I’ve been an auto electrician since 1990, I’ve been working on gantry cranes for the last 10 years, however, and for the life of me, spark plugs die when the insulator breaks, loss of tightness, electrode breakage and other MECHANICAL damage. Only insulator breakdown can be classified as electrical. Now, gentlemen riders, think and answer - who benefits from replacing WORKING spark plugs with new ones, rather than cleaning and further using the old ones? And if they colorfully describe that, say, the windshield, according to regulations, must be changed every 50 clicks, because it changes its optical properties, etc. and so on. will you change it too? No, I understand that not everyone has such a stead (it was simply stolen from me) and it also needs air, some people simply need to clean it (in any way), it’s easier for them to change, but there are those who don’t fall for any blizzard and doesn’t let you make money
Balancing the crankshaft, a whim or a necessity?
When choosing machining operations that are mandatory when carrying out engine overhauls, such a need as balancing the crankshaft Consisting of one or more elbows and several coaxial main journals resting on bearings. Each knee K. v. has two cheeks and one neck for attaching a connecting rod. The axes of the connecting rod journals are shifted relative to the axis of rotation of the engine. For many customers, this remains a question mark. Is it worth spending money on this expensive surgery? Let's try to answer this question.
According to Dr. Tech. science prof. V. A. Shchepetilnikova “...proper balancing of car parts extends the service life by 25...100%, increases useful power by 10%.” It can be calculated that at a rotation speed of n = 6000 rpm, a crankshaft weighing 20 kg, obtaining a mass eccentricity of only e = 0.1 mm (due to shaft deflection, runout of the flywheel seat, improper grinding, replacement of elements that affect the imbalance ( counterweights, pistons, connecting rods, flywheel, clutch basket), etc.), creates a centrifugal force of 788 kg.
This destructive force is distributed to the supports and leads to:
- to increased fuel consumption;
- power drop;
- reducing the service life of the engine and other vehicle components;
- increased vibration and noise in the cabin, which causes discomfort and fatigue for both the driver and passengers.
“This is all a theory, you say...” - so let us give ourselves more compelling arguments based on our practice.
Of course, crankshafts of engines from good foreign manufacturers are carefully balanced at the factory using modular assemblies. Those. All parts (crankshaft, flywheel, clutch, front pulley...) are coaxial with respect to each other, separately balanced, which makes it possible to replace any of the components without subsequent balancing. For example, crankshafts weighing up to 10 kg. after balancing they have a residual imbalance of no more than 15-30g. (here it must be said that on the 'HINES' balancing stand, the specialists of our company can improve this result to 2-5g.). However, such shafts require mandatory balancing after mechanical damage, during grinding after deformation, and also during any intervention in the design features of the units (lightening counterweights, flywheel, etc.).
With all due respect to the domestic automotive industry and the auto industry of neighboring countries, the shafts of our manufacturers must be balanced in 99% of cases. The exception, perhaps, is original VAZ spare parts. And even that one is unpredictable... In general, as for new engine parts, a characteristic feature has been noticed here: the worst surprise for a balancer is a new crankshaft. On some “unique” shafts of the ZMZ plant, the imbalance is at least an order of magnitude higher than all existing standards. Sorry that we cannot give you the maximum values. The fact is that our machine does not perceive an imbalance of more than 700 g.*cm. In this case, “ERROR” is displayed on the computer screen - an error. And may the American technology forgive us - the operator made no mistake in the settings... The mistake is the part itself installed on the machine. There is no talk of modular assemblies at all. When rebalancing such shafts, it was necessary to drill holes in the flywheel opposite the factory ones! It follows that either the factory correction was made “for show”, or the entire rear part of the shaft assembly, including the rear counterweights, the flywheel itself and the clutch housing were balanced by the flywheel! Obviously, in both cases, balancing the flywheel alone on a calibration (ideally balanced) shaft or on a balancing mandrel will not give anything. If the flywheel has not been changed, then after the mass correction, when installed on the old shaft, it will most likely give even greater vibration than before balancing. If the flywheel was replaced with a new one, then the consequences are completely unpredictable: vibration will be created by an unbalanced crankshaft. Thus, balancing individual parts of the crankshaft assembly is a very risky, if not hopeless, business. But perhaps we also produce well-balanced individual crankshafts, flywheels, and clutch baskets? To be fair, it should be noted - Yes. There are. They get caught. About one in fifty. Should you count on such luck? Isn't it better to spare no effort and balance the entire crankshaft assembly using modular assemblies?
Particular attention should be paid to balancing V-shaped and other asymmetrical crankshafts, these include the shafts of in-line engines with an unpaired number of cylinders. If you place such a shaft on a balancing machine, a powerful torque component will tear it off the supports at the very first revolutions
The fact is that the mass of counterweights on V-shaped shafts is inextricably linked with the mass of the connecting rod and piston groups of the engine. Compensating bushings of strictly (with an accuracy of 1g) calculated mass are required. This mass can be given in the technical documentation for the engine, or must be calculated using a special method: 100% of the rotational mass (lower connecting rod head + bearings) and the percentage of the reciprocating component (upper connecting rod head + piston + rings + pin + locks) from 0 to 100%. Unfortunately, data on compensating bushings for imported crankshafts can only be determined by calculation. Obviously, the calculation and production of the bushings itself will take at least a week of time, and the number of specialists who can do this can be counted on one hand. Our technique and machine equipment allows you to balance an asymmetrical shaft within 24 hours. Still, try to avoid any interference in the design features of the units (lightening, tuning...), and when replacing elements of the connecting rod and piston group, flywheel, front pulley, we strongly recommend consulting with our specialists. Conducting constant monitoring among our clients who have used balancing services, we state the facts: • after balancing the crankshaft of the ZMZ-402 engine, such a common phenomenon as rear oil seal packing leakage disappears forever. • engine power increases by 10-15%. • the engine runs stably in all modes and at idle speed. • fuel consumption is reduced by 5-10%. • vibration disappears.
In our time of high speeds, every motorist knows and understands how important it is to balance the wheels of a car, and that this operation is necessary after almost every visit to a tire shop. But, unfortunately, not everyone knows that balancing the crankshaft is no less important when overhauling an internal combustion engine.
Draw your conclusions, gentlemen motorists!
Sporty driving style = extra fuel costs
Sharp acceleration of the car from a standstill, when pressing the gas pedal to the floor, leads to an increase in fuel consumption by 20 percent. If you live in a large city with heavy traffic, but you try to accelerate as quickly as possible from traffic light to traffic light, then in addition to the already increased fuel consumption in the city (in traffic jams), you increase fuel consumption with your driving style. If you think that this way you can move around the city faster than others, then you are mistaken. You can read more about this in our article.
With this driving style, you spend 5.38 rubles more per 1 liter of fuel. If you change your driving style, you can save up to 26,550 rubles per year.
Monitor the condition of your tire tread: Fuel savings of up to 6,220 rubles per year
If your tires are significantly, unevenly worn and have a small tread depth, then with a mileage of 32,000 kilometers, add another 165 kilometers to your mileage. Due to bad tires, your fuel costs per year will be 6,220 rubles more.
There is an easy way to check the condition of your tires. To do this, you need to buy a device that measures the tire tread depth. The device must be used to check the depth of the outer tread of each tire. Remember that in most cases, tires wear unevenly, which leads to increased fuel consumption. Therefore, as a rule, if the mileage of the car is not very high, there is no need to change the tires to new ones. It is enough to carry out wheel alignment work at a tire shop, which will reduce fuel consumption.
What will be achieved during modernization?
After cutting off part of the electrode, the spark front will increase, so the flame will go straight into the combustion chamber. As a result, we should expect complete combustion of gasoline, a small but increase in vehicle power.
- The second way to improve spark plugs with your own hands is to carefully bend the electrode, simply forcibly increasing the distance between the components of the spark plug. Many people resort to this method, but due to lack of skill, the spark plug can be damaged. And remember that you cannot remove a faulty spark plug from the system; it will be very difficult to foresee the consequences.
Bend the electrode
Thus, you can determine several answers to the question of how to improve spark plugs with your own hands, and they will be polar. Firstly, if changes are introduced into the system, the calculations must be verified. Secondly, you should not push the car beyond its capabilities, because by increasing its power by force, you can actually reduce its service life.
We would like to know how many car enthusiasts are in favor of improving the spark plug, and who definitely says “no” to such an idea. State your position in the comments, we will be grateful for it.
Replace your broken or damaged spoiler
A plastic “apron” or plastic wing helps not only sports cars cope with aerodynamic drag. In all cars, plastic aerodynamic elements serve to reduce fuel consumption. Damaged aerodynamic elements can lead to increased consumption of gasoline or diesel fuel.
If a plastic element under your car is damaged, then air flows begin to dissipate incorrectly, which creates increased air resistance, leading to increased fuel consumption.