Print this article Font size 16
All car owners have to adjust valves on a VAZ 2109 from time to time. The reason may be a cylinder head repair or a scheduled technical inspection of the condition of your engine.
When repairing the cylinder head, the valves are removed, and after they are returned back, mandatory adjustment of the clearances is required.
How to properly grind valves using the example of a VAZ 2109
Valve lapping - why is it necessary?
The main task of the lapping procedure is to organize the correct functioning of the valves.
If grinding is ignored on an ongoing basis, then you cannot count on high-quality operation of the valves. Air and fuel will not be introduced into the cylinders quite correctly, but the consequences of this discrepancy will not be long in coming: the engine will begin to malfunction, and after a certain period of time, it is very likely that the engine will please you with a banal failure. By grinding in the valves, the maximum possible sealing of the mechanism is achieved. The valves are ground in both after the introduction of new elements and during prolonged operation of the power unit. As an example, you can take the jerking of a car at idle, which occurs due to a difference in compression. After grinding in, such a misunderstanding should inevitably disappear.
It is very important to correctly determine whether the valve is worn in or not.
The drill did the job for you when grinding in the valve, now you need to know for sure whether the valve is grinding in or not. Pull out the valve and wipe it clean with a rag, the ground area will have a gray matte color and the unground area will either shine if the valve is new or different from gray, but simply make sure that the color of the valve is the same all around and if there are shades of color, it’s better to let the drill work. Usually the valve grinds in immediately if it is not crooked.
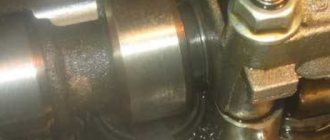
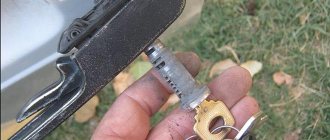
Photo. Poorly lapped valve seat.
But the valve seat does not always grind in quickly, it depends on how deep it is burned, also wipe the valve seat clean and carefully look at the color of the area being ground in; if there are different shades of color, start grinding again, let the iron drill work. Remember, if you don’t rub the valve well, then after a while it will burn out again, so it’s better to rub the valve one more time than it will burn out after some time.
Another piece of advice: even if you only have one valve burnt out, don’t be lazy and lap all the valves.
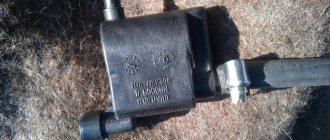
Photo. Adapter for grinding valves VAZ 08-09
Spare parts and tools for work
Before starting work on replacing valves on a VAZ 2110, high-quality new parts are purchased, the names and original articles of which are as follows:
- Set of gaskets: valve cover (art. 2108-1003270/77) and cylinder head (art. 21083-1003020), intake and exhaust manifolds (set art. 21083-1008081), exhaust gas intake pipe (art. 2103-1203020-04) , as well as an oil seal (art. 2108-1005034) and oil flinger rings (art. 2108-1007026-86) (the so-called cylinder head repair kit)
- New valves for the fuel mixture intake system 4 pcs. (art. 21083-1007010)
- New exhaust system valves 4 pcs. (art. 2108-1007012)
- Valve guides 8 pcs. (art. 2108-1007032-87)
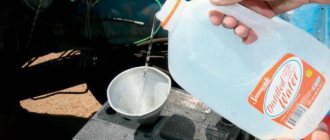
- Engine coolant
- New bolts securing the cylinder head to the cylinder block (art. 2108-1003271Н/О)
- Timing belt (art. 2108-1006040-86) and generator drive belt (art. 1000012562)
- Engine oil and oil filter
Repairs to replace worn-out parts are carried out using a standard set of tools, which are usually sold as a set, namely:
- a set of open-end wrenches marked from 8 to 21 mm;
- set of internal hex keys;
- a set of sockets with a diameter from 8 to 24 mm;
- valve desiccant;
- screw valve guide puller;
- torque wrench (needed for proper tightening of the camshaft, cylinder head and camshaft gear bolts);
- Screwdriver Set;
- electric drill;
- specialized lapping paste of two types (for rough lapping of valves to their working surface of the combustion chamber and for finishing grinding);
- gloves to protect hands from possible damage.
The presence of tools, parts and a covered room will allow you to carry out troubleshooting work yourself, since the price of replacing 8 valves on a VAZ 2110 in non-certified services in the fall of 2021 varies from 30 to 45 thousand rubles. At a certified service station of official dealers, such work will cost more than 50 thousand, which will greatly affect the financial situation of the car owner.
Procedure
Valve adjustment is carried out at an engine temperature of no more than 15 - 20 degrees. Care must be taken to ensure that the gap level is within the normal range. With a narrower gap, the valve will not completely close the hole, and thereby significantly reduce compression in the engine. And with a wide gap, the fuel will not have time to completely enter the combustion chamber, and exhaust gases, on the contrary, will exit it. This will reduce the volume of the combustion chamber, and accordingly the power.
To adjust you will need:
- Spanners;
- Screwdriver (flat and Phillips);
- Tweezers;
- Measuring probe;
- Adjusting washers;
- Device for adjusting valves;
- Set of gaskets.
When everything is prepared, you can start working. First of all, put the car on the handbrake and engage fourth (if possible, fifth is better) gear. One drive wheel needs to be placed in a position in the air.
Next, disconnect all mechanisms from the cylinder head and unscrew the spark plugs. Remove the cover and clean the cylinder head of oil. When the cylinder block is free and the cover is removed, rotate the crankshaft to a position where the piston of the first cylinder is at top dead center. This can be done by turning the drive wheel. You can monitor the position of the piston through a window located in the clutch housing.
The valves are adjusted depending on the order of their operation. On the VAZ 2109, the exhaust valves are in the order of 2, 3, 6, 7, and the exhaust valves are in the order of 1, 4, 5, 8.
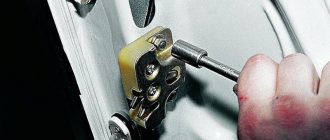
Before starting work, mark with a marker every 90 degrees around the circle of the cylinder. Rotate the camshaft so that the mark on the timing belt casing and on the pulley meet. After this, continue rotating the camshaft another 2-3 teeth using a 17mm wrench. Now, check the gap size with a feeler gauge. Move the dipstick between the camshaft cams with little force.
If the gaps are larger or smaller than normal, then you need to remove the washer from this valve using tweezers. Using the special formula H = A + (B – C), calculate the required washer size and replace it.
Decoding the formula for adjusting the VAZ 2109 engine:
Problematic seals
In addition to adjusting the valves, it is extremely important to check the current condition of the seals.
Valve seals are designed to prevent excess engine oil from leaking through. In ideal operating condition, they seal tightly against the valve and allow only the amount of oil to flow through to provide effective lubrication.
Valve seals
They sometimes have to be changed, since the rubber used to make oil seals ages over time and loses its elasticity. As a result, the oil seal leaks more oil than required. Engine oil consumption increases, problems arise in the lubrication system and more.
Therefore, we offer you instructions on how to replace them.
- The work begins with the obligatory removal of the negative terminal from the battery.
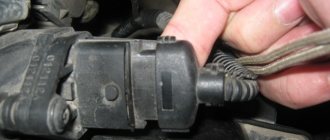
- Disconnect the contacts from the ignition coil and move them aside. It is better not to unscrew the spark plugs, otherwise you risk providing the cylinders with an impressive amount of dirt during the repair process.
- Disconnect a pair of rubber tubes from the valve cover. Loosen the valve cover mounting screws and unscrew them. Subsequently, put all small parts, nuts, bolts in a separate jar so as not to lose anything.
- Remove the valve cover and a pair of gaskets. It is best to replace these gaskets immediately.
- In order not to remove the cylinder head side cover, which covers the camshaft chain and sprockets, you can move the sprockets into the cover as far as it will go and remove the shafts from them.
- Remove the spark plugs. First, insert the oil dipstick into the spark plug hole until the end touches the piston. After this, carefully rotate the pulley until the dipstick stops before lowering.
- Using a marker or paint, make marks on the sprockets and chain, fixing the required position of the teeth in the chain. This way, when reassembling, you will be able to correctly return the chain to the teeth on which it was located before dismantling.
- Unscrew the sprockets using an open-end or socket wrench. To prevent the cylinders from turning, secure the large pulley below the wheel with a key.
- Remove the shaft mounting yokes. The one next to the stars is removed first. Next, all the others are removed, adhering to the order of weakening. Place all the elements on a rag in the order in which you removed them. This way you won't get confused when reassembling.
Replacement procedure
- Remove the stars from their nests. The first one is easily removed in the area of the cylinder head side cover, if you remove the shaft position sensor first. It is held on by one bolt, so there should be no problems here.
- Having freed the shafts from the yokes, lift them a little using a flat-head screwdriver, and then remove them from the sprockets.
- After removing the shafts, remove the near sprocket and secure the chain with a slight tension.
- Next, the valve cups are dismantled. They are shiny, so it is difficult to confuse them. Although no cup holders are used, removing them can be a problem. They stick from the inside. Try using a powerful magnet.
- Remove the springs. To do this, you will need to loosen the valves on cylinders 1 and 4. This is due to the fact that on them the piston is at TDC. Secure the outer bracket with a bolt using a suitable hole in the block head. Using the second bracket, jerk the washer until it stops. The crackers should come free, after which you carefully remove them from their seats with a magnetized screwdriver.
- Remove the springs along with the washer. Place them on the table in the order in which you removed them. That's it, we finally got to our oil seals.
- Use pliers to remove the old seals. This can take quite a long time.
- Put on new oil seals, treating them with engine oil first.
- Press into place using a washer or tube of the required diameter.
- Put the springs back in place and dry them. Here you need to be as careful and attentive as possible. We recommend covering the engine with a rag. Having dried the valves of cylinders 1 and 4, move the pistons of cylinders 2 and 3 to TDC, then repeat the operation.
- Having dried the last valve, proceed to reassemble the unit. Here, strictly follow the reverse sequence.
Symptoms of a problem
If the valves have not been adjusted properly, a characteristic clattering sound appears when the engine starts. This rather loud noise comes from under the block cover. You can hear it especially well when the speed increases.
If the valve clearance is significantly larger than specified, the loud clatter becomes more distinct, and noise appears even at low engine speeds.
Adjustment
To adjust the gap, you must use the appropriate shims. They are installed on top of the valve tappets.
If you choose the right shim using trial and error, you can return the clearance to optimal values, thereby restoring normal engine operation.
There are certain standards regarding clearance sizes depending on the valve.
Valve type
Normal clearance
Tolerance
Adjustment process
Adjusting the gaps yourself is not difficult. Just follow the instructions provided, as well as video tips and visual demonstrations of the process.
- Remove the unit cover and clean the surfaces with a clean rag. You need to remove traces of engine oil.
- Place a device for recessing the valve tappets on the cover fastener studs. This is the most common lever with a handle.
- Set the piston of the first cylinder to the TDC position - top dead center. To do this, remove the camshaft drive belt cover and rotate the crankshaft as it rotates. The marks on the camshaft drive gear and the rear gear cover must match. If you remove a couple of spark plugs, it will be easier to turn the crankshaft.
- After aligning the marks, the crankshaft rotates about another 50 degrees, no more. This will allow you to unscrew the camshaft cam from the valve lifters.
- Using a feeler gauge, check the condition of the gaps on valves 1-3 and 5. If the gap differs from the required one, return the required parameters by replacing the adjusting washers.
- To adjust the clearances, the pushrods are recessed a little so that you can release the shims. The pushers are recessed by pressing the lever. Do not let go and lock it in the desired position. Be sure to place the clamp so that it is between the edge of the pusher and the camshaft.
Fixing the pusher
- Pry the adjusting washer off the pusher by prying it with a flat-head screwdriver. On the back of the washers there is usually a mark with the size. If not, you will have to measure it manually. Write down somewhere how thick the washer you are using is, and using the dimensions as a guide, select a new washer.
- New shims must be installed with the numbers down. By recessing the device for compressing the valve pusher, the retainer can be removed.
- Check the gap. If necessary, perform the operation again, taking a washer larger or smaller than the previous one.
- Having completed the adjustment, the crankshaft rotates 360 degrees, which provides access to valves 4, 6, 7 and 8. They are adjusted in the same way.
The procedure for adjusting the thermal clearances of valves on VAZ 2109-21099
Attention! The car engine must be cold and its temperature at the time of adjustment should not be higher than 20 degrees.
Video tutorial on how to do the job
In order to clearly demonstrate the procedure for adjusting thermal gaps, it was decided to record a special video clip that shows everything in detail.
If from the guide presented above there is something still unclear to you, then below everything will be presented in a form familiar to everyone.
Photo report of the performed maintenance
So, before proceeding with this operation, you first need to remove the valve cover, as well as the casing under which the timing mechanism is located.
After this, you need to set the gas distribution mechanism according to the marks. To do this, jack up the front right part of the car so that you can turn the wheel by hand to set the valve timing marks.
Then we turn the wheel until the marks on the camshaft sprocket and the marks on the rear timing cover align, as clearly demonstrated in the picture below:
At the same time, make sure that the mark on the flywheel also coincides with the cutout. You need to look through the window, which is located to the right of the fourth cylinder on the gearbox housing. You must first remove the rubber plug:
When the camshaft is in this position, you can begin to measure the thermal clearances between the cams and pushers of the 1st, 2nd, 3rd and 5th valves (counting from the left):
For intake valves, the nominal clearance should be 0.20 (+-0.05) mm, and for exhaust valves 0.35 (+-0.05) mm. If you don’t know the location, I can say: from left to right in order: exhaust-inlet, inlet-outlet, etc.
If, when measuring the gaps, they go beyond the maximum permissible values, they must be adjusted by installing new shims. To do this, we put the bar on the valve cover studs and secure it with nuts.
Now we bring the mechanism lever to the desired valve, and direct it as if between the pusher and the camshaft cam, and recess the valve to the very end:
And when the pusher is pressed down as much as possible, you need to insert a clamp between the camshaft and the pusher:
It is worth noting that the cutout on the pushrod should be facing towards you so that you can conveniently remove the shim. It is very convenient to use long-nose pliers for this:
After that, look at its size, which is indicated on its back side:
Now we calculate, based on the measured gap and the thickness of the old washer, what the thickness of the new washer should be in order to achieve the optimal gap.
Now you can insert the new washer into place and make further adjustments. When the first 4 valves are ready, you can turn the crankshaft one revolution and carry out a similar procedure with the remaining 4, 6, 7 and 8 valves.
Good day. Tell me how to estimate the required thickness of the washer under the following conditions: after assembling the cylinder head in the garage, a mechanic and I were forced to cut off the thickness of the standard washer on the 1st and 3rd outlet valves to a gap of 030+005. Engine 21083 injector with a mileage of 170 t.km. The positions of the service technicians have changed to a worse position for the car enthusiast whose car is not a luxury. The latter are drawn to old-school craftsmen and production areas with mechanical processing of the cylinder head. The event of milling the surface of the cylinder head abutment to the block and replacing valves one or two valves with lapping creates a situation: at the mechanical processing area there is no equipment for adjusting the valve with the cylinder head dismantled. And during the assembly of the cylinder head into the engine, the assembly mechanic involuntarily cuts off standard washers for a large 030 -040 thermal gap on the repair valve in order to allow the car, under its own power, without damaging the same valve from a heated engine, to reach the point of adjusting the thermal clearance of the valves using washers.
one revolution is 360 degrees, the valves will return to their original position
No, they won't get up! One revolution of the crankshaft is only half a revolution of the camshaft!
So now I’m setting the gaps, first measured, do 1 revolution of the crankshaft and the shafts return to their original position, what the fuck
Egor, learn the material part or open the 9th grade Physics textbook and read FOUR STROKE internal combustion engines and you are talking about two-stroke engines. In short, like a peasant, when turning the crankshaft by 180 degrees, the mark on the camshaft gear is installed opposite the original one, but the gearbox does not match the gearbox and that’s all. In the initial position when the mark on the camshaft gear matches and in the gearbox hatch, adjust valves 1-3 and 2-5, and when turning 180 degrees, when the mark is opposite the original one but does not match, in the gearbox hatch you adjust 4-7 and 6-8
Process Features
First of all, pay attention to the camshaft drive. On VAZ 2109 cars of earlier production, a chain drive was installed, and on new models (carburetor and injector) - a belt drive. This affected the design of the gas distribution mechanism.
The norm, in the factory version of the VAZ 2109, is considered to be a gap of 0.2 mm for the intake valves and 0.32 for the exhaust valves. Factory adjustment could have an error of up to 0.05 mm. This gap is quite sufficient to compensate for thermal expansion in the cylinder.
Typically, valve adjustment is carried out in two cases: after a major overhaul of the engine and when characteristic noise appears when the piston moves. As a rule, such noise appears after 35,000 km.
When to change valve stem seals
Replacing the valve stem seals is necessary if:
- Engine oil consumption has increased, but no leakage is visible. This is the most deceptive sign, since most often the owners think that the problem is somewhere else and fill in the oil, not wanting expensive repairs.
- The engine consumes more than 1 liter per 1000 kilometers traveled.
- Smoke with a blue tint often comes out of the exhaust pipe.
- Motor oil appeared on the spark plug electrodes. This is a sign by which faulty valve stem seals can be accurately identified, since oil does not appear on the electrodes for other reasons.
Candles in oil
If at least one sign of the above is noticed, then replacement is already necessary.
Saddle repair
Repair of valve seats is carried out when they are naturally worn out and the disc does not fit tightly to its seat.
In order to restore the geometry of the rings, valve seat cutters are used - a set of milling heads that allow making the necessary angles.
Roller cutters can be used in combination with special equipment. However, it is expensive. Therefore, at home, a ratchet wrench with an extension is used. Properly treated areas have angles of 30˚, 60˚ and 45˚. The processing of valve seats to create each of them is carried out with the appropriate cutter.
How to make a replacement
Replacing oil seals in a VAZ 2109 engine is a relatively labor-intensive procedure that requires special skills and certain tools. It is advisable to carry it out in a garage or workshop. Allow enough time for work so as not to rush. Replacing oil seals in a VAZ 2109 engine requires care, precision, and attentiveness.
Prepare everything you need
Successful replacement of valve stem seals can be done with your own hands. But this will require more than just a simple set of keys. You will have to take care of preparing special devices. Before starting work, you must equip:
- tin (or soft metal) rod with a diameter of no more than 8 mm;
- desiccant;
- tweezers;
- hammer;
- set of keys, socket heads;
- pliers;
- collet (puller) for removing oil seals;
- flat screwdrivers;
- press-fit frame.
Step by Step Actions
You can change the valve seals by removing the cylinder head (cylinder head). Some experts claim that this is the only and most reliable way. However, in practice, most car enthusiasts ignore this belief and change oil seals without dismantling the cylinder head.
First, preparatory work is carried out:
- disconnect the negative terminal;
- remove the gear from the camshaft by carefully pulling out the key;
- by unscrewing the bolts located around the perimeter, dismantle the cylinder head cover (front);
- remove the back part of the cover (ignition distributor plug);
- remove the camshaft with oil seal.
- turn the crankshaft so that the piston under the cap being replaced reaches top dead center; having unscrewed the spark plug, insert a tin rod into the hole to prevent the valve from falling out;
- using a desiccant, the springs are removed from the valve;
- remove the crackers using tweezers;
- take out the upper spring plate, inner and outer valve springs;
- put the collet on the cap, dismantling it; craftsmen carry out this operation with pliers or screwdrivers;
- before installing a new cap, remove the spring from it;
- the prepared cap is dipped in engine oil and inserted into the mandrel;
- carefully press the cap until it rests on the bottom plate;
- return the spring from the cap to its place;
- the remaining valve seals are changed in the same way;
- replacement ends with the assembly of components and parts in the reverse order of removal;
- the rod is removed from the spark plug hole;
- after installing the crackers, substituting a metal rod, hit the valve ends with a hammer - the crackers are seated in place;
- when installing the camshaft, monitor the direction of the cams of the 1st cylinder - they should “look” in the direction opposite to the valve tappets;
- When reinstalling, all rubbing parts are lubricated with engine oil.
For better clarity, you can watch a video showing the replacement of valve seals in a VAZ engine. The demo video will present all the steps, after going through which you can change these important details yourself.
Removing the seat
First, let's look at what not to do , although some automotive garage gurus recommend doing just that.
-valve welding + knocking out
First, the old unnecessary valve is adjusted to the dimensions of the seat, inserted onto the seat and the valve is welded to the seat. While it is still warm, knock out the valve and it comes out along with the seat. Due to the different expansion of metals - steel and aluminum - the tension decreases; when it cools down, it will not be so easy to come out.
Why shouldn't you do this? During welding, the entire head heats up and it will certainly move, it will become crooked and in addition to this, hidden cracks will open where there were internal stresses in the metal (and they exist in any case). Then you will wonder why my head suddenly turned out to be pierced.
The best way : Boring the valve seat on a machine until it becomes the size of foil and jumps out of the seat hole. But... this cannot be implemented in a garage due to the high cost of the equipment, and not every village will have such a machine. Therefore, let’s consider another method, easy and safe, and can be implemented in any garage.
Choosing garage technicians: a simple and safe way
Using a milling cutter, grind the saddle all the way through one edge. The seat will weaken, lose tension and jump out of the seating hole on its own, without even having to sharpen it through, reaching the seating plane, when a little less than 0.5 mm of tension remains, the tension is no longer enough to hold on. By opening the ring, the saddle will no longer be able to resist.
A drill cutter is sold in any hardware store and costs no more than a drill, which is why this method is so affordable.
Now that the saddle is out, we need to think about what we are going to put in there.
Machining a new seat
The newly installed seat must be chamfered. It is best to do this on a specialized machine, so it can be processed most accurately. This is achieved thanks to rigid centering of the cutter, which cannot be achieved using hand cutters.
But if there is no such equipment in your area, roller cutters are all you can count on. If there is a metalworking shop nearby, you can try processing the valves on a milling machine, the result will be fine.
On the seat you need to cut three edges - the outer, the inner and on top of them the central, narrowest one, along which the seat will come into contact with the valve.