The fan of the VAZ 2107 stove does not work.
Hello.
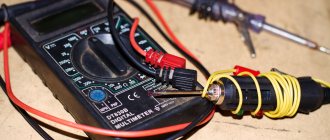
This time I will write about possible reasons for which the heater motor on the VAZ 2107 may not work. These reasons can also be attributed to other classic models such as the VAZ 2105, 2106, 2101, 2103, 2104. To check all variants of the malfunction you need Have at least a test lamp, or better yet, a multimeter.
If you find out that it is the heater motor that has broken down, then read the article “Replacing the heater motor in a VAZ 2107.”
To understand what can break and why the VAZ 2107 heater fan may not spin, you need to consider the electrical circuit for powering this motor.
Connection diagram for the VAZ 2107 heater fan.
The diagram below shows how the stove fan (4) . Power from the battery, through the mounting block (1) , goes to the ignition switch (5) and again goes to the mounting block (1) . In the mounting block (1) it passes through fuse F1 (10 amperes) and goes to the stove speed switch button (2) . Next, power from the button goes either through resistance (3) to the motor (4) , or directly to the stove motor (4) .
The VAZ stove fan will not work if any of its circuit components is faulty. You can determine the reason why the VAZ 2107 heater fan does not work:
- There is a fault in the mounting block.
- The contacts of the heater fan speed switch are burnt out.
- The speed control resistance has burned out.
- There is a malfunction in the heater motor itself.
Let's take a closer look at each of the faults.
There is a malfunction in the VAZ 2107 mounting block.
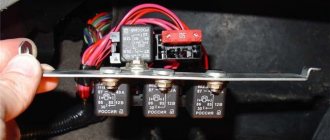
If the stove stops blowing air, then first of all look to see if fuse F1 in the mounting block is intact. Usually, if this fuse blows, then the heated rear window and reverse lights stop working along with the heater. This fuse must be rated 10 amps . No more and no less. If you install a fuse of less than the nominal value, it will constantly burn out, and if you install a fuse of a higher nominal value, it is possible to burn the mounting block. If you have a fuse of a higher rating (as in the photo below), then the likelihood increases that the mounting block has failed and the plus is not supplied to the speed shift button. How to find out, read the next paragraph.
The contacts of the heater fan speed switch are burnt out.
You checked the fuse and saw that it was intact. Let's dig further. Now we take and remove the gear shift button from the panel and disconnect the wires from it. Afterwards, we reliably one end of the indicator light to ground, and alternately insert the other end into the removed terminals of the wires disconnected from the button. must be on !
If the light does not light up, then power is not supplied to the speed switch and the mounting block is most likely faulty.
If the light comes on when testing one of the contacts, it means either the button or something else is faulty. How to find out? Very simple! To do this, we make a jumper from a regular wire, from the contact, during the test of which the indicator light came on, to one of the other two contacts. The stove motor will work if the button is faulty. If the motor does not work, then it is the motor that is faulty.
The stove only works at one speed VAZ 2107.
When the stove operates only at the highest speed, this means that the ballast resistance has burned out.
In this case, just change it. It is located under the dashboard approximately in the middle, closer to the driver's side.
There is a malfunction in the heater motor itself.
Before disassembling the panel and stirring up the interior, check whether the mass going from the heater motor to the body sits well. It often happens that this wire simply rots.
If you have a multimeter, you can ring it. To do this, take out the speed switch button and disconnect the contacts from it. Now, in the continuity mode, connect one probe of the multimeter to ground, and check the wires with the others one by one. If the motor and ballast resistance are working properly, the multimeter will beep when checking two of the three wires. If the ballast resistance is faulty, then the multimeter will beep when checking one of the three wires, and if the heater motor does not work or does not have contact with ground, then the multimeter will be silent.
If you want to learn how to replace the stove motor, read this article!
I hope you found this article useful. If you have any questions or comments, leave them in the comments.
How to modify and modernize the stove with your own hands?
You can improve the operation of the heating system on the “seven” in the following ways:
- redo side window ventilation;
- modernize the damper;
- modify the foot airflow system to increase its efficiency;
- improve the operation of the rear cabin heating system;
- modify the thermostat;
- improve the functioning of the steam exhaust line;
- install an additional water pump.
User Egor Panther spoke about options for upgrading the heating system in VAZ 2107 cars.
Improved side ventilation
The side ventilation system needs to be modified after purchasing an additional fan. The device is mounted in the left line, which will allow forced air flow to the deflector.
The tuning procedure looks like this:
- At the first stage, the deflector device is dismantled from the main line. To perform this task you need to use a screwdriver. The deflector in the cabin is pryed up and removed; it must be pulled forward. Similar actions are performed on the other side of the stove.
- Dismantling the device is carried out carefully so as not to leave any traces of damage on the center console.
- If the deflector is removed, it is necessary to remove the holding device from the dashboard. This element is mounted in the center console using special antennae. The essence of this modernization is that a classic computer fan is installed to force air flow into the heating system.
- To install the ventilation device, the element must first be fitted to the deflector body. After applying it to the plastic with a marker or pencil, you need to apply markings. Using a utility knife, a cut is made in the plastic on the deflector.
- If the dimensions are marked accurately, the ventilation device will be tightly installed in the housing. This is important, since such installation will prevent the part from loosening while driving.
- After completing the installation of the fan, you need to make sure that its blades rotate normally and nothing interferes with them. If problems arise, the device is adjusted. If necessary, the blades can be trimmed a little.
- To ensure efficient air flow and no backdraft, the entire structure must be sealed. Therefore, using sealant or the remains of plastic that appeared after cutting the deflector, the cracks are clogged.
- If all steps are completed, the ventilation device is installed in the main line area, and then mounted on the body of the deflector element.
- After completing all the installation steps, you need to work with the electrical component. It is recommended to connect the fan electrical circuit to the conductor where the current appears when the ignition is activated. This option is more convenient. It is possible to connect the device to the heating unit control cable.
Damper modernization
Modification of the VAZ 2107 stove, which consists of upgrading the lower damper of the system, is the easiest option to implement. If all actions are performed correctly, the device will not open or close randomly when the car drives over bumps. This will ensure efficient and equal airflow on both glasses.
The upgrade procedure is carried out as follows:
- It is necessary to visually evaluate the housing of the heating unit. In its corner there is a hole of the required diameter to carry out the work. If it is not there, then it is drilled. For this, a drill with a diameter of 6 mm is used.
- A bolt is installed into the hole made from the inside. The valve itself closes.
- After this, using the same drill, a hole is drilled directly into the handle of the device. It is necessary to drill so that the hole is located at the level of the bolt installed earlier. In this case, the length of the screw must be such that when lifting the damper, the element can freely fit into the hole made.
- If everything is done correctly, the bolt is tightened with a nut. It is recommended to use a black part, then it will be difficult to see.
User Nail Poroshin spoke about the features of modifying the air damper thrust.
Rear seat heating system upgrade
To modernize the rear seat heating system, you will need to install an additional “snail”, which can be used from the VAZ 2108:
- First you need to make a housing to fix the “snail”. To perform this task, you need to cut plexiglass.
- Using a regular hairdryer, you need to carefully make bends on the glass so that it turns out as shown in the photo.
- Then, using a hair dryer, you need to carefully change the shape of the case. It is necessary to act carefully, otherwise the “snail” may not fit into the landing site.
- When completing the task, you can remove the device plug using a utility knife. This will reduce the dimensions of the part by approximately 3 cm.
- Then the side walls of the structure are manufactured. For this you can use duralumin or other similar material. The wall thickness should be 1.5 mm.
- The next step is to remove all the cracks. To do this, the joints of the device must be sealed using adhesive-sealant or other means.
- Then you need to work with the channels through which air will flow to the blower openings. It is recommended to make these elements collapsible. For manufacturing it is desirable to use a similar material.
- In order to reduce the amount of resistance and remove turbulence, the turns of the air channels must be smooth. They can be made from duralumin.
- At the next stage, we need to build slots that will be used to warm the feet. We are talking about front airflow - for the driver and passenger. The slots must be equipped with shutters. You can additionally install a variable resistor device, which will be used to regulate the speed of the electric motor. This element can be used instead of a resistor designed to change the brightness of the backlight.
- The main stage in this modernization is the construction of a system for effectively heating the feet of passengers sitting in the rear. To do this, it is necessary to additionally install several longer pipes. The radiator device is quite powerful and its power will be enough to supply air flow back. All connecting points of lines and blowers are sealed to prevent leakage of warm air flow.
Using a hair dryer, a body for the “snail” is made from plexiglass
Removing the snail plug
Modernization of the housing for the production of air channels
Improved foot airflow efficiency
To improve the efficiency of blowing the legs, you will need to replace the standard fan with another; you can use a device from a VAZ 2108.
The upgrade procedure is performed as follows:
- The first stage is performed inside the car. It is necessary to dismantle the lower part of the heating unit. A standard ventilation device is installed here.
- The fan is being dismantled. It will no longer be needed and can be recycled.
- Next, the plastic ridge is cut, which supplies the air flow to the floor of the machine. On “eight” units, the fan motor is larger in size.
- A ventilation device equipped with two blades is dismantled. A knot with five elements will be used instead. Before installing a new device, it is necessary to diagnose the quality of its operation. To do this, the node is connected and checked.
- If the device works correctly, then it is installed instead of the old one. After installation, the unit must be properly fixed. This will prevent the negative impact of vibrations during movements and rapid failure of the device.
- In order for the ventilation unit to function more smoothly, it is necessary to replace the resistor element. This is due to the fact that the device allows for a larger volume of air flow and operates noisier. Therefore, a resistor element is installed, which can be used from a VAZ 2108.
- The buttons, as well as the control components of the ventilation device, must be replaced with new ones. It is allowed to use parts from the VAZ 2108. The standard key from the “seven” is suitable in size and mounting. But it quickly fails as a result of a large difference in current. At this stage, the modernization procedure can be considered complete.
We recommend: Internal combustion engine
Modification of the thermostat
Thermostat from a Chevrolet Niva car
The procedure for modifying the thermostat on a VAZ 2107 involves replacing the standard device with a part from a Chevrolet Niva:
- First, the refrigerant from the cooling system is drained. The car engine warms up, a container is placed under the heater tap and the liquid is drained.
- The engine compartment is opened, the thermostat with the lines connected to it is dismantled. It is necessary to disconnect the outlet pipe located at the bottom; it goes from the radiator device to the element being replaced. The bypass line is disconnected; it is installed on top, as well as the hose going from the thermostat to the pump. The condition of these pipes is assessed. If they are worn out or damaged, then new ones must be prepared.
- The refrigerant outlet pipe and the copper pipe are disconnected. The last element is unscrewed from the pump; to do this, you need to unscrew two nuts and remove the flange from the studs.
- The lower removed line is taken and the middle part is cut out of it. The length of the segment should be about 7-9 cm.
- A new thermostat device is being installed. Its connection is made using a pipe with a water pump. The hose must be slightly bent in advance.
- Then a thick pipe from a VAZ 2108 is taken and adjusted to the place where the lower standard hose was installed. You need to cut off identical parts from both ends of the element and connect it to a new device. In principle, it is also possible to install a standard line, but this option is simpler.
- The upper hose is being installed; we are talking about a standard pipe.
- Instead of the dismantled line, a plug is made; it went from the heating unit to the water pump. To do this, you will need a copper tube; a connecting flange is soldered off from it. A sealing element is made from rubber, then the surface of the pipe is treated with sealant. The structure is screwed back to the water pump.
- The next step is to connect the pipe that removes the refrigerant from the heating device with the inlet on the thermostat. To complete the task, take a dismantled copper hose, remove the excess part, then bend it a little.
- A bracket is made that will be used to fix the pipe to the exhaust manifold device.
- The outlet line from the heating unit with the hose, which was previously disconnected, is connected. The output from the stove remains the same, but the input will go not to the pump, but to the thermostat.
- The end of the line with the corresponding input is connected to the thermostat device; this will require a shorter and curved pipe. It is used to remove refrigerant from the cylinder head to the heating unit. This element must be adjusted to length in advance. Difficulties may arise when using an aluminum thermostat because the walls of such devices are thicker. This means that the line must be used with a large diameter.
- The thin pipe of the heating system of the intake manifold is fixed to the thinnest outlet of the thermostat. First you need to disconnect the end going to the lower line from the heating device to the water pump. The pipe is measured and, if necessary, the excess part is sawed off. The connection point is treated with sealant. To prevent leakage, the volume of glue must be large.
- Then the junction of the pipes and the thermostat is tightened using clamps. Refrigerant is added to the heating system. The engine is started. If an air lock has formed in the system, it must be removed.
Valery Imenov spoke in detail about installing a thermostat from a Lada Granta car on classic VAZ models.
Installing an additional pump
Installing another pump on the heating unit will provide better heating of the car interior. Typically this device is installed next to the battery and pipes in the engine compartment. When performing the task, it is necessary to dismantle one line coming from the cylinder block. This pipe is connected to an additional pump. From the cylinder block, the line should go to the front of the water pump, and the outlet pipe will connect to the heating system.
The power supply to the auxiliary pump is taken from the activation key for the rear window heating system. This will allow the device to turn on together with this node. There is one positive conductor coming from the electric motor of the additional water pump. The negative contact is the mass of the device.
To provide power to the pump, do the following:
- The first connector with conductors is dismantled. Several electrical circuits are connected to it. The gray conductor is designed to activate the rear window heating system; this is the main cable.
- The power cable from the water pump is connected through this wire. The cable itself is led out into the engine compartment through a technological hole.
- For better fixation of the conductor, it is recommended to solder the contact element.
- Once the pad installation is complete, the auxiliary water pump is ready for testing and operation.
The Avtopodogrev channel spoke about the installation and features of connecting an additional pump on classic VAZ models.
If necessary, connecting the water device can be done using another method:
- To complete the task, you will need a block from the injectors or a detonation controller. This item can be purchased at any auto store.
- Two conductors are soldered to the ends of the block, and then the cables are installed in a corrugation and wrapped with electrical tape.
- Then an electrical circuit is drawn out to connect the ground; you can use any conductor available on the bracket near the installation site.
- The harness itself is installed upward, the resistor elements of the heating unit are connected to the connector where the positive contact was taken. This will automatically activate the water pump, which draws about 1.5 amps during operation. This connection method allows you not to use additional relays and connect directly to the positive output in the connector.
Many car owners install not “VAZ” pumps, but “foreign-made” pumps on their cars. You can use device model 0392020034 from the manufacturer BOSCH. The productivity of such a pump is 750 liters per hour, but additionally you need to purchase clamps, as well as about 10 meters of corrugation. Before performing the task, be sure to drain the refrigerant from the system.
The difficulty of installing a branded water pump is that the diameters of the hose and fittings of the device do not match. The first is 1.6 cm, and on the pump - 2 cm. Therefore, it is recommended to use more elastic hoses. This will allow you to tighten the line onto the fitting. For better passage, the element can be treated with motor fluid.
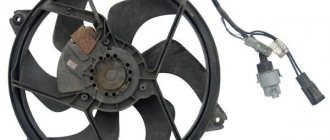
VAZ 2107 radiator fan does not work
The cooling system is designed in such a way that the fan starts only after the engine has warmed up to the set temperature. A malfunctioning fan switch can lead to serious engine problems.
Do not confuse this sensor with the coolant temperature sensor (DTOZH), which displays the engine temperature on the instrument panel and is installed on the right side of the engine.
It is possible to notice its breakdown in time only perhaps only in the summer, and even then in the city or when driving slowly, since the oncoming air flow is quite enough for the normal operation of the cooling system. The cooling system fan on VAZ 2107 cars starts with a characteristic noise, so the moment it starts is clearly audible.
Where is the switching temperature located?
The fan switching sensor is located on injection models, on the aluminum outlet pipe of the cylinder head (article - 23.3828, used in VAZ-2107i-2112, 21213, 2123, ALFA ROMEO, DAEWOO, FIAT, LANCIA, OPEL), on carburetor models (TM 108 -02 92/87 C) it is installed on the engine cooling radiator.
For the “classic” fan, the operating temperature is 92 degrees and the shutdown temperature is 87 C 0, so installing a fan that is suitable in size, but with a different number, is not recommended.
On carburetor models the sensor is located on the radiator
Checking the electric fan and its circuits
In order to check the operation of the fan and power circuits on the injection “seven”, you need to disconnect the connector from the sensor, the ECU will give a command to turn on the fan. If this does not happen, then you need to check not the sensor itself, but the serviceability of fuse F7, the electric motor, the fan relay and the power circuits. Below is a diagram of how to turn on the VAZ 2107 injector cooling fan.
Circuit diagram for switching on the VAZ 2107 cooling fan (injector)
The principle of operation of such a device differs from TM 108 and is based on a change in resistance.
As the sensor heats up, it reduces the resistance; the ECU monitors this change and, when the specified parameter is reached (about 195 Ohms), turns on the fan relay.
How does the heater work?
The operating principle of the heating device is very simple. After opening the tap, the coolant begins to circulate through a large circuit and is supplied to the heater radiator. When the air intake damper is moved back, it passes into the radiator, where it heats up and is then sent to the passenger compartment.
If the car is driving fast, then the natural flow is enough for the stove to work well and effectively heat the cabin. In this case, the fan is not turned on. In other situations you cannot do without it.
Disadvantages of the heater in the VAZ-2107
The need to improve or improve the operation of the heating system may arise as a result of the following shortcomings:
- Ineffective rear airflow. Due to design features, warm air is difficult to reach passengers sitting in the back. It will take time to effectively warm up the entire interior of the car.
- There is a weak air flow from the left deflector device on the “sevens”.
- The electric motor of the heating unit is too loud.
- The faucet of the radiator device is also considered a weak point. With prolonged use, it leaks, which leads to a decrease in the volume of antifreeze in the system.
Everything about the cooling radiator fan on the VAZ 2107
The design of the VAZ 2107 car provides a cooling system, which is based on such an important element as a fan. The main purpose of the VAZ 2107 radiator fan is to provide cooling of the radiator with coolant due to airflow. The element in question plays an important role on which the efficiency of a car engine depends. If the device malfunctions, the operation of the car cannot continue, since the result of such a breakdown is overheating and jamming of the engine.
Mechanical forced radiator cooling
Owners of some of the first sevens know how the mechanical cooling fan system works. The impeller of the device is driven by the rotating crankshaft rotor. The elements are connected using a belt drive, and the operation of the radiator cooling fan begins immediately after the engine starts.
This method of fan operation is called mechanical, and its main advantage is reliability. When the engine starts, the impeller of the device begins to rotate, thereby providing airflow to the radiator. Such a system is simple and therefore practically does not require repairs. The main disadvantage of this mechanism is that the rotation speed of the impeller directly depends on the engine speed. At idle, the impeller rotates at a lower speed than when moving at high speed.
If in the summer, when starting a VAZ 2107 with such an engine, the rotation of the fan does not negatively affect the warming up of the engine, then in winter it is the opposite. When starting the engine in winter, it is necessary to quickly warm up the engine, and the constant rotation of the fan complicates this task, even despite the cooling system, which consists of two fluid circulation circles - small and large.
The disadvantage of prolonged warm-up of the engine is eliminated by using a thermostat, which controls the circulation of coolant in a large and small circle. When the operating temperature is reached, when the engine warms up, the thermostat opens the valve and the liquid circulates in a large circle, that is, through the cooling radiator.
In winter, when the car is moving at high speed, the fan cools the liquid too quickly, so you will notice that on such sevens the temperature gauge needle often does not reach the operating value. This is why many car owners place cardboard or cloth on the radiator grille to prevent the flow of cold air.
Electric Radiator Cooling Fan
In the design of the VAZ 2107, more modern carburetor and injection versions, an impeller with built-in electric motors is installed, to which wires are connected together with a belt drive. The electric fan motor for cooling the radiator is activated by the activation of a sensor that measures the coolant temperature. As soon as the temperature in the system reaches the appropriate mark (over 90 degrees), the contact in the sensor closes and therefore the fan turns on.
Such a system cannot be called reliable, but in terms of efficiency, it is ahead of the mechanical system. Such a system cannot be called reliable, since during operation the electric motor, sensor may fail, the wiring may be damaged, or the fuse may blow. In terms of efficiency, such a system is a leader, since the fan is switched on only when the coolant temperature in the system reaches above the corresponding value. In this case, the fan does not work in vain, as is typical for “mechanical” sevens.
Checking the electric fan and its circuits
If the cooling fan does not work on a VAZ 2107 car of an injection or carburetor type, then you need to start troubleshooting from the sensor itself. The fan motor switch is very easy to check. To do this, you need to disconnect the terminal blocks from it (there are two of them) and short them to each other (with the ignition on). If after closing the contact the cooling device operates, then the fault is in the sensor itself. If the impeller does not rotate after this procedure, then the problem must be looked for elsewhere.
Principle of operation
The radiator in all VAZ models is secured with two self-tapping screws, and the heater tap is built into the supply pipe. It is a coolant flow regulator. It can be controlled using a flexible rod from a lever located in the control unit in the ventilation system. A VAZ 2107 is installed under the radiator. Its electric motor is mounted on two elastic cushions placed in a guide casing. An additional resistor is also built into the motor, providing a two-speed mode for fan rotation, the activation of which is ensured by a switch that has three positions for operation and is located on
The VAZ 2107 stove has air ducts extending from its fan casing. They direct the flow not only to the deflectors that blow on the side windows, but also to those tubes that are directed to the windshield. It is possible to control hot air by closing and opening the heater dampers alternately. The air supply cover itself is adjusted by rods from levers located on the control unit.
VAZ 2107 fan does not work
Over the years of their production, VAZ-2107 cars were equipped with both carburetor and, subsequently, injection engines. Therefore, the electrical circuits for supplying voltage to the electric motor of the engine cooling system fan differ from each other.
On VAZ-2107 injection engines, a two-contact fan sensor, which is located in the upper pipe, when the coolant temperature rises above that for which it is designed, it must send a signal to the ECU. The electronic control unit, having analyzed the signal, turns on the fan through a relay.
Therefore, the search for reasons for the fan not turning on begins by removing the connector from the sensor with the ignition on. If the fan itself is working properly, then it should work. By inserting a load in the form of a light bulb into the connector terminals, the fan should stop. Thus, you check the electrical circuit of the fan motor. In this case, it will be fine, but the fan sensor will have to be replaced. However, it should be noted that there are also substandard sensors on sale, which, when installed on the engine, will also not work.
If, after removing the connector from the sensor, the fan does not work, then its functionality must be checked by connecting it directly to the battery. There are only two options for the experiment. If the fan is working, then you will have to check the functionality of the fuse that protects this circuit, the fan relay and the ECU. And if the fan does not work, then you will have to check the condition of its brushes for wear.
On carburetor engines of the VAZ-2107 car, there will be no ECU in the electrical circuit for turning on the fan, and some “sevens” do not even have a fan turn-on relay. Therefore, it is much easier to find the reason why the fan does not turn on, and many drivers of VAZ-2107 cars can cope with this.
2 comments
Thank you, you helped. Accessible and understandable.
Eng. I remove the chip from the sensor - it doesn’t turn. The fan is working (connected directly), I replaced the mother folders, the fuse is intact (the signal works), I changed the P3 relay under the glove compartment - no changes. The relay clicks when the ignition is turned on. The only thing I didn’t look at was the power supply unit for the burnt track. Tell me what the problem is.
Add a comment Cancel reply
- VAZ 2107
- 2109
- 2110
- 2112
- 2114
- 2115
- Vesta
- Kalina
- Lada Priora
- Lada Granta
- Lada Largus
- Chevrolet Niva
- Gazelle
- Logan
- Accent
- Octavia II
- Jetta V
- Patriot
- Nexia
- Aveo
- Focus 2
- Rio 2
- 80
- Qashqai
- Tiggo
- Astra
- Lancer
Popular posts:
- The radio does not work on the Lada Vesta
- The instrument panel does not work on the UAZ Patriot
- Why does the instrument lighting not work on the Priora?
- Why do the devices on the Gazelle not work?
- The washer does not work on Lada Largus
Search
The last notes:
Audi will take charge of Volkswagen Group's research and development efforts- Restyling Hyundai i30 2021 model year
- Volvo is redefining the concept of autonomous driving
Details about the new Kia Sorento 2021 before its debut presentation in Geneva
About Us:
Each of us faces problems while operating a car. It's always unpleasant. However, sometimes these problems can be solved on your own. The main goal of this site is to help motorists avoid unnecessary costs when repairing cars by suggesting the causes of the malfunction and options for eliminating it. We are focused on live communication, so we look forward to your comments and mutual assistance to other motorists. Thank you for being with us and good luck on the roads!
Contacts:
All rights to materials published on this site belong to the editors of the site, with the exception of cases of reprinting of other people's materials, and are protected in accordance with the legislation of the Russian Federation. If you found your photo or text on our resource, tell us about it. We will indicate your authorship or remove the material.
Why does the stove heat poorly on a classic?
The most likely reason why the stove on a VAZ 2104 does not work....
and other “classic” models - the heater radiator is clogged, and the more clogged the radiator honeycombs are, the worse it will give off heat.
But before blaming the stove radiator for everything, you definitely need to check:
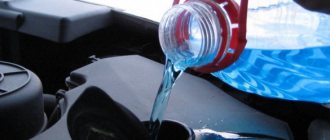
- Coolant level in the expansion tank.
- visually the liquid should be slightly less than half.
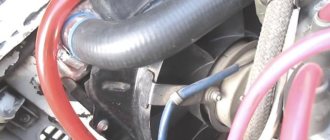
- Is the cooling system full of air?
- when the engine is warm, the supply pipe should be warm (it is indicated by an arrow in the figure).
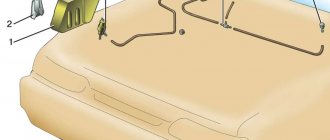
- The functionality of the stove tap.
The heater valve is located on the passenger side under the glove compartment. (the figure shows a radiator with a valve in the removed position and an arrow roughly indicates where to look for the heater valve when it is installed).
The figure shows a radiator with the valve in the removed position and an arrow indicating approximately where to look for the heater valve when it is installed
- Warm up the car to engine operating temperature
- We try the pipe that supplies coolant to the tap, it should be warm (this way we make sure that there is fluid circulation through the system).
- On the panel of ventilation control levers, move the upper lever all the way to the right (the heater valve is open).
- We try the pipeline that goes from the tap to the stove, just be careful not to get your hands on fire, the pipeline must be warm. To be sure, turn on the blower fan; a couple of seconds after opening, warm air should come out.
If the pipeline from the tap is cold and there is no outlet of warm air, then there are 3 reasons:
- The cable that connects the control lever and the tap has broken,
- The cable is intact but rusted to the casing,
- The faucet simply “sours” and does not turn. This is a very common reason because after traveling through the warm season, which is 5-6 months, we do not use the stove. Then we try to turn the flag with our hands to the open position; if my memory serves me correctly, we need to turn it counterclockwise, but if you have a new tap on hand, it’s better to look at the open/closed position on it. As often happens, the faucet becomes so sour that the flag bends due to the force of your hand, then we remove the flag and try to twist it with pliers.
A couple more points:
- Before checking the tap, in order to save your nerves and not remember the VAZ designers once again, it is better to remove the shelf that is located under the glove compartment.
- I would like to say on my own that if you buy the cheapest faucet, you will most likely have to change it before the first winter.
If there is fluid circulation through the system, the antifreeze level and the heater tap are normal, then we turn our attention to the radiator, which is located in the cabin. It needs to be removed; many people are afraid of this procedure and take their time to debug the work. And if, God forbid, your radiator leaks a little, all the liquid collects under the rugs, which is hard to notice if you rarely do general cleaning. As a result of increased humidity in about a year, the bottom can literally rust from the inside.
For quietness
For this purpose, the built-in resistor is replaced, the main task of which is to ensure relatively silent operation for the fan. Moreover, the new one - with a VAZ 2108 - creates a lot of noise due to the larger amount of distilled air flow. The best replacement option is the resistor that is installed on the same eighth model. In addition, when upgrading, it would not be a bad idea to replace the fan switch by installing a model from the same car as the entire structure, for example, from 2108. This is done because the VAZ 2107 stove gets very hot during prolonged operation, as a result of which, after a certain time, standard power buttons simply melt. The noise from the modernized and updated device, of course, will be a little more than the factory one, but this drawback in cold winter times after the heater has been modified is almost unnoticeable.