VAZ-21213 (Niva). Heater
VAZ-21213 (Niva). Removing and installing the heater
| 1 – air distribution cover; 2 – lever of the air distribution cover; 3 – damper for the windshield heating air duct; 4 – control handle for the heated windshield damper; 5 – air supply cover control handle; 6 – crane control handle; 7 – control lever bracket; 8 – flexible rod; 9 – air duct for body ventilation; | 10 – side window heating air duct; 11 – air duct for heating the windshield; 12 – air supply cover; 13 – air supply box seal; 14 – air supply box; 15 – radiator; 16 – inlet and outlet pipes; 17 – tap; 18 – fan casing; 19 – spring bracket; 20 – fan motor |
EXECUTION ORDER
1. Move heater valve 17 control handle 6 all the way to the right and drain the liquid from the engine cooling system. 2. Disconnect the ground cable from the battery. 3. Remove the fastening screws, remove the instrument panel shelf and the radio panel, and disconnect the electrical wires. 4. Loosen the clamps and disconnect the rubber hoses for supplying and discharging fluid from pipes 16 of the heater. 5. Unscrew the two mounting bolts inside the engine compartment and remove the heater radiator pipe seal. 6. Loosen the bolt of the bracket securing the flexible rod shell on the tap and remove the rod from the tap. 7. Remove the heater fan motor switch and disconnect the wires from it. 8. Remove the four spring holders and the fan casing 18 assembled with the electric fan. 9. Remove the instrument panel panel, through the opening for it in the panel, loosen on bracket 7 the screws of the brackets of the flexible rods of the air inlet cover 12 and the damper 3 of the windshield heating air duct. Remove the rods from the control levers. 10. Unscrew the nuts securing the radiator casing 15 to the air inlet box 14, disconnect the ground wire secured under one of the nuts, remove the casing and the air inlet box. 11. Install the heater in reverse order. Pay attention to the correct position of the sealing gasket between the radiator casing and the body, and to the reliability of tightening the rubber hose clamps. 12. After installing and connecting the hoses, fill the engine cooling system with liquid and check the tightness of the connections.
VAZ-21213 (Niva). Disassembly and assembly of the heater
| 1 – air distribution cover; 2 – fan casing; 3 – resistor; 4 – guide casing; 5 – radiator casing; 6 – air supply cover gasket; 7 – air supply cover; 8 – spring bracket of inlet and outlet pipes; | 9 – spring holder of the fan casing; 10 – radiator gasket; 11 – radiator; 12 – inlet and outlet pipes; 13 – tap; 14 – fan impeller; 15 – electric motor; 16 – spring bracket; 17 – electric motor mount |
Interior ventilation
Outside air can enter the vehicle interior:
- through open door windows;
- through nozzles 2 (Fig. 1-6) for blowing the windshield, if you move distribution lever 8 and lever 7 for controlling the air supply hatch cover to the right;
- through the side nozzles 1 for blowing the door windows, if you move lever 7 to the right and lever 8 to the left;
- through holes 9 of the heater casing into the driver's and front passenger's foot area, if you open the heater cover with lever 10 and move lever 7 to the right;
- through the central nozzles 5 directly from the air supply box when the car is moving, if the regulators 3 open the nozzle flaps (summer airflow). By moving lever 4 in the horizontal and vertical directions, the direction of the air flow from the nozzle changes.
In the middle position of lever 8 and in the right extreme position of lever 7, air will flow through nozzles 1 and through nozzles 2.
If the car is moving at low speed, you can increase the amount of incoming air by turning on the electric heater fan with switch 12.
Heater modernized from VAZ 2108 for Lada 4×4 NIVA
Manufacturer: Avtozap63, Tolyatti. Our production. Quality assurance!!!
Contents of delivery:
1. Heater assembly with cabin filter
2. Fan mode switch
3. Wiring harness
4. Metal divider
Description:
The modernized stove for the field with a motor from a VAZ 2108 is a plastic case with a built-in electric motor and an air blower. On the right, if you look from the side of its protruding part, there will be two wires: positive (with a chip) and negative.
On the left is a resistor with three terminals (each of them has its own number - 1,2,3).
The wiring (harness) consists of four wires, on one side there is a wide connector with a short wire, on the other side there are the ends of the wires with terminals (3 pieces).
The three-position switch is black with a white rear mounting cover. They indicate numbers 1,2,3 (for connecting to the wires from the harness) and a plus sign.
Installation procedure:
1. Disconnect all electrical equipment from the power source (battery)
2. Before installation, dismantle the air intake box in the engine compartment and remove the damper cover.
3. Install the divider in place of the removed damper.
4. Install a new heater in place of the dismantled damper and secure it in its original place.
5. Lay the cable from the installed heater into the vehicle interior.
6. Attach a three-position switch to a free space on the instrument panel.
7. Connect the wires between the heater resistor and the switch in accordance with numbers 1,2,3.
8. Disconnect the positive wire from the old heater switch and connect it to the corresponding positive connector on the three-position switch.
9. Check that the connection and installation are correct.
10. Connect the power source (battery).
Note:
1. The serial motor with a fan in the cabin can be removed (removal/installation steps are carried out in accordance with routine maintenance), but if you want to have a spare option, you can leave it. In this case, the old motor with the impeller will provide some resistance to air movement.
2. If desired, the standard heater can be kept in working order as a backup. In this case, it will be necessary to connect an additional positive wire to the new heater and take into account that the simultaneous operation of both heaters will create an increased load on the vehicle’s on-board electrical network, which is highly undesirable.
Interior heating
To heat the interior and protect the windshield, door windows and rear window from fogging and freezing:
- move levers 6 and 7 to the right;
- set lever 8 to the middle position;
- open the heater cover with lever 10;
- turn on switch 11 heated rear window;
- If necessary, turn on the electric heater fan with switch 12.
Warm air will be directed both to the driver’s and passengers’ footwells and to the windshield and front door glass. For faster heating of only the windshield, close the heater cover with lever 10 and move lever 8 to the right.
Do-it-yourself modification of the stove on Niva 21213 is necessary if the car’s heating system malfunctions. There is no point in delaying this, because uneven thermal regulation leads to foggy windows or icing. In any of these cases, the view of what is happening on the road deteriorates. The malfunction causes wear of individual elements of the device or manufacturing defects.
VAZ 2121 (Niva 4x4): replacing the heater radiator with your own hands
The operation of the stove on the classic Niva traditionally causes complaints from most owners of this car. A frankly weak but noisy fan and poor design of the air ducts do not warm the interior properly. In addition, the operation of the heater is affected by the operation of the VAZ 2121, 2131 in difficult road conditions. The stove radiator, air ducts become clogged, and the pipes are destroyed. Therefore, understanding the operating principles of the heater and the ability to repair it with your own hands become an important task for the Niva driver.
Fault Diagnosis
The stove supplied as standard will need to be modified for preventive purposes. The procedure will not take much time, but it will prevent many problems in the future. Driving experience suggests that the first severe frosts will undermine the “health” of the device. The list of main weaknesses is as follows:
- the optimal operating temperature range for model 2121 is from -5 to +10°C;
- inability to warm up the air in the cabin if outside is -8°C or lower;
- when the blowing power increases, the temperature does not increase;
- When driving in 2nd gear, the noise from the Niva's stove becomes significant.
That is why it is better to take the necessary measures in advance. The driver has few alternatives. On the one hand, everything remains in its place. The heating device is used at minimum power. During mild winters this is still tolerable, but with the onset of real cold weather the conditions will become unbearable. On the other hand, it's easy to spend a few hours rectifying the situation.
Further developments proceed as follows. If the heating in the car is running at ½ power, you can limit yourself to minor repairs. The main thing is to make sure that there are no noises or extraneous knocks, otherwise the Niva 21213 should immediately go for a technical inspection.
The presence of an unpleasant sound indicates the need to replace the device. A specialized retail network offers ready-made options for heating mechanisms for Niva. If desired, it can be assembled independently.
Interior ventilation and heating controls
Interior ventilation and heating are adjusted depending on the outside temperature.
Rice. 1-6. Interior ventilation and heating controls:
1 – side nozzles for blowing glass of the front doors; 2 – windshield blower nozzles; 3 – air flow regulator; 4 – lever for changing the direction of air flow; 5 – central nozzles of the interior ventilation system; 6 – heater tap control lever; 7 – air supply hatch control lever; 8 – distribution lever; 9 – holes in the heater casing; 10 – heater cover lever; 11 – rear window heating switch; 12 – heater electric fan switch.
Technical details of the procedure
The efficiency of the new heating system on Niva will be determined not by the cost of the purchased parts, but by their quality. To operate, you will need the following elements: a car resistor, a figure-eight heater and a “snail”. It is a mistake to believe that only “original” spare parts are suitable for repairing a heating device. The main requirement is technical compatibility.
If in doubt, a drawing of the heating system will provide clarity. The further procedure is as follows:
- Cut a new mounting hole. This is done carefully, because the reliability of the heating system’s operation depends on the quality of the preparatory process. It is recommended to place the engine as low as possible in the air duct, otherwise the device will rest against the hood. This should not be allowed to happen, otherwise the stove fan will not last long.
The heating system of a new model is checked by test switching on. It is recommended to switch modes smoothly. The device must remain on each of them for at least 5-7 minutes. The driver’s task is to make sure that the operation of the system is not accompanied by extraneous noise and vibration.
Heater diagram
1 – damper; 2 – electric fan casing; 3 – fan electric motor; 4 – impeller; 5 – heater radiator; 6 – radiator inlet pipe; 7 – radiator outlet pipe; 8 – radiator casing; 9 – air duct damper; 10 – air duct box; 11 – air duct for heating the windshield; 12 – central deflector damper; 13 – central deflector; 14 – crane control lever; 15 – control lever for the windshield heating flap; 16 – air duct damper control lever; 17 – control lever bracket; 18 – windshield heating flap; 19 – windshield heating damper cable.
Heating and ventilation system components
The heater fan (ME-255) supplies air to the passenger compartment through air ducts. Its rotation speed is controlled by a three-position switch on the panel.
An additional resistor is designed to reduce the fan rotation speed (intermediate rotation speeds).
The heater radiator is installed in the passenger compartment under the panel in a plastic case and serves to transfer heat to the interior.
Also interesting: Generator Niva 2121, 21213, 21214: which one is installed, replacement
The heater valve is installed at the inlet of the heater radiator and serves to regulate the flow of antifreeze that passes through it.
The damper control levers serve to distribute air flows that are directed into the cabin, as well as to control the heater tap.
The design of the heater has a number of disadvantages, for example, strong fan noise, as well as its low performance. We'll talk about this and other problems in the improvements section.
Keywords: stove 4x4 | 4x4 air ducts
Found an error? Select it and press Ctrl Enter..
- AvtoVAZ recalls Lada Vesta, XRAY and Largus due to problems with brakes
- What is the fuel tank volume and range of the Lada XRAY?
- Pros and cons of Lada Granta Cross
- What accessories for Lada 4x4 are best to choose?
Fan replacement
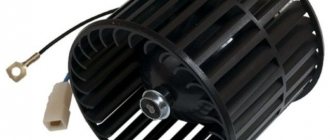
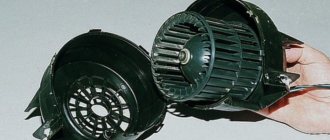
The main reason for the low temperature in the car is the poor performance of the heater fan, which forces warm air through it into the cabin. In addition, being directly inside the car, it operates quite loudly at high speeds and whistles unpleasantly, especially in winter. Therefore, it is replaced with a fan from a VAZ-2108 (“eight”) car, which together with the casing is often called a “snail”.
They place it inside the air duct, since it needs airflow.
The cross-section of the wires suitable for it needs to be increased, since the new motor consumes more power.
Also interesting: Suspension lift in the field yourself
The outer openings for air passage in the hood must be sealed to reduce the flow of cold air through them to the stove by half.
Dear friends, today we will tell you how to independently remove and install the electric motor of the stove fan on the Niva VAZ-21213 and VAZ-21214. The procedure is quite simple; we only need two screwdrivers, a Phillips screwdriver and a flathead screwdriver with a thin blade. The reason for removing and replacing the heater motor may be its squealing due to wear on the bushings.
Often even new heater motors suffer from this problem, so when replacing the heater motor, we recommend that you install a bearing motor. To get to the motor we need to remove the lower part of the stove body, and to get to it we need to remove the shelf, the radio panel and the decor on the tunnel.
Carefully remove the terminals from them and move all the buttons to the side. We recommend labeling the terminals, this will speed up the assembly process and help avoid mistakes!
Then use a flat screwdriver to pry the panel from above and carefully remove
They can be removed either by hand or by prying them with a screwdriver. Be careful, they are springy and can fly away in an unknown direction, to the land of lost things
After this, disconnect the motor wiring and remove it from the stove body
We remind you that the stove motor is essentially unrepairable and if it “squealed” then the bushings are damaged and then only a replacement is needed. Ideally, straight to the bearing. When assembling and installing, do not forget to put rubber spacers on the motor, otherwise vibration will occur. We perform assembly in reverse order. So you have learned how to independently remove and install the heater motor on the Niva VAZ-21213 and VAZ-21214. Good luck to everyone on the roads and fewer breakdowns.
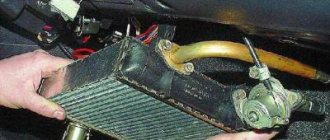
The procedure for removing the heater radiator on a VAZ Niva does not require any special skills or abilities. It is important to prepare the necessary materials and tools in advance. Most instructions for repairing car heaters contain a recommendation to drain the coolant before starting work. In practice, many car enthusiasts limit themselves to draining only that part of the antifreeze that is located in the radiator itself and the nearby pipes of the cooling system.