Replacing the VAZ stove valve
To replace the heater tap you need:
- New faucet.
- Worm clamp with a diameter of 16-23 mm.
- Antifreeze.
- Gaskets and seals.
- Rust remover.
- Metal brush.
- Socket and socket wrench for 10 and 13.
- Phillips and flathead screwdrivers.
- Silicone sealant.
It is best to carry out the replacement in the presence of an inspection hole or overpass, although if the question concerns specifically the “eight”, then you can get by with a set of socket heads with a cardan. By the way, it is also not necessary to remove the torpedo; just unscrew it and lift it up.
Step-by-step instructions for replacing the VAZ heater tap: 1. Place the car in a pit to make draining the coolant more convenient. We place a previously prepared container under the engine, unscrew the plug on the block and drain the coolant.
2. We clean the threaded connection on the two studs with which the stove faucet is attached, use WD-40 liquid and a metal brush specially designed for this purpose. Unscrew the clamps with a screwdriver.
3. We return to the salon. We unscrew the side panels in the car; for this we need a Phillips screwdriver.
4. Inspect the stove tap. The leak is clearly visible. We loosen the clamps of the pipes in the cabin; if you decide to change them, then loosen the pipes on the radiator side as well. The pipes are removed very carefully, because coolant may leak from the stove.
5. We go down under the car and, using a No. 10 socket wrench, unscrew the crane mounting nuts. Next, in the cabin we dismantle the spring clamp by disconnecting the control cable from the tap, after which the tap itself simply needs to be pulled towards itself by the pipe.
6. Replace the old faucet.
7. Then we begin to install the new one. Here it is necessary to remember that before screwing the crane, you must first connect the cable, and only then the crane can be screwed to the body.
8. Next, we assemble everything in the reverse order, and also install new seals and gaskets between the heater valve and the car body. When installing the pipe, sealant should be used.
9. You also need to remember about the sealant; it is imperative to add it at the moment when you connect the pipes in order to reduce possible antifreeze leakage in the future. We put on the pipe and secure the clamp. We tighten the drain plug and pour coolant into the radiator.
Do-it-yourself replacement of the VAZ 2109 stove tap
It's no secret that such unpleasant moments as car repairs are not uncommon.
One good thing is that large components and parts are not prone to breakdown so often. But not a single car owner could avoid minor repairs.
Sometimes there is a problem with the heating stove faucet. When that very moment has arrived, the owner of a VAZ 2109 will understand immediately. A coolant leak will not go unnoticed. The car interior will fill with an unpleasant odor and the floor covering will get wet. Another faucet breakdown is associated with the inability to switch off the air supply. It is clear that replacement is inevitable.
Tap function
How to change the heater radiator of a VAZ 2109. Do-it-yourself replacement instructions
In a VAZ-2109 car, coolant circulates through two circuits. If a large one is used, then it passes through the engine. It heats up there and then goes to the radiator of the heater itself. This element is blown by a special fan, which drives the air heated by the stove into the cabin.
In summer, the large circuit is not used, and the liquid circulates exclusively through the small circuit, which includes the main radiator and power plant. The air ducts of the stove provide ventilation to the interior.
The tap itself regulates the supply of hot coolant to the heater or completely blocks its access there. Accordingly, during the warm season it is constantly in a closed position.
Tap selection
Before you begin replacement, it is important to select a new, high-quality faucet that can reliably serve the heating system of your VAZ 2109.
Factory
Crane type
Peculiarities
This is a standard type of faucet that the VAZ 2109 is equipped with from the factory. Its main advantage is its affordable price. As for the reliability and frequency of jamming, here we are talking about obvious shortcomings. It is worth taking such a faucet as a replacement only if you could not find others
Recommended Actions
How to open the tap of a Gazelle business stove
So, how to change the heater tap on a VAZ-21099? How easy is it to host a self-planned event?
Sometimes a problem with heating a car interior can be successfully corrected only if you understand how to adjust the faucet of the VAZ-21099 stove. In this case, you will need to remove the entire device to correctly determine the nature of the problem. What is the best way to proceed?
- Initially, you need to disconnect the hoses from the pipes located on the tap of the heater.
- The next step is to unscrew the faucet fasteners and remove it.
- The rods going to the part must be dismantled.
- After this, it is recommended to remove the trim panel located on the floor of the vehicle.
- The air duct located in the tunnel should be disconnected.
- Now you need to carefully remove the heater wires, unscrew the mounting nuts and remove the device.
After this, you can change the heater tap. Knowing where the heater tap is located on the VAZ-21099 and correctly determining its functionality, it will be easier to cope with subsequent tasks. All steps must be performed in reverse order.
Despite the ease of the task, you may still need the help of a friend. If guidance is provided, you can understand how to open the heater valve on a VAZ-21099 and make it work. In fact, it is possible to miss a small detail in the pipes and nuts, but fixing it is not so easy. It is not as easy for a beginner to find the slightest error as we would like.
It is important to understand that the valve of the VAZ-21099 injector stove must be positioned correctly for successful heating of the car interior:
- an additional pipe is installed in the thermostat housing;
- A special plug for the water pump is placed in the housing.
As a result, liquid from the heating equipment will flow to the thermostat, and then continue its cycle. It is assumed that the thermostat will be included in the automatic cooling system, so there is no need to worry about overheating or excessive cooling of the engine.
In most cases, the question of how to change the used stove faucet is not so easy. However, it can be solved just as successfully as many other issues related to the heating system of a domestic vehicle. Only if you correctly replace the used faucet can you count on successfully heating the car interior and maintaining the most comfortable temperature.
How to Open the Faucet on the Stove VAZ 2109
How to remove the stove faucet VAZ 2114
Self-replacement of a VAZ crane stove2109
high and low panel
In practice, it is usually necessary to replace the heater valve if it begins to leak or becomes stuck in order for the heater regulator to stop moving. The old man cannot be restored and cannot be restored. Although without this element the heating in the room does not work normally.
How to replace a damaged stove valve on a VAZ car2109
, described in this article.
Error is a characteristic
But in fact, the faucet was leaking, and the following signs appeared:
- traces of water were found on the floor in the cabin;
- the corresponding smell of antifreeze appeared in the car.
If you notice any of the above symptoms, you should definitely look for a broken node. Remember that if you don't fix the damage in time, the repairs will cost a lot of money and you won't be able to do it yourself.
How to check? It will be useful to get under the hood of an unfamiliar engine. It should be emphasized that leaks sometimes occur in different places in the cooling complex of accounting programs, so it is useful to study all this. It is more convenient to do this with a flashlight. Refrigerant, namely, often drips from:
- radiator;
- connection points for hoses and pipes.
If the fault is found to be the fault of the faucet, the owner must begin replacement as soon as possible.
This requirement is even more relevant if it is winter, because without heating it will be very inconvenient to move in the car, and also dangerous if the road continues through a sparsely populated area.
Which one is better to choose?
The duration of its operation and the reliability of the entire crane practically depend on the properties of the new crane. Accounting
(Software).
Of course, there are three types of this unit on the Russian market. There are reasons:
Malfunction - characteristic symptoms
The following signs indicate that the faucet is leaking:
- traces of liquid are found on the floor in the cabin;
- A characteristic smell of antifreeze appeared in the car.
Having discovered one of the above symptoms, it is necessary to inspect the failed unit. It is important to understand that if the breakdown is not repaired in a timely manner, then repairs will subsequently cost much more money, and it will most likely not be possible to do it yourself.
How to perform an inspection? You will need to get under the hood on the engine side. It should be noted that leaks can occur in various places in the cooling system, so you will need to inspect the entire system. It is more convenient to do this with a flashlight. Coolant, in particular, often drips from:
- radiator;
- joints of hoses and pipes.
When it turns out that the faucet is the culprit of the malfunction, the owner needs to start replacing it as soon as possible.
This requirement is even more relevant if it is winter, because without heating in a car it will be very uncomfortable to move and, moreover, dangerous if you have a long trip through a sparsely populated area.
Replacement
Having discovered that the problem lies precisely in a faulty, failed faucet, it will have to be replaced.
The heater valve is located on the front passenger side under the console.
To replace you will need the following set of tools and materials:
- New faucet. A ball or ceramic one will do, but at worst you can use a factory one;
- Set of gaskets and seals. It should come with the new faucet;
- The almighty WD40;
- Metal brush;
- Socket and socket wrenches for 10 and 13;
- Set of screwdrivers (phillips and flat);
- Silicone based sealant;
- Container for draining coolant;
- Fresh antifreeze or antifreeze;
- Lift, pit or overpass.
When everything is ready, you can start working.
- Drive the car into a pit, put supports under the wheels, wait until the engine cools down, apply the handbrake and disconnect the negative terminal from the battery.
- Take a container to drain the coolant, unscrew the drain plug from the radiator and drain the antifreeze or antifreeze from the system.
- After draining all the coolant, go to the pipes that go from the engine to the heater tap. Loosen the tension of the clamps on the pipes, clean the threaded connection of the pair of studs. They hold the heater tap.
- Using WD40 penetrating agent and a metal brush can effectively clean the joints. Practice shows that without this procedure, problems may arise when dismantling the stove faucet.
- Unscrew the clamps with a screwdriver.
- Remove the pipes one by one. Be careful here as coolant may continue to leak. This is due to imperfections in the coolant drain system. It is better to work with gloves and keep a container ready.
- Let's go to the car interior. Here, remove the side trim of the dashboard, dismantle the pipes, if necessary.
- If the pipes are intact and replacement is not needed, it is not at all necessary to completely dismantle them. Again, there are antifreeze residues in the pipes, so keep dry rags on hand.
- We return to the hole under the car and use a 10 mm socket wrench to remove the faucet mounting nuts.
- We go back to the salon, where we pull the tap towards us and remove the spring clamp. Now you can disconnect the control cable from the faucet.
- This way you can easily remove the old faucet, replacing the worn, damaged element with a new faucet.
- Before you put it in place, connect the cable. Only now is it possible to tighten the valve on the body.
- Assembly is performed in reverse order.
- But here many people make the mistake of leaving behind the old gaskets and seals between the body and the faucet along with the new faucet. Do not do that. Moreover, gaskets and seals are always included with a new part.
- When connecting pipes, it is advisable to use silicone-based sealant. This will help minimize the likelihood of leaks occurring at the joints in the future.
- Be sure to tighten the drain plug, and then feel free to fill the system with new coolant.
As you can see, there is nothing complicated about replacing the heater tap on VAZ 2109 cars. The procedure is easy to do with your own hands and does not require the intervention of specialists or spending money on their services.
But if you are not confident in your abilities or you do not have time to repair it yourself, find a trusted car service center.
The heater tap is a mechanism designed to regulate the flow of coolant into the heater radiator. On VAZ 2114-2113-2115 a single heater faucet from the VAZ 2108 is installed. The main problem with the heater faucet on a VAZ is that it oxidizes, jams, and leaks, resulting in a puddle of coolant forming under your feet, which can damage the electronics.
Let's consider the following situation: when spring comes, we close the heater tap, i.e. Move the stove temperature regulator to the extreme left position. Throughout spring, summer and autumn, we very rarely regulate the temperature of the stove, as a result of which the faucet turns sour. With the arrival of cold weather and winter, we open the faucet, that is, we turn on the stove in “hot” mode, as a result of which the faucet flows. In this case, the faucet will need to be replaced: How to replace the stove (heater) faucet?
Replacing the radiator on the low panel
This happens especially quickly if the coolant is not changed for a long time. Another important factor influencing the reserve of a part is the quality of the material from which the part is made.
Replacing the radiator of a VAZ-2109 stove is not an easy task, but it is quite doable on your own.
This method does not require unscrewing the dashboard and draining the coolant. The replacement work itself will not take more than an hour. But the only disadvantage of this method is the need to cut down the magazine shelf under the glove compartment. What you need:
- Hacksaw for metal.
- Phillips screwdriver.
- A 7 or 8 wrench, depending on the clamps.
- Radiator for replacement.
- 3 corks from a bottle of champagne.
- Container for remaining coolant.
Progress
Move the front passenger seat as far back as possible. Find the dashboard fasteners on the right and unscrew them. Pull the instrument console towards you and insert a spacer into the resulting gap; you can use a block of wood for these purposes. Close the heater valve and place rubber mats or old rags where coolant may leak. Open the hood and unscrew the expansion tank cap. To reduce pressure, close the lid. The radiator is located between the glove compartment and the lower shelf. To avoid spilling the coolant, perform all actions very quickly. In addition, you will need 2 rubber plugs or champagne corks to plug the holes in the hoses. Place your hands through the gap in the retracted instrument panel towards the part that needs replacing. Remove the lower pipe and immediately plug its hole with the thumb of your left hand, then insert the plug into the hose with your right hand. Drain the coolant from the pipe into a prepared container. Disconnect the heater element and replace it with a new one
Remove the part carefully: first lift it up, then move it a little and pull it down. This will make it easier for you to remove it
The progress of work on replacing the heating system of cars with a low dashboard is similar to models with a high one. However, replacing the radiator does not require moving or removing the front seats.
Also, before starting work, be sure to remove the cover from the steering wheel so as not to damage it when bending the instrument console. The most reliable replacement option is a copper stove radiator; it is the most expensive of all existing ones, but it is the most reliable and in case of damage or leakage, it can be repaired by soldering the resulting hole.
When removing the heater radiator on a VAZ-2109, do not forget about safety, the coolant is hazardous to health, try to protect your hands with at least gloves, and wash them thoroughly after work. If you have any doubts that you will not be able to cope, it is better to seek help from car service But it’s much more pleasant to figure it out yourself and save a couple of thousand rubles.
Features of the VAZ 2109 stove design
1. Heater casing mounting bracket; 2. Heater control damper; 3. Left heater casing; 4. Leg heating damper rod; 5. Radiator gasket; 6. Radiator; 7. Heater gasket; 8. Electric motor; 9. Fan shrouds; 10. Fan impeller; 11. Heating damper; 12. Heated windshield air duct; 13. Side nozzle air duct; 14. Side nozzle; 15. Central nozzle flap; 16. Blade pusher; 17. Blade axis; 18. Shoulder blade; 19. Lever for shutting off the central nozzle; 20. Windshield heating damper rod; 21. Lever for changing the direction of air flow; 22. Air heating control handle; 23. Windshield air supply handle; 24. Leg air supply handle; 25. Control lever bracket; 26. Bracket for fastening the rod shell; 27. Crane control rod; 28. Heater control damper rod; 29. Foot heating flap; 30. Axes of air heating control levers; 31. Screw clamp; 32. Heater valve; 33. Crane body; 34. Valve lever; 35. Hoses connecting the tap to the heater radiator; 36. Internal ventilation duct; 37. Windows for heating the feet of rear passengers; 38. Heater valve; 39. Driver's foot heating window; 40. Facing the central pillar; 41. Internal cavity of the central pillar; 42. Exhaust ventilation duct; 43. Upholstery of the central pillar; 44. Exhaust ventilation deflector lining; 45. Rubber valve; 46. Deflector housing; 47. Exhaust ventilation deflector; 48. I. Heater; 49.II. Heater operation diagram; 50.III. Heater valve; 51.IV. Interior exhaust ventilation
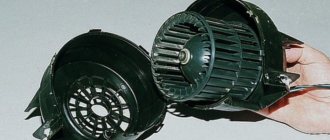
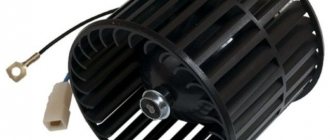
The stove consists of 2 plastic casings (right and left), which are connected to each other along the perimeter with fastening brackets. A special harness is placed into the grooves of the casings for sealing. The electric fan, which forces air into the passenger compartment, is secured with two screws on top of the heater. The design of the stove is made in such a way that the electric fan can be easily removed from the engine compartment.
An electric motor of type 45.3730 is attached to the fan casings, on the shaft of which an electric fan impeller with three rotation speeds is installed thanks to two resistor spirals. To obtain the required rotation speed of the impeller, an additional resistor is provided, attached to the hole in the stove casing on the left side with a screw.
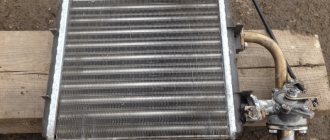
The radiator for heating the supplied air is installed in the heater casings. It is attached to the right casing with three screws and sealed with a polyurethane foam gasket. It consists of:
- two rows of tubes,
- cooling plates,
- two plastic tanks.
The heater tap, consisting of a housing with two pairs of pipes, is connected to the cooling system by rubber hoses. The cooling system pump circulates fluid through the radiator. On the supply line in the faucet body, a plate faucet valve is installed on the axis, which has a hole that allows coolant to pass through. The valve lever is connected by a rod to the handle lever, which can be used to control air heating. When you turn this lever, the hole in the valve will open the line so that fluid begins to flow into the radiator. Read more about replacing the heater valve here.
The stove is controlled using three handles, the levers of which are mounted on the axes of a plastic bracket attached to the instrument panel with four screws. The heating control handle acts on the valve lever through the rod and on the damper drive lever. When it moves completely to the right, both the valve and the damper are fully opened, and air is supplied by an electric fan through the radiator, where the heated coolant flows.
When the handle is in the middle position, the valve and damper are in intermediate positions; in this case, part of the air passes through the radiator, and part bypasses it. This reliably ensures the required degree of air heating at the moment. If the handle is placed in the extreme left position, the valve and control damper are completely closed, and the air supplied to the cabin is not heated.
The upper left handle, which regulates the air supply to the feet of the driver and passengers, is connected to the damper lever by a rod. When it is moved to the left, the foot warmer flap opens and air from the casings is directed into the windows. On the left and right sides, air is supplied to the feet of the driver and front passenger. Air is supplied to the feet of passengers in the rear seats through the interior ventilation duct.
Stove VAZ 2109
The design of a car heater is not as complicated as it might seem at first glance. The base consists of two plastic casings connected by brackets. They have a heating radiator installed. Air is supplied through the radiator to the car interior by a fan.
The electric motor is attached to the fan casings. The coolant passes through the heater core thanks to a pump. A faucet is also connected to the cooling system. Its connection occurs through rubber hoses. There are two more pairs of pipes in the housing. The faucet valve has a hole through which coolant flows. A special valve lever controls air heating. Three knobs on the instrument panel control the heater. With their help, the faucet and the stove damper are opened or closed. If the tap is open, heated coolant circulates in the heating system. Closed - cold air blows.
VAZ 2109 (low panel). where is the heater valve...
The faucet is located just above the passenger foot area, and closer to the central tunnel, on the shield separating the passenger compartment and the engine compartment.
Usually I change the heater valve on a VAZ 2109 car in two cases, if it has become faulty and does not switch from cold air to hot air. In this case, repairs usually do not require any urgency and are done as needed. But in the second case, when the heater valve on a VAZ 2109 car leaked, there is no place to put off repairs, since coolant gets into the cabin and leaves the cooling system, which in itself is not good and can lead to bad consequences., but besides this The cabin immediately smells unpleasant, the carpet becomes wet, and in general there is a lot of inconvenience.
Therefore, in this article we will talk specifically about replacing the heater tap on a VAZ 2109 car.
When choosing to replace the heater valve itself on a VAZ 2109, we would strongly recommend that you purchase a domestically produced ceramic heater valve. These stove taps are more reliable and have earned their respect among owners of nines.
Necessary tool for work:
— container for draining coolant
Screwdrivers
Key to "10"
Socket wrench "13"
Well, of course, the work will be carried out either in an inspection hole or on lifts, since you will later see for yourself that it will be very difficult to unscrew some of the pipes from the ground.
Now let's move on to replacing the heater valve on a VAZ 2109:
First, you need to drain the coolant; to do this, place the prepared container under the car engine, which is already on a pit or lift, and unscrew the drain plug, thereby pouring the contents of the cooling system into this container.
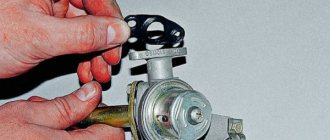
Now that you have drained the liquid, you still shouldn’t move the container far away, since now we will be unscrewing the pipes in which there is probably still liquid left. Having reached the pipe going from the engine to the heater tap, you should release the clamps and clean the threads of the two studs of the heater tap with a metal brush, after spraying them with WD-40 (image 3)
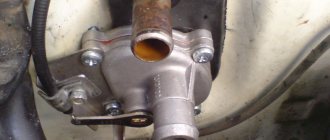
This is very important, because if you do not prepare the thread, you may encounter a problem during the unscrewing process. After all, studs are ordinary bolts, the heads of which are buried in the plastic body of the faucet (as shown in image 2)
And the fastening nuts are self-locking, with a plastic ring, but it won’t unscrew easily. Moreover, if the threads are clogged and rusty, then rotation in the housing is practically guaranteed. In this situation, it will be practically impossible to disassemble the stove faucet, or it will not be so easy, don’t be lazy and spend an extra couple of minutes and save at least an hour on this.
Now remove the pipes, draining their contents into a container with coolant
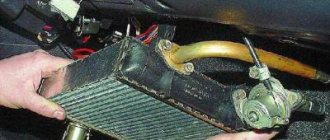
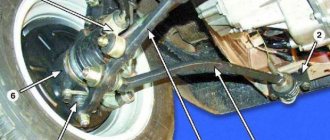
Now let's go to the interior of the VAZ 2109 car, you should remove the side trim of the torpedo (shown in image 4), after removal you should get to the pipe clamps (see image 5). If the clamps don’t look very good and you decide to replace them too, then you should unscrew them from the other side near the radiator. Most likely, coolant will still leak from the radiator, so a rag will not hurt us.
Now that the pipes have been removed, you should crawl under the car and unscrew the fastening nuts of the heater tap using a “10” barb. Since we prepared the nuts and they have already acidified during this time, I think this should not be a problem.
When they are unscrewed, we will return to the interior of the VAZ 2109 car. We must pull the heater valve towards ourselves (from the passenger side) and in this position remove the spring clamp and disconnect the control cable from the valve (shown in image 6). Now we can begin installing a new heater tap; first we need to connect it to the cable, and only then screw it to the body. If you do it the other way around, it will be very difficult to install the spring cable with the clamp.
Next, everything should be done in reverse order. You should also give some useful tips: when installing the pipes in place, use sealant, this will protect you from leaks at the joints of the pipes, and rubber seals should be placed between the tap and the body as shown in image 7
Well, that’s all, now you can easily replace the heater on a VAZ 2109 car yourself
Cable location
Learn more about how this process is carried out in the video below (the author of the video is the Engine Repair channel! And interesting!).
So, get your pliers ready and remove the upper part of the dashboard. By the way, you can do without dismantling, but this way you can clearly see where the central damper of the VAZ-2109 heater is located, assess its condition and control the adjustment process. After removing the panel, find the fastening cable, which is located to the right of the accelerator pedal and, using pliers, carefully bend the wire.
In the “nine”, the VAZ heating system operates using an electric drive. The instruction manual for the VAZ 2109 high panel shows an electrical diagram of the stove's operation. The interior heater connection diagram consists of:
- fan motor;
- the ignition switch, which turns on the stove;
- operating mode switch;
- additional resistor;
- fuse mounting block (fuse F4 is responsible for the stove in the “nine”).
Kia Rio 2021 DISCOUNT RUB 190,000.
- Official dealer
- Credit 4.5%
- Installment plan
- Trade-In
- 95% approval
- No down payment
The first thing you need to do is turn off the power to the car. To do this, simply remove the negative terminal from the battery. Remove the panel trim in the area of the ashtray, radio and the mounting of the heater control levers - to do this, unscrew the 4 fastening bolts. Disconnect the wires from all switches: lights, foglights, radio, etc. Move the front seats all the way back or, in general, remove them so that they are not in the way. Remove the seat belt anchors on the floor. Also remove the plastic trim that holds the gear lever boot on. From under this casing you will need to remove the lower air duct
Very carefully disconnect the clamps from the faucet, and then the cables themselves. To make it convenient, first disconnect the leg heating flap rod (3), then the windshield heated flap rod (14), then the rod that controls the valve (19) and the rod that controls the flap (20).
On the back of the heater, disconnect the wires that control the fan speed and the fastenings of the wires, backlights and levers. Not quickly, so as not to damage it, lower the heater control lever diagonally downwards. Now you can remove the cable and replace it with a new one.
As you know, on the VAZ 2109, interior heating is provided by air heated by a radiator. On the VAZ 2109, the heating and ventilation of the interior are interconnected and represent a kind of special system. In this article we will look at the general principles of operation of the heating and ventilation system of the VAZ 2109.
Like most repairs, this procedure is carried out on an overpass. Replacement requires the following tools:
- Container for draining coolant;
- Classic set of wrenches and screwdrivers;
- Sealant;
- WD – 40;
- New faucet with a set of rubber gaskets.
Operating procedure:
- 1. Display the VAZ 2109 car;
- 2. Place the prepared empty container under the motor and, opening the drain hole, allow the coolant to drain;
- 3. Next, you need to unscrew the pipes running from the engine to the heater. To do this, just loosen the fastening clamps. It happens that they do not give in, then it makes sense to use a “bucket” and clean the threads of the crane bolts;
- 4. Remove the pipes and drain the remaining antifreeze;
- 5. Remove the side trim of the dashboard in the car interior. Here, too, unscrew the pipes;
- 6. Then, using a 10mm wrench, loosen and unscrew the faucet fastening nuts. It's under the car. Continue working inside the car again and tighten the tap on the passenger seat side. Then remove the clamp. Disconnect the control cable;
- 7. The next stage is the installation of a new tap. First of all, it must be connected to the control cable. Now put the spring clip in place. Tighten the fasteners. When installing pipes, use sealant.
Where is the heating system on the domestic nine? How to disassemble and remove hoses for repair, for what reasons may the device stop working? If the VAZ 2109 stove does not heat up, first of all you need to understand the reasons why this is happening.
Radiator device for heating system
- Replacing the radiator of the VAZ 2109 stove - Lada master
- What to do if the VAZ 2105 stove does not heat well
- Repair of generator on VAZ 2108, VAZ 2109, VAZ 21099
- Starter 2108, how to make repairs yourself. How to repair a VAZ 2108 starter. Repair and replacement of a VAZ 2108 starter.
Self-replacement
Like most repairs, this procedure is carried out on an overpass. Replacement requires the following tools:
- Container for draining coolant;
- Classic set of wrenches and screwdrivers;
- Sealant;
- WD – 40;
- New faucet with a set of rubber gaskets.
- 1. Display the VAZ 2109 car;
- 2. Place the prepared empty container under the motor and, opening the drain hole, allow the coolant to drain;
- 3. Next, you need to unscrew the pipes running from the engine to the heater. To do this, just loosen the fastening clamps. It happens that they do not give in, then it makes sense to use a “bucket” and clean the threads of the crane bolts;
- 4. Remove the pipes and drain the remaining antifreeze;
- 5. Remove the side trim of the dashboard in the car interior. Here, too, unscrew the pipes;
- 6. Then, using a 10mm wrench, loosen and unscrew the faucet fastening nuts. It's under the car. Continue working inside the car again and tighten the tap on the passenger seat side. Then remove the clamp. Disconnect the control cable;
- 7. The next stage is the installation of a new tap. First of all, it must be connected to the control cable. Now put the spring clip in place. Tighten the fasteners. When installing pipes, use sealant.
Having finished installing the new heater part, you need to pour coolant into the system and check how the replacement went as a whole.
Replacing the heating valve on a VAZ 2109
Before starting work, let's decide on consumables and tools. Here they are:
- new furnace tap;
- a pair of steel clamps for hoses with a diameter of 20 mm;
- canister of new antifreeze (4 liters);
- metal brush to remove rust;
- a set of rubber gaskets for the heating tap VAZ 2109 (in case the old ones are worn out);
- silicone-based automotive sealant;
- a pair of screwdrivers: Phillips and flat;
- socket heads for 13 and 10;
- set of open-end wrenches.
Sequence of operations
First of all, you need to pay attention to two points. Firstly, it is most convenient to change the stove valve in the inspection hole
At least on an overpass. And secondly, before replacing the valve, the engine must be allowed to cool properly, and the antifreeze mode regulator should be set to the “hot” position. This will allow the antifreeze to completely drain from the heating radiator.
- A container is installed under the car standing on the pit to drain the old antifreeze. The cap on the radiator is unscrewed and the coolant is drained.
- Under the hood there is a pair of hoses attached to the faucet pipes using clamps. These clamps are thoroughly cleaned of dirt with a wire brush. If they are very rusty, you can use WD40. Once the rust is gone and the bolts on the clamps begin to move, the clamps are loosened using a flathead screwdriver. As a rule, a lot of rust and dirt accumulate on the heating tap clamps
- Inside, use a Phillips screwdriver to unscrew the screws holding the side panels. The side panel is held in place by two self-tapping screws, unscrewed with a Phillips screwdriver.
- Access to the heating tap is provided. On the interior side there are two pipes with clamps. These clamps also need to be loosened. After this, the hoses are removed from the pipes (and this must be done very carefully: antifreeze may remain in the hoses, which will certainly spill onto the floor of the cabin). After removing the panel, access to the tap opens, you can loosen the clamps and remove the hoses
- The faucet is mounted on three 10mm nuts. They can only be unscrewed with a socket wrench. There is also a spring-loaded lock with a cable. The cable is detached manually. The faucet is held on by three 10mm nuts; they can only be removed with a socket head
- The old tap is removed from the niche and replaced with a new one. After which the elements of the VAZ 2109 heating system are reassembled. The faulty faucet is removed from its niche - you can install a new one
Video: changing the heating valve and radiator on a VAZ 2109
So, replacing the heating valve on a “nine” is a task that even a novice car enthusiast can do. All you need to do is follow the recommendations above and remember to drain the coolant before starting work.
Problems with VAZ 2108-99 heaters with a high panel
Almost all owners of these cars note that cars with a high panel have a “colder” stove. Moreover, measures such as replacing and adjusting the heater tap, replacing an aluminum stove radiator with a copper one do not bring the desired result.
The point is a flaw, or, more precisely, a miscalculation in the design of the heater as a whole. For comparison, look at how heaters with low (a) and high (b) panels are arranged:
The heater control damper 8, working “paired” with a tap, on a stove with a high “torpedo”, is structurally designed to create less resistance to air movement, which contributes to better “purging” of the radiator.
But in reality, it constantly warps, as a result, cold air is not cut off (when the tap is open), but gets into the cabin in addition to the radiator. It’s practically impossible to eliminate this on your own, so some owners change the stove body by installing the “old” version.
What are the signs of a malfunction?
You only need to replace the heater valve on a VAZ 2108-09 if you notice problems with its tightness. The most important sign of a leaking heater tap is the appearance of puddles of coolant in the car interior on the carpet in front at the passenger’s feet and a typical sweetish smell.
In most cases, replacing the heater tap on cars such as the VAZ 2108 and VAZ 2109 can be done by yourself to save money.
Common causes include a leak under the shift lever or valve diaphragm. In these two cases, it is not recommended to postpone replacement until later, because a leaking heater tap is not only a source of an unpleasant odor, but also a decrease in the required level of coolant.
Therefore, to make the task easier, let’s consider which option to choose for this part and clearly demonstrate how to do it.