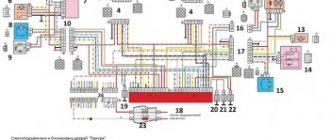
↑ Diagram of the carburetor electro-pneumatic valve control system
1 - microswitch in the carburetor;
2 - pneumatic valve; 3 — mounting block; 4 - ignition relay; 5 — ignition switch; 6 — pneumatic valve control unit; 7 - ignition coil; A - to terminal “30” of the generator; B - order of conditional numbering of plugs in the control unit. A working control unit 25.3761 should turn off pneumatic valve 2 when the engine crankshaft speed exceeds 1600 min-1 and turn it on again when the speed drops to 1200 min-1.
Before checking the operation of the unit, you must make sure that the vehicle wiring harness is connected correctly to the control unit (see view “B” of the control unit connector).
The functionality of the control unit is checked using a tachometer and a voltmeter (with a measurement range of 0–15 V) in the following order:
- disconnect the wires from the microswitch installed on the carburetor;
- connect 1 voltmeter to the control unit using a special adapter connector 2;
- start the engine and, gradually increasing the speed, monitor the voltmeter readings: after starting the engine, the voltmeter should show a voltage of at least 10 V, and at the moment the pneumatic valve is turned off, an abrupt decrease in voltage to a value of no more than 1.5 V;
- after turning off the pneumatic valve, gradually reduce the rotation speed until the pneumatic valve turns on: the voltmeter should show a sudden increase in voltage to at least 10 V.
Restoring stable idle
Restoring a stable idle shouldn't be too difficult. Troubleshooting procedure;
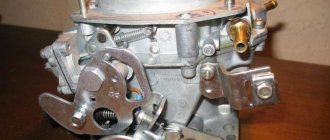
- Using a key set to “17”, unscrew the pneumatic valve from the carburetor.
- The valve is disassembled, washed well with kerosene or pure gasoline and blown out with compressed air.
- We screw it into place and check its functionality.
If, however, the cause of the unstable idle speed has not been eliminated, you need to check the power supply control circuit. If the power supply circuit is broken, the carburetor pneumatic valve is constantly in the closed position. This results in the engine not idling. Repairing the open circuit will solve this problem without much effort.
Malfunctions associated with the electro-pneumatic valve are extremely rare, but if this happens, it should be replaced.
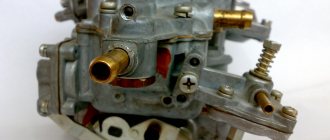
Vacuum from the intake manifold is supplied through the pneumatic valve to the economizer diaphragm, due to which the economizer needle valve opens
When the pneumatic valve is turned off, the economizer cavity above the diaphragm communicates with the atmosphere - the needle valve closes, interrupting the supply of the fuel mixture through the idle channel to the engine.
Control unit 25.3761 turns off the pneumatic valve at an engine speed of 1600 rpm and turns it on again when the speed drops to 1200 rpm.
The microswitch supplies voltage to the air valve, bypassing the control unit, when the throttle valve is open.
Diagram of the forced idle economizer system (EFS): 1 - solenoid pneumatic valve; 2 — intake manifold; 3 — economizer needle; 4 — economizer body; 5 — adjusting screw for the amount of mixture; 6 - microswitch; 7 — mounting block; 8 — ignition switch; 9 — ignition coil; 10 - control unit.
1. Connect a voltmeter or test lamp to the valve power wires.
If there is no voltage on them when the ignition is turned on, we check the control unit (Checking the EPHH VAZ-2107 unit).
2. To further check the valve, disconnect the connecting hoses from it.
3. We put a suitable rubber hose on fitting “1” (central) and create a vacuum in it with our mouth. In this case, close the fitting “2” (side) with your finger. The valve must be sealed.
Turning on the ignition, apply voltage to the valve output. The valve of fitting “1” should open, making a characteristic click, and close again when the voltage is removed.
4. We replace the faulty electro-pneumatic valve. To do this, use an “8” wrench to unscrew the valve mounting nut.
We connect the hose from the carburetor economizer to the side fitting, and the hose from the intake manifold to the central one.
↑ Checking the functionality of the control unit
The operation of the control unit is checked using an adapter connector with a voltmeter in the following order:
- disconnect the wire from the carburetor limit switch and connect the tip of this wire to ground;
- connect a voltmeter to the control unit using an adapter connector;
- start the engine and, gradually increasing the speed, monitor the voltmeter readings: after starting the engine, the voltmeter should show a voltage of at least 10 V, and at the moment the valve is turned off, an abrupt decrease in voltage to a value of no more than 0.5 V;
- after turning off the valve, gradually reduce the rotation speed until the valve turns on: the voltmeter should show a sudden increase in voltage to at least 10 V;
- set the crankshaft speed within 2200–2300 min-1, disconnect the tip of the wire going to the carburetor limit switch from ground, and then reconnect it to ground. When the wire is disconnected from ground, the valve should turn on, and when connected to ground, it should turn off.
It is possible to check the unit without a voltmeter by the characteristic knock of the valve when turning it off and on.
| Terminal | Address |
| 1 | To terminal "K" of the ignition coil |
| 2 | Weight |
| 3 | — |
| 4 | +12 V from fuse “10” |
| 5 | Carburetor limit switch |
| 6 | Carburetor solenoid valve |
| 7 | — |
Valve check
Sheriff alarm wiring diagram aps95lcd b4.
sheriff car alarm wiring diagram. full activation of the security system. Checking the solenoid valve for correct operation can be carried out in three different modes:
- when the engine is idling;
- when braking the engine;
- after turning off the ignition.
The general serviceability of the valve can be checked after turning on the ignition. To do this, you need to increase the engine idle speed to 2100 RPM. After crossing this mark, a characteristic click should be heard, which means that the valve has closed. After this, you can lower the speed, as soon as its number reaches 1900 RPM, a click should be heard again, meaning that the valve has opened.
When braking with the engine while the gear remains engaged, the valve should not open, even if the engine speed has dropped below 1900 RPM. If a click is heard at this moment, the valve is not working properly.
If detonation and vibration occur after the engine ignition is turned off, this means that the valve does not close the idle jet and the fuel mixture enters the engine, which also indicates a malfunction of the solenoid valve.
You can also simply check the valve by disconnecting the power cable with the engine running. The motor should stop immediately after disconnecting.
You can check the valve by completely disconnecting the device from the carburetor. After dismantling the valve, you can connect it to the battery, after which you should hear a click and the valve needle should retract into the device. After turning off the power, you should hear a click again and the needle should move out.
The problem with the solenoid valve may lie not only in its malfunction, but also in the electronic control unit and in the wires. You can check the functionality of the wire using a multimeter (12 V ± 10%).
Checking the functionality of the control unit will require connecting the valve to the battery using an additional wire. A standard voltage control light is also required. First you need to disconnect the supply wire from the valve and connect it to the positive terminal of the battery. An additional wire is also connected to the battery positive. After this, you need to start the engine, at the cut-off of 900 RPM the warning lamp should light up, after reaching 2100 RPM it should go out. When it drops to 1900 RPM, it lights up again. If these indicators are met, but the engine stalls at idle, then the fault is probably in the valve control unit.
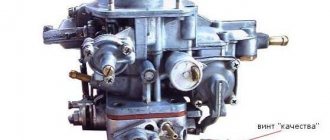
Carburetor repair VAZ 2107
Repairing a carburetor is considered a rather complicated procedure. Any operation requires care and precision. Moreover, to avoid contamination from entering the carburetor, all work must be carried out under virtually sterile conditions.
For self-repair, you will need a repair kit - a factory-prepared set of materials and parts necessary for the work. There are two types of standard repair kit:
- Full. Includes absolutely all possible elements that may be required to replace failed parts. It is usually purchased during major repairs or other serious faults.
- Incomplete. Allows you to carry out only one repair operation (for example, replacing jets).
It is more profitable to buy incomplete repair kits, since you can select only those kits that are really needed.
When repairing a VAZ 2107 carburetor, you will need a standard set of tools and a carburetor cleaner, which can be purchased at any auto store.
Carburetors become dirty quickly. In a relatively short time, jets, channels and other small elements can become clogged with dust and impurities in the fuel. The moving parts of the device wear out quickly during aggressive driving. This primarily concerns sealing gaskets.
Typically, the carburetor repair process consists of disassembling, washing all parts, replacing worn and damaged elements, and reassembling.
Recommendations before repair
Before starting repair work, you should pay attention to the following points.
- Work should be carried out on a cold engine to avoid the possibility of burns.
- You need to make sure that there is little fuel left in the system. Otherwise, most of the gasoline must be drained.
- Repairs must be carried out outside in dry weather or in a well-ventilated area (gasoline fumes can cause nausea and dizziness).
- You should prepare a clean place in advance for disassembling the carburetor and a container for washing it.
Read also: Priority signs for pedestrians
Depending on the symptoms of the malfunction, you should pay attention to individual parts and components of the carburetor:
- If the engine idles unsteadily or stalls, then the economizer valve needle is most likely worn out.
- If during disassembly water is found in the cavity, then the carburetor has lost its seal. It is recommended to check all hoses and connections.
- The appearance of a flame under the hood indicates a fuel leak. A thorough inspection of all carburetor elements and a search for gaps or holes will be required.
- If, when independently adjusting the quality and quantity screws, the engine does not react in any way to the turns of the screws, you should remove them and check whether the threads are broken.
- If the carburetor starts to “shoot”, you need to check all wires and terminals for short circuits.
Removing the carburetor
Any repair begins with removing the carburetor mechanism from the car. Dismantling the device is carried out strictly according to the following scheme:
- Disconnect power from the battery.
- Remove the air filter housing (it prevents access to the carburetor).
- Disconnect all fuel and air supply hoses from the carburetor.
- Unscrew the bolts securing the carburetor to the body. If the bolts do not come out, you can apply WD-40 water repellent to them.
- Place the removed carburetor on a flat surface and clean it of dirt and gasoline stains.
Video: how to quickly remove a carburetor from a car
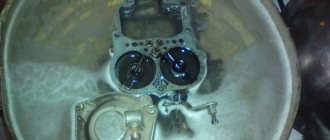
The procedure for repairing a VAZ 2107 carburetor
To repair a particular carburetor component, you will need to disassemble the entire device, thoroughly wash all parts, dry them, inspect them and decide on replacement or adjustment. First, place the removed carburetor on a clean, level surface. Next you need to perform the steps in the following order.
- Remove the return spring.
- Using a Phillips screwdriver, remove the screw securing the three-arm lever.
At this point, disassembling the carburetor is considered complete. Metal parts are washed from carbon deposits and dirt with acetone or a special liquid for cleaning carburetors and dried with a stream of compressed air. Gaskets and other rubber elements are replaced with new ones.
All components will need to be checked for integrity - there should be no visible signs of wear or mechanical damage . Installation of new parts is carried out in the reverse order of disassembly. In any case, the following must be replaced:
- accelerator pump diaphragms;
- return springs;
- fuel valve mechanism;
- all rubber seals;
- most paronite gaskets.
Video: DIY carburetor repair
Valve check
There are three main steps to checking the functionality of the solenoid valve.
Verification method
Your actions
Basic operating mode of EPHH
Engine braking mode
Fuel cut-off when ignition is turned off
In addition to the solenoid valve itself, you should also definitely check the EPHH control unit.
Plus and minus
Checking the control unit
To check the control unit of the solenoid valve of the carburetor VAZ 2109 you will need a wire. The length of the wire should be such that it is sufficient to connect the valve to the positive terminal of the battery. Plus, you will need a standard voltage control light.
Your steps when checking the control unit will look like this.
- Disconnect the power wire from the valve without interfering with the operation of the carburetor itself. After this, connect the valve via the prepared wire to the positive terminal of the battery.
- The supply wire of the solenoid valve, which you disconnected in the previous step, must be connected to the positive terminal of the control lamp. The minus connects to the mass.
- Turn on the engine and let it idle for a while. The crankshaft should rotate at a speed within 850-900 rpm. The control lamp should light up.
- Begin to gradually increase the speed, reaching 2100 units per minute. If the control unit is working properly, when this level is reached, the light will go out. Reducing the speed again to 1900 units per minute, the lamp should light up.