Do-it-yourself replacement of the VAZ 2115 wheel bearing
Problems with the brake system or wheel bearing can be diagnosed by characteristic squeaks or knocking noises in the front (wheel area). If the brake system is in order, you will need to diagnose the wheel bearing and replace it if necessary.
To check the wheel bearing, you need to compare the temperature of the wheel rim at the end of a long trip on the side where the squeaks and knocks are coming from. If the disc is too hot, it means the pads are sticking or the wheel bearing is faulty. The latter can lead to wheel misalignment, which usually leads to friction.
To check everything more thoroughly, you need to use a lift or jack.
Raise the tire that is causing some doubt with a jack and rock its lower part, holding it with both hands. If you feel play and a dull knock appears, the wheel bearing needs to be replaced.
Do-it-yourself replacement of the VAZ 2115 wheel bearing
If while driving your car you often hear a characteristic creaking or knocking sound in the front part, in the wheel area, this may indicate problems with the brake system or a failed wheel bearing.
If the first option with the brakes is not confirmed, then most likely the wheel bearing will need to be replaced. To make sure the “diagnosis” is correct, perform a simple diagnosis.
To check the wheel bearing you do not need to have any special devices. To do this, it is enough to compare the temperature of the wheel rim after a long trip, from the side from which squeaks and knocks are heard. If the disc is very hot and cannot be touched, this indicates that the pads are seizing or the wheel bearing has failed. A faulty wheel bearing causes the wheel to become misaligned, causing friction.
A more accurate check is made using a lift or jack.
Jack up the “suspicious” wheel, then grab the bottom of it with both hands and rock it slightly. If, when rocking, you feel play and hear a dull knock, this will mean that the hub bearing needs to be replaced.
Today we’ll talk about how to replace a VAZ 2115 wheel bearing with your own hands, but before that, a few words about the tool.
You will need:
- “30” wrench for unscrewing the central hub nut;
- Puller for pressing out/pressing in the wheel bearing;
- Circlip pliers (or pliers);
- Jack.
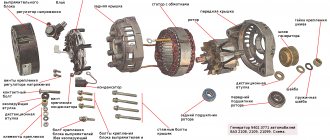
List of new parts and tools for replacing them
Replacing the front wheel bearing on a VAZ 2114 begins with the purchase by the car owner of the following spare parts:
- front wheel bearing (original art. 11180 – 3103020 – 04);
- front hub retaining rings (usually included in the repair kit under art. 11180 – 3101800 – 86);
- a new front hub (art. 11180 - 3103012 - 00), which will be needed if there is excessive wear of the bearing and rotation in the seat.
It is possible to carry out all the work to eliminate this malfunction without damaging other suspension parts using the following set of tools:
- tire remover;
- a set of open-end spanners from 12 mm to 24 mm;
- socket heads from 12 to 19 mm and wrenches;
- specialized wheel bearing puller;
- specialized steering wheel end remover;
- duckbills for removing retaining rings;
- carriage;
- Screwdriver Set;
- regular pliers.
The cost of work to eliminate this malfunction from official dealers (at the end of autumn 2021) ranges from 4 to 6 thousand rubles. In small private service workshops they will ask for work from 2500 to 3000 rubles. After reading the instructions below, carrying out repairs yourself will not cause big problems for the owner of a VAZ model 2113, 2114 or 2115.
Self-replacement of the VAZ 2115 wheel bearing
1. Put the car on the handbrake and install wheel chocks or place stones.
2. Remove the mounting bolts.
3. Remove the wheel.
4. Install the jack and hang the wheel.
5. Using a “30” wrench, remove the central nut securing the hub.
6. Disconnect the drive shaft CV joint from the hub and remove the caliper along with the disc.
7. Remove the two mounting bolts that secure the ball joint to the lower arm.
8. Disconnect the lower suspension arm from the steering knuckle and move the lower part of the shock absorber strut aside.
9. Using a suitable extension, knock the hub out of the steering knuckle. For this it is better to use a special puller.
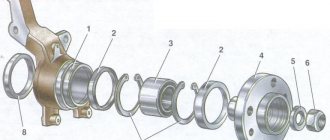
10. Using special pliers, remove the outer retaining ring of the hub bearing, then the inner one.
Good advice: Fix the steering knuckle on the lower arm by connecting it to the ball joint arm, in this position it will not interfere with you.
11. Install a special puller on the steering knuckle.
12. Install the outer snap ring into the steering knuckle using pliers.
13. Install the puller with the new wheel bearing on the steering knuckle, slowly tightening the power nut of the puller, press the bearing into the seat in the knuckle until it stops.
14. As a rule, when the hub is knocked out of the steering knuckle, the inner race of the bearing comes out with it. Therefore, if you have the necessary puller for this, then with its help you can easily remove the ring, but if you don’t have it, then you will have to use a grinder to remove it. In the second case, you need to be extremely careful not to accidentally damage the hub, otherwise you will have to change it as well.
15. Install the hub onto the puller, thread the puller into the steering knuckle. Place the puller against the inner ring of the bearing and press the hub into the bearing. If there is no puller, the bearing can be driven in using a tool and a hammer.
16. Take snap ring pliers and install the inner snap ring.
Further assembly is carried out in reverse order. After the wheel bearing has been replaced, I recommend doing a wheel alignment.
Also check out
- How to replace the support bearing of a VAZ 2110 without wheel alignment
- Replacing power steering fluid in a VAZ 2115 without going to a service station
- How to replace a VAZ 2110 timing belt and tension roller at home
- Remove the 2 bolts securing the ball joint to the lower control arm.
- Disconnect the lower suspension arm from the steering knuckle and move the lower cavity of the shock absorber strut to the side.
- Use a suitable extension to knock the hub out of the steering knuckle (it is better to use a special puller).
- Using special pliers, first remove the outer and then the inner retaining ring of the wheel bearing.
Do-it-yourself replacement of the VAZ 2115 hub bearing Do-it-yourself replacement of the VAZ 2115 hub bearing
Recommendations:
Secure the steering knuckle to the lower control arm. So that it does not interfere, you need to connect it to the ball joint lever.
- Install the special key on the steering knuckle.
Do-it-yourself replacement of the VAZ 2115 wheel bearing
- Using pliers, install the outer retaining ring into the steering knuckle.
- We fix the puller with the new wheel bearing on the steering knuckle. To do this, you need to tighten the power nut of the puller, then press the bearing into the knuckle seat as far as possible.
- The hub is knocked out of the steering knuckle along with the inner bearing ring. That is why it is welcome to have a special puller with which you can remove the ring without much difficulty. If it is not there, you will have to use a grinder (this must be done especially carefully so as not to damage the hub).
Do-it-yourself replacement of the VAZ 2115 wheel bearing
- Place the hub on the puller and insert it into the steering knuckle. Place the puller against the inner wheel of the bearing, into which you want to press the hub.
You can also use a tool and a hammer instead of a puller.
- Using pliers, install the inner retaining ring.
Do-it-yourself replacement of the VAZ 2115 wheel bearing
Reassemble everything in reverse order. After replacing the VAZ 2115 wheel bearing, perform a wheel alignment.
Replacing the wheel bearing of VAZ 2115, VAZ 2110 on your own
Welcome, friends, to the DIY car repair website. Sometimes, after using the car for a long time, the front wheel bearing begins to hum.
The problem is not fatal, but still requires repair. Many owners of VAZ 2109, 2110, 2115 are thinking about replacing the bearing in a garage on their own.
This type of repair, of course, cannot be called easy, but if you have a little skill and tools, then replacing the VAZ 2115 wheel bearing will not take much effort.
Chassis design
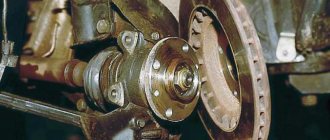
Front wheel bearing
Before you begin the replacement process itself, you need to see all the structural elements that need to be dismantled. Therefore, first you need to understand the structure of the front part of the suspension, or rather, look at the elements in section and determine the location of the bearing.
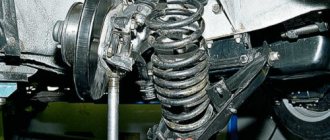
Front chassis design
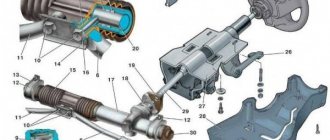
Front suspension assembly: 1 – upper support of the telescopic strut; 2 – upper support cup; 3 – compression stroke buffer with protective casing; 4 – compression buffer support; 5 – suspension spring; 6 – lower spring support cup; 7 – steering rod ball joint; 8 – steering knuckle; 9 – telescopic stand; 10 – eccentric washer; 11 – adjusting bolt; 12 – rack bracket; 13 – steering knuckle; 14 – front brake protective cover; 15 – brake disc; 16 – retaining ring; 17 – wheel hub nut; 18 – splined shank of the wheel drive hinge housing; 19 – guide pin; 20 – wheel hub bearing; 21 – ball joint; 22 – suspension arm; 23 – adjusting washers; 24 – stabilizer strut; 25 – stabilizer bar; 26 – stabilizer bar cushion; 27 – stabilizer bar mounting bracket; 28 – body bracket for mounting the suspension arm; 29 – suspension arm extension; 30 – bracket for fastening the extension; 31 – protective cover of the ball pin; 32 – ball pin bearing; 33 – ball pin; 34 – ball pin body; 35 – suspension strut rod; 36 – outer body of the upper support; 37 – inner body of the upper support; 38 – upper support bearing; 39 – rubber element of the upper support; 40 – travel limiter of the upper support; 41 – protective cap of the upper support; B - zone for monitoring the suspension joint
How to check a wheel bearing?
The procedure is quite simple and banal: after a long ride, you need to touch the part of the wheel where the extraneous sound comes from. If it is hotter than the other side, this is the first sign that the bearing needs to be replaced.
It is possible to carry out diagnostics in more detail. Raise the car with a jack, first unscrewing the wheel bolts. Place the wheel chocks and fully raise the side you are checking.
Then you need to take the wheel and rock it with maximum effort. If there is a dull knock, you need to ask a friend to apply the brakes. Carry out the procedure again, if the knocking noise disappears, then the wheel bearing needs to be replaced.
Which bearing is better to choose?
This part can be either Russian or foreign made. Many craftsmen recommend Vologda bearings, which are not of poor quality, and Samara bearings.
The quality is not bad, and the price is much lower. It is not recommended to buy Chinese counterfeits. The wheel bearing measures 64/34/37 millimeters.
As for the tools, if you don’t have a puller for removing the front or rear wheel bearings of VAZ cars, and especially if you don’t have any repair experience at all, then in this case you shouldn’t start work and you need to contact a service station.
Although if you have at least some skills, then the bearing can be knocked out using improvised means.
You will also need a socket wrench (head) for thirty and keys for seventeen and nineteen.
Replacement
First, let's set priorities. If you just want to save money, so you do the work yourself without any experience, then this is a wrong decision that can lead to dire consequences. If you have experience and certain knowledge, you can safely do the repairs yourself.
In any case, we recommend watching the training video instructions, where you will be told in detail about all the nuances of such work. This way you will gain additional experience and useful knowledge.
After this, we proceed directly to the work of replacing the wheel bearings. There are several ways. We will tell you about each of them in more detail, and you will decide for yourself which option suits your skills and capabilities.
- The first method involves carrying out work without removing the steering knuckle from the car. But here you will definitely need a special puller to dismantle the bearings. The advantage of the method is that there is no need for subsequent wheel alignment adjustment. But this is the most inconvenient way. To press out and reinstall the wheel bearing, we recommend driving the car into an inspection hole.
Puller
- The second method will require removing the steering knuckle. A workbench will also be useful for removing the bearing. In this case, you will definitely break the collapse. If you don’t want to go to a service station after repairing yourself, use a couple of tricky tricks: Before removing the lower bolt of the strut and steering knuckle, apply marks;
- One mark will allow you to determine the position of the bolt;
- The second mark will be responsible for the position in the steering knuckle strut;
- During the reassembly process, try to ensure that the marks match each other as accurately as possible. This method allows you to simultaneously make adjustments to the chassis and check the condition of the components.
The third method will require removing the bearing along with the stand and dismantling it using a vice. This method is complex compared to others.
It remains to press out the element
Before work, do not forget to turn on the handbrake and place wheel chocks under the wheels to avoid accidental movement of the vehicle.
- Remove the strut, knock out the tie rod ends and unscrew the fasteners of the upper support to the body of your car.
- Position the jack so that it does not become an obstacle during operation. It all depends on your personal understanding of comfort.
- The wheel bolts are unscrewed, after which the nut of the desired bearing is removed using a 13 mm wrench.
- Using a 17 mm wrench, you dismantle the caliper, which is secured with wire to prevent sagging on the brake hose.