The steel stabilizer bracket 2107 in the form of a bracket is used to attach the transverse link connecting the lower arms of the front wheels. In classic models of Zhiguli 2101-07 there are 6 such elements. As is the case with other components of these machines, maintenance of the anti-roll bar can be performed by the owner himself, if he so desires. The main thing is to have time and understand what this service involves.
What is a rear stabilizer
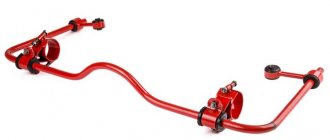
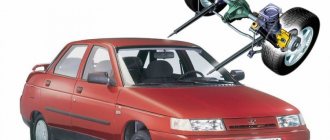
The rear stabilizer for the VAZ 2107 is a curved C-shaped rod installed next to the rear axle of the “seven”. The stabilizer is attached at four points. Two of them are located on the rear suspension arms, two more on the rear side members of the “seven”. These fasteners are ordinary eyes with dense rubber bushings inside (these bushings are the weak point of the entire structure).
The rear anti-roll bar for the VAZ 2107 is a conventional curved rod with fasteners
Today you can purchase a rear stabilizer and fasteners for it at any spare parts store. Some drivers prefer to make this device themselves, but this is a very labor-intensive process that requires certain skills that a novice car enthusiast simply does not have. That is why the replacement of bushings on a finished stabilizer will be discussed below.
Purpose of the rear stabilizer
The anti-roll bar on the “seven” performs two important functions at once:
- this device gives the driver the opportunity to control the tilt of the car’s chassis, while the force acting on the camber of the rear wheels practically does not increase;
- After installing the stabilizer, the tilt of the suspension between the axles of the car changes significantly. As a result, the driver is able to better control the car;
- The improvement in car control is especially noticeable on sharp turns. After installing the stabilizer, not only does the lateral roll of the car during such turns decrease, but you can also take them at a higher speed.
About the disadvantages of the rear stabilizer
Speaking about the advantages that the stabilizer provides, one cannot fail to mention the disadvantages that also exist. In general, the installation of a stabilizer still remains the subject of fierce debate among car enthusiasts. Opponents of installing stabilizers usually justify their position with the following points:
- Yes, after installing the rear stabilizer, lateral stability increases significantly. But this is a double-edged sword, since it is the high lateral stability that makes it much easier for the car to skid. This circumstance is good for those who engage in so-called drifting, but for an ordinary driver who finds himself on a slippery road, this is completely useless;
- If a car enthusiast decides to install a rear stabilizer on his “seven”, then he is strongly recommended to install a front one, and not a regular one, but a double one. This measure will help prevent excessive loosening of the car body;
- The cross-country ability of a car with stabilizers is reduced. On sharp turns, such a car often begins to cling to the soil or snow with its stabilizers.
It is easy to notice that the ground clearance of a VAZ 2107 with a stabilizer decreases, which affects cross-country ability
Thus, a driver who is thinking about installing stabilizers should weigh all the pros and cons as carefully as possible, and only after that make a final decision.
Sequence of work
It is better to carry out all work related to replacing stabilizer bushings on an overpass or inspection pit.
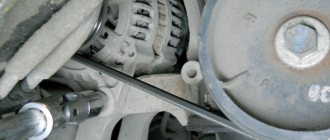
Before disassembling the units, all threaded connections must be treated with WD-40 liquid: the stabilizer mounting brackets are constantly exposed to moisture from the road surface, as a result of which rust forms on them.
Next, you need to jack up the front of the car to loosen the stabilizer from twisting.
Using a wrench, unscrew the nuts securing the metal brackets to the lower suspension arms. This process must be carried out carefully: over time, the studs become fragile and break easily.
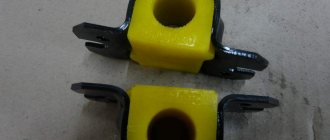
Next, use a screwdriver to pry up the staples and remove them. The design of the brackets differs from each other, so when removing it, you need to remember which one is left and which one is right. If the plates are accidentally swapped during assembly, they will crush the new bushings.
After removing the plates, the bushings are removed. To facilitate the dismantling process, it is necessary to use a soap solution, which covers the outer part of the stabilizer, after which the bushing easily comes off when turning.
Then the inner bushings are removed, which are located under the central brackets screwed to the side members of the car. The central bushings are replaced with the stabilizer completely removed from the vehicle.
To dismantle the stabilizer and remove the bushings, it is necessary to unscrew the nuts securing the central brackets.
After removing the stabilizer, you can begin replacing the bushings, which can be done in two ways:
- The first option is to remove the complete mounting bracket and bushing from the stabilizer. To do this, you need to clamp the bracket in a vice and, turning the rod, try to remove it.
- In the second method, use a slightly larger drill to drill out the mounting holes on the bracket. This will remove the beading, which will separate the bracket into an inner and outer bracket, after which the rubber bushing can be cut.
Then you need to install new bushings. To do this, the part is placed in the bracket and pulled through the entire stabilizer to its landing place. If, when removing the old bushing, the bracket was disconnected into two parts, it must also be pulled to its place, and then placed in the parts of the bracket, and then fastened together by welding.
Replacing the VAZ 2107 stabilizer bushings is considered complete after the stabilizer is returned to its place and all parts are reassembled.
The VAZ 2107 anti-roll bar is used to reduce vehicle roll during maneuvering and turning. It has four mounting points: two on the side members and one on each lower front suspension arm. The fastening is made in the form of a bracket with a rubber bushing. Under the influence of loads, the bushings are subject to wear. This is especially noticeable on the external ones, mounted on levers. They take most of the load from impacts on the road surface.
The main signs of wear on the stabilizer bushings are knocking and squeaking noises when the car moves on uneven roads. In this case, it is necessary to immediately replace them with new ones.
Signs of a broken rear stabilizer
It’s not difficult to guess that something is wrong with the rear stabilizer of the VAZ 2107. Here's what's observed:
- a characteristic grinding or creaking noise, which is especially clearly heard when entering a sharp turn at high speed;
- a significant increase in vehicle roll when cornering and a decrease in controllability when cornering;
- the appearance of play on the stabilizer. Play can be easily detected by placing the car in an inspection hole and simply shaking the stabilizer bar up and down;
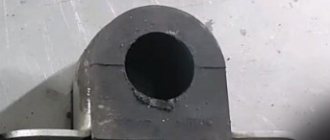
- destruction of bushings. The play mentioned above is almost always accompanied by the destruction of rubber bushings. They are squeezed out of their eyes, crack and completely cease to perform their functions.
On the right is a worn stabilizer bushing, the hole in which is much larger than in the new bushing on the left
All of the above things indicate only one thing: it’s time to repair the stabilizer. In the vast majority of cases, repairing the rear stabilizer comes down to replacing damaged bushings, since the fasteners and rod rarely need repairs. Such a need may arise only in the event of serious mechanical damage, when the driver caught a large stone or curb with the stabilizer, for example.
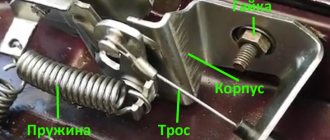
How should the stabilizer be positioned?
A properly installed stabilizer should be able to twist under the influence of forces on the wheels, and it should do this even when the forces applied to the right and left wheels are directed at completely different angles.
On the "seven" rear stabilizers are installed only with rubber bushings
That is, stabilizers on passenger cars should never be directly welded to the frame; between the frame and the wheel mount there must always be some kind of intermediate link responsible for compensating for multidirectional forces. In the case of the VAZ 2107, such a link is dense rubber bushings, without which it is strictly not recommended to operate the stabilizer.
The stabilizer on the VAZ 2107 is usually attached at four key points
Why does the stabilizer bushing squeeze out?
As mentioned above, the bushings on the stabilizer serve to compensate for the forces on the wheels. These efforts can reach enormous values, especially when the car enters a sharp turn. Rubber, even of very high quality, systematically subjected to enormous alternating loads, inevitably becomes unusable. Severe frosts and reagents that are used to sprinkle roads in our country during icy conditions also contribute to the destruction of bushings.
The rear stabilizer bushing is worn out, torn lengthwise and comes out of the clamp
It usually starts with cracking of the bushing surface. If the driver does not notice the problem in time, the cracks become deeper and the bushing gradually loses its rigidity. At the next sharp turn, this cracked bushing is squeezed out of the eye and does not return back to it, since the elasticity of the part is completely lost. After this, play appears on the stabilizer bar, the driver hears a creaking and grinding sound when entering a turn, and the car’s controllability decreases sharply.
About double stabilizers
Double stabilizers are installed only on the front wheels of the VAZ 2107. As the name suggests, there are already two bars in this device. They have the same C-shape and are located approximately four centimeters from each other. The mounting lugs in the double stabilizers are also paired. Otherwise, this design does not have any fundamental differences from the rear stabilizer.
Front stabilizers on the VAZ 2107 are usually made of two paired c-shaped rods
Why use two bars instead of one? The answer is obvious: to increase the overall stiffness of the suspension. The double front stabilizer copes with this task perfectly. But one cannot fail to note the problems that arise after its installation. The fact is that the front suspension on the classic “seven” is initially independent, that is, the position of one wheel does not in any way affect the position of the second. After installing a double stabilizer, this situation will change and the suspension will turn from independent to semi-independent: its working stroke will be significantly reduced, and in general the control of the car will become tougher.
Of course, the roll when entering turns with a double stabilizer will be reduced. But the driver should think: is he really ready to sacrifice personal comfort and cross-country ability of the car for the sake of its stability? And only after answering this question can you start working.
Strengthening stabilizing traction
Some owners of the “classic” VAZ, who love to improve their car in every possible way, have even gotten to the stabilizing unit. There is an opinion that the car behaves better on the road if you install a double stabilizer on the VAZ 2101-07. This modernization improves the car's handling, since rigidity does not allow it to sway and deviate from the trajectory.
To realize the strengthening of the stabilizer, you need to buy the following parts:
- stabilizer rod;
- set of rubber bushings;
- 4 brackets designed for attachment to the lever.
The new rod must be immediately trimmed by 80 mm on each side. Then remove the “original” rod along with the brackets. Further steps - according to the instructions:
- Remove the outer bushings from the “original” rod and clean the ends.
- Place 2 middle bushings on the new rod so that they coincide with the brackets on the old one. Pull the outer rubber bands onto the ends of the rod.
- Pull additional rubber bands on the old stabilizer that match the outer ones on the new one.
- Place the rods together and twist them with brackets placed on additional bushings on both sides.
- Install a reinforced stabilizer on the car.
A similar design can be made by welding from bushings from a Niva and stabilizer struts from a VAZ 2110. This will cost a little more, and the appearance will not be very aesthetically pleasing.
About the choice of jet thrusts
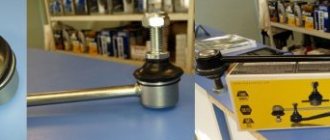
Traction "Track"
The product is very popular among owners of the “Seven”. These rods are distinguished by their high reliability and high price, which starts from 2100 rubles per set.
Trek thrusters are distinguished by high reliability and high price
The main difference between Trek is the heads for the bushings. Firstly, they are large, and secondly, they are attached to the rods by welding. The silent blocks on Tracks are also made of especially dense rubber, which significantly extends their service life.
Read more: New Ford Mondeo 2017-2018 specifications and prices photos technical specifications reviews
Rods "Cedar"
Kedr rods have an affordable price and mediocre quality
The quality of Kedr is somewhat inferior to Trek. This is especially true for bushings and silent blocks. All this wears out quite quickly, and therefore they will have to be changed more often. But there is also a good side - a reasonable price. A set of “Cedar” rods can be purchased for 1,700 rubles.
Belmag rods
Despite the simplicity and reliability of Belmag rods, they have one significant drawback: they are not so easy to find on sale. Every year they are found less and less often on the shelves of auto parts stores. But if the car owner still manages to find them, then he can be congratulated, since he got a reliable product at a reasonable price. The cost of Belmag rods starts from 1800 rubles per set.
Today it is not so easy to find Belmag rods on sale
So what should a driver choose from all of the above?
The answer is simple: the only criterion for choosing jet rods is the thickness of the car owner’s wallet. If a person is not short on funds, the best option would be to purchase Trek rods. Yes, they are expensive, but installing them will allow you to forget about problems with the suspension for a long time. If you don’t have enough money, it makes sense to look for products on the shelves. Well, if this idea is not crowned with success, there remains a third option - “Cedar” rods, which are sold everywhere.
Here we should say a few words about fakes. Knowing that car owners most often choose products from the three above-mentioned companies, unscrupulous manufacturers are now literally flooding the shelves with counterfeits. Moreover, in some cases, the fakes are made so skillfully that only a specialist can identify them.