Every car owner of an injection car sooner or later encounters problems in the fuel system and begins to think about cleaning the fuel injectors. The task of the injector is to maintain the pressure created by the fuel pump and only at the right moment to open for a fraction of a second to allow the required amount of fuel to pass through. There are a lot of different additives in the fuel, which during engine operation stick to the seat of the injector locking needle. As a result, the injector begins to spray fuel incorrectly or leak fuel when it should be closed. In such cases, it is necessary to clean the injectors or replace them. The recommended period for cleaning injectors is 25,000 km - 30,000 km. Failure to properly maintain fuel injectors can lead to their complete failure, and then only replacement will be necessary.
How to understand when it is necessary to clean fuel injectors
- Loss of dynamics during car acceleration.
- When you press the gas there are jerks and dips while driving.
- The engine is running rough and unstable.
- Fuel consumption has increased.
- It takes a long time to start the engine with the fuel pump running.
- Black smoke from the exhaust pipe.
There are many instructions and methods for cleaning fuel injectors on the Internet, but we recommend using the most reliable and proven one - cleaning in an ultrasonic stand.
How fuel injectors work
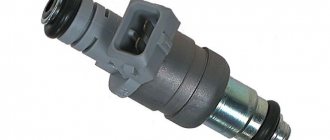
The main function of the fuel injector is to supply the engine with fuel. The injector atomizes (injects) fuel into the engine cylinder through a nozzle so that the internal combustion process can begin. The fuel must be delivered at the right time, in the right quantity and at the right pressure, angle and spray pattern.
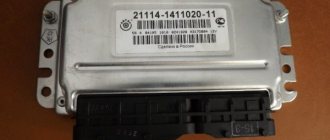
The engine control unit (ECU) is the central computer or "brains" of any vehicle, which controls many individual components, including the fuel injector. Using various sensors, the ECU ensures that the injector sprays fuel at the right time and in the right amount, and also creates the correct air-fuel mixture.
The vehicle's fuel pump supplies gasoline from the tank to the fuel injectors through fuel lines. When the ECU determines that the engine requires fuel, it transmits a message to the fuel injector solenoid, which then opens to allow pressurized fuel to be sprayed into the cylinder.
How to remove and clean
- Turn off the fuel supply from the fuel rail.
- Disconnect the electrical connector for the fuel injectors.
- We unscrew the two bolts securing the ramp and pull it out.
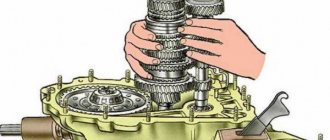
- We remove the injectors from the ramp and install them in a special stand
- After cleaning, put everything back together in reverse order.
Further in our photo report there are more detailed instructions.
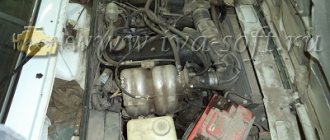
1We begin to remove the fuel injectors for further cleaning. The injectors are located behind the intake manifold.
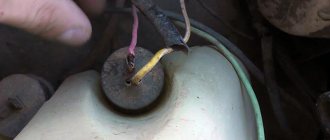
2First of all, we need to relieve the fuel pressure from the fuel rail. To do this, unscrew the plastic cap indicated by the arrow in the photo.
3And use something sharp to press on the spool valve, first placing a container so as not to pour gasoline all over it.
4Having released the pressure, screw the plastic cap back on and unscrew the 5mm hexagon bolt securing the fuel rail.
5On the other side of the manifold, between the third and fourth injectors, there is another fuel rail mounting bolt.
6It is convenient to unscrew it using a small ratchet with extensions and a 5mm cue ball.
7Under the air filter bellows we need to disconnect the fuel supply hose to the ramp using two 17mm wrenches. And disconnect the electrical connector of the fuel injector wires.
8Now that everything is turned off, lift up the fuel rail with the injectors, pulling them out of their seat in the manifold.
9And we pull out the ramp with injectors and wires towards the right wing of the car.
10Located on the table, disconnect the electrical connectors from the fuel injectors by pressing the metal brackets on the sides of the connectors.
11Pull out the metal clamps of the injectors. They can be removed by hand, but if difficulties arise, you can use a screwdriver.
12We remove the injectors from the ramp and clean them of dirt, preparing them for installation in the stand.
13In a special stand for cleaning injectors, we create WYNN'S liquid pressure and make sure that the injectors do not allow liquid to pass through themselves. Then we turn on the intermittent opening of the nozzles and look at their spray. The liquid is sprayed filling the container in the stand.
14After cleaning the nozzles by passing liquid through them, we lower the nozzles into a container with WYNN'S liquid and turn on the ultrasonic cleaning mode, setting the timer for 30 minutes.
15After cleaning, replace the injector O-rings, if necessary, and install them back into the fuel rail. We recommend lubricating the O-rings with silicone grease before installation to avoid damaging them during assembly.
16It is also necessary to lubricate the rubber bands of the injectors on the installation side of the manifold.
17Here are all the tools needed to remove and install fuel injectors.
18The work is finished. Before starting the engine for the first time, you must turn the ignition on and off several times to fill the fuel rail with gasoline.
The VAZ 2114 (2115) is equipped with engines of 1.5 and 1.6 liters (8 and 16 valves), therefore the performance of the injectors must be selected depending on the type of engine.
If you make the wrong choice, fuel consumption may increase or the internal combustion engine may lose power. The VAZ 2115 injector is no different from the VAZ 2114, so when considering the device of the “fourteenth” model, we will also keep in mind the “15th”. Model 2114 can be equipped with fuel injectors from different manufacturers, and accordingly, the cost of the injectors may also differ. Manufacturers and cost (price range in the Russian Federation): • GM (1300 - 1400 rubles), • BOSCH (1000 - 1200 rubles), • SIEMENS (800 - 1400 rubles). Which injectors should I choose for replacement?
Here you should focus on the part markings.
For example, BOSCH 0 280 158 502 is only suitable for a 1.5 l 8-valve engine. It’s hard to say anything about the manufacturer; the quality of all products is approximately the same. . It is necessary to remove the pipe from the air filter. Remove the terminals from the battery. . We take some kind of container for draining gasoline. . We take a screwdriver and a container, approach the car, unscrew the cap from the valve on the fuel rail (TR), prying the valve nipple with a screwdriver, release the pressure (gasoline will flow from the FR), then screw the cap back on. . Next, we take the keys for 24 and 21 or 22 (so for a square TR, for a round one there are most likely two keys for 24, I don’t know for sure) and try to unscrew the tube that goes to the TR under the throttle pipe on the driver’s side and try to pull it out of the ramp. . Then he unscrews the fuel pressure regulator (FPR) with a ratchet or just a 6-point 5-pointer, we also try to pull it out of the TP, to do this we carefully pull up so as not to tear the white hose that goes from the RTD to the receiver. . We disconnect the chip, impulses pass through it to the injectors. . We unscrew the fuel rail (FR) itself with a ratchet or just a 6-point 5. We pull it towards the receiver, then, when the injectors come out, we turn the FR with the injectors up and carefully pull it out towards the right wing, everything came out and went back in without any problems! . We remove the wiring from the injectors, here you need a screwdriver, press your finger on the spring (U-shaped piece of iron). We try to push it upward with a screwdriver (towards the wires coming out of the injector). Next, we move the spring forward, one end should come out, the other will remain in place, pull the chip up, i.e. remove from the nozzle. . Now you need to remove the clamps from the injectors; to do this, use a screwdriver to pry them off on both sides. Then we try to pull them out with our hands or a screwdriver (whichever is more convenient) and pull them to the side. Then we pull the injector up, if there are rings left in the ramp, as I had, then we take them out with a screwdriver, they come out easily, don’t forget about the ring on the RTD, it’s better to change it in advance, I didn’t buy rings on the RTD, I left the old one. . Everything was removed. In fact, there are quite a lot of reasons why injectors may not work well. And the most common symptoms are described below: • Difficulty starting the engine in any weather; • The engine is running unsteadily; • The engine stalls at idle; • High crankshaft rotation speed at idle speed; • Loss of power, poor response to the accelerator pedal; • When you press the gas, shocks or dips may appear; • High gasoline consumption; • If the nozzle is dirty or damaged, it should be replaced or cleaned. There is no point in repairing it. It should also be noted that today injectors cannot last even 100 thousand km. The VAZ-2114 model can be equipped with different injectors from different manufacturers. Depending on this, durability and their cost also differ. It is recommended to buy not domestic parts, but from other companies, for example, GM, BOSCH, SIEMENS
.
Also, the choice of injectors also depends on the working volume and the number of valves. For 16-valve engines, the performance of such parts will be different than for the 8-valve version. If the parts are selected incorrectly, then most likely, gas mileage will be higher or the car will lose power. If we talk about choice, then preference should be given to the BOSCH brand at number 0280158502
. This is the serial number that is suitable for an 8-valve engine with a volume of 1.5 liters. Injectors fail not only because of their quality; their performance is largely affected by fuel that contains a lot of dirt or large fractions. Cleaning injectors at service stations will not be cheap. Therefore, if you do not check and clean it yourself, then you should think about whether it might be easier to buy new parts and replace them.
| Fastening bolts KAMAZ 740.60-360, 740.61-320, 740.62-280, 740.63-400, 740.64-420, 740.65-240, 740.70-280, 740.71-320, 740.72-360, 740.73-4 00, 740.74-420 and 740.75-440 caps of the main (liners) bearings (vertical) of the crankshaft (M16). ... After stopping the overheated ZMZ 409 UAZ Patriot engine, you need to inspect the cooling system and find the reason that caused it to overheat. As a rule, this can be a burst... The rear axle gearbox seal is responsible for the seal, and if it is slightly misaligned or worn out, the seal will be compromised, which will lead to oil leakage from the gearbox or dust, water and dirt entering the gearbox. On a VAZ 2107, replacing the oil seal x... The operation of each automobile engine depends on the quantity and quality of the air-fuel mixture prepared by a special device called a carburetor. All carburetor systems create the mixture and help distribute it evenly... |
| When soundproofing your car, you should understand that it is impossible to eliminate all external noise completely. You'll likely still hear road noise, especially in older cars, so don't expect complete silence. … For a few hours I came across an almost serial UAZ “Patriot” with two pedals. I’m sharing the details that I managed to find out. At the end of last year, it became known about the upcoming release of the “Patriot” with an automatic transmission Punch Powerglide 6L50, etc... Unlike other types of paint, automotive paints are specially designed for spraying and have a long service life on cars. Paint intended for any other purpose can lead to disaster if applied to a vehicle. ... UZAM-412 is a Moskvich 412 gasoline engine, which has established itself as a reliable and durable power unit, characterized by efficiency and ease of maintenance. This engine has been on the assembly line from 1966 to the present. For that… |
Injectors are an indispensable attribute of any car fuel system based on injection type engines. The injectors act as gasoline atomizers and determine the required amount of fuel to be supplied to the combustion chamber. However, during operation there is a gradual depletion of the injectors. To optimize the operation of the entire system and increase engine power, it is recommended to periodically clean and flush the injectors.
Step-by-step procedure for checking injectors
When nothing interferes with the operation of the dismantled ramp, we reconnect the power supply and gasoline supply pipes to it. Don't forget about the negative terminal of the battery.
- When everything is connected and ready for testing, we fix the ramp with the injectors so that four measuring containers of the same volume can be placed under them. This is necessary to ensure that the measurements are made as accurately as possible.
- Next, it is best to ask an assistant to sit in the driver’s seat, and if this is not possible, secure the ramp motionless and start the engine yourself.
- While the starter is “spinning” the engine, make sure that the injectors work in the same rhythm and the fuel is sprayed evenly. When carrying out such diagnostics, it is very clearly visible which of the four injectors is “snotty” or does not work at all.
It is noticeable how one of the injectors works differently than the other.
- When the measuring containers are filled to the required level, everything will become extremely clear and understandable. And if such facts are identified, the nozzle should be replaced, since washing it can only bring a temporary result, after which operational problems may occur again.
The check ends some time after the injectors are turned off.
- Also, after completing the diagnostics, wait a while to see how effectively the injectors maintain their tightness. This is important because when the car is idle, some of the fuel may simply drip into the cylinders, and its excess can negatively affect the condition of the engine as a whole.
- Inspect each injector for any external defects, the integrity of the o-rings and the power supply.
The latter should be given special attention if any of the pads does not work at all, because damage to the wiring becomes the reason for this. If damage is present, then it is necessary to replace the nozzle with a new one (see “more about choosing nozzles”).
Procedure for checking injector power supply
- First of all, disconnect all the pads from the injectors.
- Then, we connect two wires to the pre-working block, the other end of which we bring to the “non-working” injector.
- Next, turn on the ignition and if the injector starts working, this means it is necessary to replace the non-working element of the electrical circuit - the block, and if not, then only the injector needs to be replaced.
Resistance faults
- In order to diagnose the injector windings, you must disconnect the negative terminal from the battery and all injector power connectors.
- Next, we connect the multimeter probes to the injector contacts and measure their resistance.
Values are within normal limits.
- Performance indicators should be from 11 to 15 Ohms; if they are significantly increased or decreased, the nozzle must also be changed.
This is interesting: We independently remove headlights from a Porsche Cayenne
What injectors are installed on VAZ 2114/2115 cars
Almost all types of injectors that the VAZ 2114/2115 are equipped with at the factory can be considered interchangeable. Depending on the year of manufacture, injectors manufactured by Bosch and Siemens of different markings were installed on the car. Bosch injectors:
- Model 0280 158 022. The product is compatible only with a 16-valve engine with a volume of 1.6 liters.
The nozzle is black and is designed to operate at an optimal pressure of 3.8 atmospheres.
- Model 0280 158 017. An injector with this marking is installed on 8-valve engines with a volume of 1.6 liters. The body is also black.
- Modification 0280 158 996 is considered obsolete, since injectors with this marking were installed on cars until 2006. The model was intended for 8-valve power units.
Standard equipment for VAZ 2114/2115 injection engines Siemens injectors:
- VAZ20734 is made in an orange case. The model can be installed on a VAZ 2114/2115 of any year of manufacture, but the modification is paired with an 8-valve engine.
- Model VAZ20735 is intended for a 16-valve engine. In terms of its characteristics, it is practically no different from the previous model. The nozzle has a blue marking.
Depending on the marking, it can be used on different types of engines.
Replacing injectors
The difficulty in identifying problems in the operation of injectors is that the fuel system is quite branched and it is necessary to diagnose the functionality of all its parts. For example, a malfunction such as a decrease in engine power can have two reasons - failure of the injectors or exhaustion of the pump's life.
Clogged injectors can result in sudden jerking of the engine while driving or unstable idle speed. In addition, an increase in fuel consumption can be considered a sign of injector failure.
You can check the functionality of each injector even without removing them. Simply start the engine and remove the wires from the connector of each injector one by one. If immediately after removal the engine starts to twitch or stalls, then the injector is fine. If the stability of the engine does not change with removal of the wire, then the injector needs to be thoroughly cleaned or even replaced.
This material will help you to independently replace or wash the injectors on VAZ 2110-2112 cars: https://vazweb.ru/desyatka/pitanie/zamena-forsunok-vaz-2110-8-klapanov.html
Causes of malfunction of injection nozzles
Modern fuel injectors in gasoline engines come in two types: electromagnetic and mechanical. The first is a solenoid valve that is controlled by the vehicle's ECU system. When the appropriate signals are given, the valve opens to a certain angle, regulating the amount of fuel supplied to the cylinder. The second only supplies fuel to the channel. Its design includes a needle with a step. When there is enough pressure, the fuel overcomes the resistance of the spring and the needle rises. Accordingly, the nozzle opens and fuel is supplied to the chamber. Currently, electromagnetic injectors have gained wide popularity as they are more technologically advanced. Therefore, we will further consider checking and cleaning using their example.
There can be only a few malfunctions of the electromagnetic injector:
- lack of signal from the ECU;
- malfunction or complete failure of the winding;
- nozzle outlet is clogged.
As practice shows, it is the latter option that is the most common cause of complete or partial failure of the nozzle.
How to remove
The procedure for dismantling and installing injectors is not particularly difficult, but it does take a lot of time. You need to prepare a set of tools in advance:
- 2 open-end wrenches for 17;
- crosshead screwdriver;
- screwdriver with a flat thin blade;
- hex key 5.
None To relieve fuel pressure, you must turn off the fuel pump. It is located in VAZ 2114/2115 cars in the fuel tank. The easiest way to get to the pump is through the hatch located under the rear seat cushion. For this:
- The seat needs to be reclined.
- Find a small hatch under the rug.
- Unscrew the screws securing the hatch.
- Remove the cover and remove the contact block from the fuel pump housing.
Then you need to start the engine. The engine will run on the amount of fuel that remains in the system, since the pump will not build up pressure after removing the block. You must wait until the engine has completely used up the remaining gasoline and stalls.
None The procedure for removing injectors is as follows:
- Open the hood of the car and remove the wire from the negative terminal on the battery.
- For ease of dismantling, it is recommended to remove the air filter box. It will prevent free access to the engine.
- After that, use your finger to snap off the plastic retainer on the engine and disconnect the connector from the throttle valve.
- The connector from the idle air control regulator is removed in the same way.
- Next, you need to disconnect the connector block from the wiring harness of the injectors themselves.
- The injectors can only be removed together with the fuel rail. Therefore, you need to unscrew the bolts securing the ramp to the body.
- After which it will be possible to move the ramp to the side so that each of the nozzles moves slightly out of the mounting socket. The wires are removed from the injectors, otherwise it will be impossible to pull out the ramp.
- The ramp is pulled out and placed in a clean place. Now you can easily remove all the injectors - they are pressed out using a plastic clamp.
Disconnecting the injectors is possible only after dismantling the ramp itself. Accordingly, new products are inserted in place of the old ones. And then the installation work is carried out in the reverse order.
Dismantling
Before replacing or cleaning the injectors, they will need to be removed from the fuel rail. To achieve this, the following activities are carried out:
- Make sure the engine has cooled down properly. It is not safe to work on a hot engine;
- Disconnect the power wires from the fuel pump to de-energize the device;
- Try to reduce the pressure in the engine power system as much as possible. To do this, the engine starts, and then you need to wait until it stalls at idle speed;
- Repeat this procedure several times until the car simply stops responding to turns of the ignition key;
- That's it, now our goal is the fuel rail. To remove it, you must first remove the terminals from the battery, turn off the power to the ramp itself, disconnect the fuel supply hoses, and also disconnect all electrical appliances going to it. These are pressure, idle, throttle position sensors;
- If you have an 8-valve engine, then you do not need to remove the receiver. This step is relevant for engines with 16 valves;
- Experts do not recommend removing the intake manifold without dismantling the throttle valve and the hose going to it. It is better to unscrew and disconnect everything at once, which will allow you to continue working more conveniently;
- Cover the exhaust manifold openings with something to protect them from foreign objects;
- Using a hex wrench, you can unscrew a couple of bolts and remove the fuel rail along with the injectors;
- Make sure that there are no distortions when removing the ramp, otherwise problems may arise with the dismantling processes;
- We remove the injectors. To do this, remove the mounting brackets that hold the electrical connector. You also need to remove the bracket that holds the injector in its seat.
After dismantling the elements, be sure to close the seats to prevent debris and other objects from getting in, and place the nozzles themselves on a table or floor, after laying down a dry rag.
Here you can decide whether to change or clean the elements of the fuel system. If replacement is required, install new injectors in place of the old ones and follow the assembly procedure.
Cleaning
Here proceed as follows.
- Remove the rubber rings from the injectors, and when cleaning is finished, replace them with new seals.
- The cleaning process should begin with the nozzles, on which various deposits form as the car is used.
- Be sure to thoroughly clean the funnel-shaped surfaces where tar deposits accumulate.
- The next step is the fuel mixture supply channels.
- To open the solenoid valve to supply fuel, you will have to trick the device with a 5-7 V power supply.
- Some use stabilized voltage sources, phone chargers, or even a car battery. If using a battery, the voltage should be supplied through the light bulb. It will play the role of a current damper. Otherwise you risk burning the winding.
- Electricity is supplied through two wires, in the gap of one of which a button is installed. It will close and open the network. This creates an imitation of the operation of an injector in an engine due to the influence of a pulsed electric charge.
- You can supply the cleaning liquid to clean the injectors through a can of carburetor cleaner. Inexpensive and effective, even better than specialized chemicals.
- Be sure to tightly connect the cylinder and nozzle with a rubber tube, clamps and any other means.
- All is ready? You can then apply electricity to open the injector. At the same time, press the button on the cleaning agent canister.
- Soon the torch of the liquid jet, which will exit through the fuel atomizer of the injector, will change its “clumsy” direction and will begin to uniformly exit the nozzle. This indicates that you have removed all carbon deposits.
Repair of injectors VAZ 2114/2115
Repairing injectors involves carrying out a number of works at once:
- cleaning;
- purging;
- replacement of rubber seals.
After the products have been removed from the fuel rail, you need to take a good look at each of the four nozzles. If there are visible signs of leakage on the body, repair will not be practical. You will have to immediately replace the nozzle with a new one.
The differences in flushing and cleaning procedures for 8-valve and 16-valve engines are not significant. Therefore, you can be guided by the same scheme.
Video: the easiest way
If the body is clean and there are no deformations or cracks on it, then repair work is allowed . To do this, you will need to remove the seal from the body and the sprayer. It is recommended to leave these parts in acetone or solvent for 1.5–2 hours. While the parts are being washed, you can use a vacuum cleaner to clean the fuel rail. Next, you need to carefully clean the place where the injectors fit into the ramp using a toothpick or a needle.
After this, you can start purging the nozzle from the inside. You will need a roll of electrical tape, an aerosol can for cleaning carburetors and a syringe. An aerosol cleaning liquid is supplied through a thin syringe into the nozzle cavity.
It is better to wrap the joint between the syringe and the tube of the canister for sealing with electrical tape. It is recommended to repeat washing the nozzle from the inside three times. Afterwards the product must dry.
A cheap product will perfectly remove dirt and deposits from the nozzle. Before installation, each nozzle is tested for resistance. The tester readings should be in the range of 11–15 ohms.
There is also a simple way to clean the injectors, without dismantling the fuel rail. However, it is only appropriate in cases where the injectors have not yet exhausted their entire service life (120–150 thousand kilometers). The use of cleaning additives in gasoline is allowed. In this case, all elements of the fuel system will be cleaned, but its closed nature does not allow removing dirt and sediment from low-quality gasoline.
A broken fuel pump can cause serious problems. You can read more about this here: https://vazweb.ru/desyatka/pitanie/zamena-toplivnogo-nasosa-vaz-2114.html
The liquid is poured into the gas tank and, together with the fuel, cleans all elements of the system.
Replacing rubber rings and seals on injectors
Usually, when washing or repairing injectors, car enthusiasts immediately change all rubber elements. This is due to high wear rates. The cost of rings and seals is very low, but after replacement you can immediately observe the stability of the motor.
Rings and seals can be removed with one movement of the hand. However, installing new ones will require care, as it is easy to damage the rubber. The plastic element is first lubricated with gasoline, and then pulled in place of the old seal.
Spare parts for VAZ injectors can be purchased at a minimal price. Almost every driver can clean or replace the injectors on VAZ 2114/2115 cars on their own. Difficulties can arise only in the process of unscrewing the fuel rail or reconnecting the wires to the injector contacts. However, if each stage of work is carefully carried out, even a beginner can independently maintain this element of the fuel system.
- Author: Veniamin
Before moving on to the procedure for removing injectors, I recommend that you first become familiar with what INJECTORS are and what functions they perform in the power supply system of an engine with distributed injection. You can read about this in detail on the website in the article Fuel injectors.
Procedure for removing injectors
- First, remove the fuel rail with all the injectors. (You can read about this in more detail on the website in the article “How to remove the fuel rail of injectors?”).
- Next, you need to disconnect the injector wire block, while holding the spring clip.
- Using a screwdriver, move the injector retainer along the ramp.
- We remove the injectors from the ramp, while turning it a little.
- Then remove the O-rings from the injector by prying them off with a flat-blade screwdriver.
- They are removed from the nozzle body itself, as well as from the atomizer. You can throw them away, as they will most likely be replaced with new ones.
Attention! Be careful when removing or installing injectors!
- Do not damage the nozzles or the connector plugs.
- The injectors cannot be disassembled.
- Do not allow engine oil to get inside the injector.
- Do not immerse the nozzles in any detergents, as the nozzles contain electrical components.
And finally, I bring to your attention the following signs of injector malfunction, which in the future will lead to the replacement of the injectors themselves:
- the engine starts to stall at idle;
- fuel consumption in the car increases noticeably;
- the engine cannot start working at full power;
- engine response has become insufficient;
- engine operation has become unstable;
- the amount of CH in the exhaust gases has increased;
- the engine starts to work poorly;
- at idle, the crankshaft rotation speed is reduced;
- failures in the operation of the engine itself while the car is moving.
In order to install new injectors on the ramp, you need to do everything the same, but only in reverse order. You can learn more about this on the website in the article How to install injectors?/.