Chevrolet Niva Niva67 › Logbook › Replacing the Chevrolet Niva pump.
Something started making noise, or rather, it started making noise about a month ago.
But the sound appeared and disappeared, but here there was a constant noise. I was a little upset until the thought “Pump” dawned on me. It’s business))) Removing the belt showed that yes, it’s darling. So for those who have not encountered the replacement, a short report. It's not complicated at all. Unscrew the tensioner and remove the belt from the pump.
We unscrew the protection and boot and climb up to the pump. Unscrew the clamp.
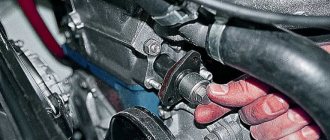
We insert a small screwdriver or nail under the pipe. Carefully pour the liquid into anything you can get your hands on.
Unscrew the 3 bolts securing the pump housing to the engine and remove the pump.
When removed, another 100 grams of liquid may leak out.
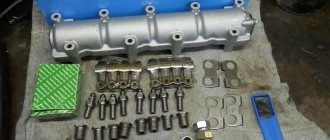
Then disassembly, replacement of the worn part and reassembly in reverse order.
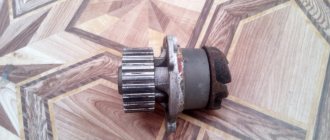
I found a cool pump.
The width of the main blades is the same, but the working surface of the new one is different (blue and red arrows) plus additional blades.
Signs of breakdown
Most often, the seal or bearing of the unit breaks. As a result, the pump begins to leak, which can lead to loss of antifreeze or engine seizure. The impeller may also break or break. You can understand that the pump needs replacement by the following signs:
- the characteristic smell of antifreeze vapor in the cabin;
- extraneous noise when the engine is running;
- the appearance of antifreeze drops under the car;
- engine overheating;
- drop in coolant level in the expansion tank.
Pump repair
Basically, pump failure occurs due to wear of the bearings and seal. These parts are difficult to find in stores, so most often the old pump is simply replaced with a new one. But in some cases repairs are necessary:
- leaking from the pump. A leak occurs either due to strong or, conversely, weak tightening of the mounting bolts, or due to wear of the gasket. In this case, the gasket must be replaced;
- pump play. Occurs due to weakening of the mounting bolts. It can be easily determined by shaking the pump pulley with your hand. If after tightening the bolts the play does not disappear, then the reason is in the bearings on the shaft.
It is important to remember that pump wear is also affected by the tension of the accessory drive belt.
Despite the fact that the process of replacing a pump seems simple, you should exercise extreme care and caution when working. Having completed the repair, you should once again go through the instructions
Make sure fasteners are tight. Before going out on the road in various modes, test the operation of the water pump. Only after making sure that the car is functioning properly should you begin its daily use.
Having completed the repair, you should once again go through the instructions. Make sure fasteners are tight. Before going out on the road in various modes, test the operation of the water pump. Only after making sure that the car is functioning properly should you begin its daily use.
Despite the fact that the process of replacing a pump seems simple, you should exercise extreme care and caution when working. Having completed the repair, you should once again go through the instructions
Make sure fasteners are tight. Before going out on the road in various modes, test the operation of the water pump. Only after making sure that the car is functioning properly should you begin its daily use.
A nice bonus will be a review of pumps from various manufacturers.
To complete the work of replacing the pump we will need:
- antifreeze or antifreeze similar to the one poured in (full capacity is 10 liters, see how much you need)
— sealant (where without it?)
— key for 13 (favorite number on AvtoVAZ?)
— straight hands (we’ll work with them!)
- screwdriver (for removing clamps)
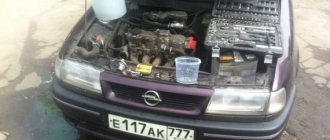
The work can be done anywhere, i.e. no garage or pit required.
As a rule, if the pump malfunctions, the antifreeze runs out, so I don’t describe how to drain it; if it hasn’t drained, drain the remainder (to buy less).
Sequence of actions for replacing a Chevrolet Niva pump:
— Remove the corrugation from the throttle to the mass air flow sensor
— Unscrew all pipes suitable for the thermostat and remove it
— For convenience, unscrew the 3 nuts securing the cooling fan and push it towards the radiator.
— Remove the generator belt — Remove the pump pulley by unscrewing the 3 nuts by 13 (no need to touch the belt tensioners) — Unscrew the 4 nuts securing the pump and one stud (this makes it easier to remove) — Pull the pump out towards the removed stud
— We coat the block with sealant and install the gasket.
- Reassemble in reverse order: Reinstall the pump pulley
- Tension the generator belt
- We install the thermostat, coating the pipes with sealant
- Screw on the electric fan
- Filling with antifreeze
- We install an air corrugation
We are happy with the money we just saved...
Here is a video instruction on how to replace the pump, you don’t need to disassemble anything unnecessary, and everything is very convenient:
Review of pumps from different manufacturers.
It so happened that cars made in Tolyatti became the main cars in the Russian Federation. And because of their popularity, we have the opportunity to choose spare parts from different manufacturers.
Practice has shown that these pumps last the longest (TZA - original VAZ):
Reasonable compromise (SOATE or fenox):
You definitely shouldn’t buy pumps (Pekar), but, unfortunately, these are the ones that are mainly sold in stores, and they look like this:
Pekarovsk pumps have not been running for over a year! Buy them only as a last resort!
Source
Work progress
Before you begin replacing the water pump on a Niva with air conditioning, you need to drain the excess coolant. If it has already leaked out (which usually happens when the pump breaks down), you can start working right away.
The sequence of actions is as follows:
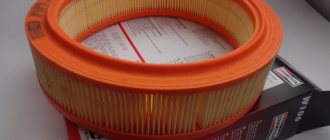
1. Remove the air filter bell;
2. Remove the pipes going to the thermostat and pump;
3. Unscrew the 3 nuts securing the cooling fan;
4. Loosen the 3 bolts securing the pump impeller using a 13mm flat wrench
6. Loosen the tension with a socket wrench and remove the belt;
7. Unscrew the nuts securing the pulley using a size 13 wrench and pull it out;
8. Unscrew 3 nuts and 1 stud holding the Chevy Niva pump;
9. Remove the water pump, it will be more convenient to do this through the bottom by unscrewing the 2 bolts securing the protection;
10. Remove the remaining sealant and old gasket with a knife;
12. Install a new gasket;
Next, all operations are performed in reverse order:
13. Insert the water pump into its seat;14. Tighten the stud and fastening nuts;15. Install the pulley;16. Tension the generator drive belt;17. Apply sealant to the thermostat and pump outlet;18. Put on the pipes and tighten the clamps;19. Secure the air duct corrugation;20. Add antifreeze.
Replacement frequency, what antifreeze to fill
In the maintenance information for Niva Chevrolet, it is recommended to change antifreeze every 60,000 kilometers. But many car enthusiasts are not happy with the flooded antifreeze, which becomes unusable by 20 thousand. Dzerzhinsky antifreeze is usually filled from the factory, but there is also information about pouring red antifreeze.
When choosing coolant, it is better to use a concentrate rather than a finished product. Since it can be diluted in the required proportion, because after flushing there is still some distilled water left in the system.
A good choice would be Castrol Radicool SF concentrate; it is what dealers often recommend for use.
If you choose ready-made antifreezes, then you should pay attention to the red AGA Z40. Well-reviewed FELIX Carbox G12+ or Lukoil G12 Red
How much antifreeze is in the cooling system, volume table
| Model | Engine capacity | How many liters of antifreeze are in the system | Original liquid / analogues |
| Chevrolet Niva | gasoline 1.7 | 8.2 | Castrol Radicool SF |
| AGA Z40 | |||
| FELIX Carbox G12+ | |||
| Lukoil G12 Red |
Replacing the Niva-Chevrolet pump yourself
Noise when the engine is running. Antifreeze is leaking. The pump does not stay firmly in place. There is no circulation of cold air in the radiator. The air conditioner doesn't work well. If at least one of the above points is present, you can safely make a diagnosis - the water pump needs to be replaced.
Causes of failure
Most often, the oil seal or bearings fail. If there is a leak, most likely this is a violation of the tightness of the part due to weak tightening of the fasteners or a worn gasket. If play is noticeable when touching the pump pulley, tighten the bolts. Does not help? This means that the cause of the malfunction is in the bearings, and the pump on the Niva-Chevrolet needs to be completely replaced.
How to choose a pump
There is a wide range of pumps from different manufacturers on sale. It is not necessary to buy an original pump for the Niva-Chevrolet; other brands also work well on such cars.
It is important to pay attention that the impeller is made of high-quality material, for example cast iron. Steel or plastic blades are good, but not as durable. Among the inexpensive pumps, you can purchase the TZA 2123 pump. It features a reinforced oil seal and bearings
It features a reinforced oil seal and bearings.
Next, we’ll look at how to replace the pump on a Chevrolet Niva with your own hands. There is no need for an inspection hole, so everything can be done in the garage.
Sequence of work
If by the time of replacement the antifreeze has not yet leaked out, its remains should be drained from the cooling system into a container by unscrewing the radiator cap from the top and then from the bottom. Replacing the pump on a Niva Chevrolet with air conditioning will take a little longer, because the air conditioner bracket is attached to the pump. It will also have to be removed.
To keep the fans out of the way, unscrew them and move them to the radiator. To get to the pump itself, you can also jack up the car and remove the right front wheel. Using a 13mm wrench you need to unscrew the two nuts that hold the fluid supply tube to the pump. We do this carefully so as not to damage the hose, otherwise you will have to change it too.
Unscrew the pump mounting bolts from both the top and bottom. We do not touch the belt tensioners. Then unscrew the nuts of the main fasteners of the pump and one stud. The pump on the Niva-Chevrolet is replaced by carefully removing it. We clean everything thoroughly, you can even rinse the radiator with water, and lubricate it with sealant.
We insert the new pump according to the same procedure, only in reverse order. We insert a new gasket onto the housing lubricated with sealant, and install the pump on the bolts from the bottom side. We tighten the nuts as tightly as possible so that there is no play. We put a belt on the pulley and scroll until the pump holes are in their original places.
If necessary, the belt can be loosened. We remove the thermostat and clean the tubes, lubricate them and install them in place.
Replacing the oil seal and bearings
When there is no desire or possibility to completely replace the pump on the Niva-Chevrolet, we will fix the problem by replacing the oil seal and shaft with bearings. We remove the impeller from the pump, remove the old gasket from the shaft, and place a new one in the previously cleaned area. The shaft is changed using the same method. The fastening bolts are removed, the faulty shaft is removed and replaced with a new one.
However, replacing individual parts has its drawbacks: The cost of bearings and oil seals is much higher, so it is more profitable to buy a complete water pump. It is not recommended to change just one thing, the shaft, oil seal or impeller. This pump will not last long. Parts purchased separately may not fit.
You will have to process them with sandpaper, or the impeller blades will touch the body.
Final stage
Don’t forget to add antifreeze if it leaked out during a breakdown. It is advisable, of course, to fill in a new one, its characteristics are better. We thoroughly flush the engine cooling systems.
To prevent air locks from forming when filling in fluid, disconnect one of the hoses and pour coolant into the system until it begins to flow out from the other end of the radiator. We fasten the hose in its place.
Replacing the pump on a Niva Chevrolet without air conditioning will not take much time. To do this you will need several plumbing tools and a couple of hours of free time. At the very end, we start the engine and heater so that the engine warms up to the maximum.
Selection of spare parts – which company is better?
Buying a cheap, low-quality product can cause serious damage to the power unit. Defective or counterfeit parts may leak almost immediately after installation.
It is also possible that the pump may jam, accompanied by a broken timing belt and “meeting” of the valves with the pistons. Then the cost of a tow truck will be added to the expensive repairs.
Therefore, it is better to buy a water pump only from a trusted manufacturer -
HEPU , Metelli , Dolz , Valeo . From domestic products, TZA or Phenox .
To avoid buying a fake, use the services of a trusted seller or online store. Consultants will tell you which pump is suitable for your car and help you choose a high-quality spare part that matches your repair budget.
Pump repair
Basically, pump failure occurs due to wear of the bearings and seal. These parts are difficult to find in stores, so most often the old pump is simply replaced with a new one. But in some cases repairs are necessary:
- leaking from the pump. A leak occurs either due to strong or, conversely, weak tightening of the mounting bolts, or due to wear of the gasket. In this case, the gasket must be replaced;
- pump play. Occurs due to weakening of the mounting bolts. It can be easily determined by shaking the pump pulley with your hand. If after tightening the bolts the play does not disappear, then the reason is in the bearings on the shaft.
It is important to remember that pump wear is also affected by the tension of the accessory drive belt.
Despite the fact that the process of replacing a pump seems simple, you should exercise extreme care and caution when working. Having completed the repair, you should once again go through the instructions
Make sure fasteners are tight. Before going out on the road in various modes, test the operation of the water pump. Only after making sure that the car is functioning properly should you begin its daily use.
Having completed the repair, you should once again go through the instructions. Make sure fasteners are tight. Before going out on the road in various modes, test the operation of the water pump. Only after making sure that the car is functioning properly should you begin its daily use.
Despite the fact that the process of replacing a pump seems simple, you should exercise extreme care and caution when working. Having completed the repair, you should once again go through the instructions
Make sure fasteners are tight. Before going out on the road in various modes, test the operation of the water pump. Only after making sure that the car is functioning properly should you begin its daily use.
Troubleshooting ESP
Chevrolet Aveo Sedan Logbook Attempt to repair the heated passenger seat
To prevent the front door window lift mechanism from breaking, it is enough to lubricate all its parts once a year. In case of breakdowns, remove the ESP and carry out repairs:
1. The fuse is checked in the standard way. Using the diagram or visually we find the required fuse. We inspect it for broken wires and burnt marks. You can check with a tester (multimeter) by resistance or voltage.
2. Check the relay for serviceability. To do this, either connect a new one, or close contacts 30 and 87 with each other. The relay cannot be repaired; it must be replaced.
3. Window lifter buttons are easier to remove and replace. The reason for their malfunction is oxidation of the contacts. You can quickly restore the operation of the buttons by treating them with WD-40 penetrating liquid.
4. The faulty motor must be replaced. Its repair is possible only if the contacts are oxidized. They need to be cleaned. If there is no voltage in the walk-behind tractor wires, you need to find the break and repair the damage.
All moving parts of the removed ESP mechanism are inspected for mechanical damage, dust, and dirt. Sometimes it is enough to clean the parts from rust and lubricate them for the lift to work properly.
How to Change a Pump on a Chevrolet Niva Video ~ AUTOTEXNIKA.RU
For any jeep, the engine cooling system is very important, especially if it has to “sit down” off-road. In this case, its engine will work in extreme mode, because there is no natural air flow to the radiator and motor, and the fan itself cannot cope with this task.
The factory Niva Chevrolet pump has a short service life
Now many owners of the Chevrolet Niva are noticing a situation where the factory pumps, after a short period of time, begin to leak and fail. As a rule, this happens after a short run (on average 10,000 km).
In this case, even small repair work does not help to cope with the situation, and as a rule, this ends with the pump having to be completely replaced.
The “originality” of the Pekar pump can be checked through the official website of the manufacturer
But not enough motorists now know which pump is recommended to be installed on the Niva. Some amateurs conduct independent tests of these nodes, while others seek help on the Internet or from friends who have also encountered this problem.
Most car owners prefer spare parts from abroad. Below is a list of more popular manufacturers:
- Airtex (Spain).
- SKF (Germany-Spain).
- Hepu (Germany).
All these companies are engaged in the creation of pumps for cooling systems. Such spare parts differ in performance because they all have huge impellers made of cast iron, which guarantees good pumping of water in the system and the durability of the pump, because its main parts are made not of metal, but of cast iron, and therefore they are less susceptible to corrosion.
Chevrolet Niva pump replacement
It is noted that seals and bearings also influence the performance of the pump and its service life. The owners' experiences with such pumps confirm this.
Pumps with iron impeller manufactured by Hepu and Tai
Pumps from the Graf company are especially popular. They differ from others in their large impeller, its correct offset, and also a long service life. If the unit is installed correctly, it can last 4-5 years with proper use. Such a resource for pumps is considered normal.
It must be emphasized that almost always the pump can fail not because of its old age, but because of incorrect tension of the drive belt. This affects the centering of the shaft and therefore the bearings quickly fail.
Experts also note that in 2021, the pump from , which can also be installed on the Chevrolet Niva, has proven itself well. Its special feature is reinforced bearings.
The drawback is that the site has many fakes. At first glance, such a part is difficult to distinguish from the original, because the Chinese have learned to bypass all methods of protecting an unusual product.
The fact that the pump has failed can be determined by the corresponding sound that occurs when the engine starts. When replacing the pump on your own, you should keep in mind that a similar unit from a “penny” will fit on a Chevrolet Niva, but it will no longer fit on an ordinary Niva.
You should also see that the pump from the VAZ-2101 is cheaper than the unique one from Chevrolet. This will be needed by those who do not have the ability to spend a lot of money on buying spare parts from a foreign manufacturer.
But it also happens that finding foreign parts is quite difficult, especially if they are needed quickly.
Chevrolet Niva › Logbook › Replacing the pump
Hello everyone and happy holidays!
The New Year began with a pompous farewell. A whistle appeared from under the hood, I opened it, saw a dangling pulley and splashes of antifreeze and an empty tank)) Fuck it, I thought. Never happened and here again Hope for the HEPA P620
ended ahead of time (I thought I would at least ride for a couple more years, but it was only enough for another 600 km). With grief, this pump covered approximately 30 thousand km, of which the last 9 thousand km were noisy and playful)
It’s extremely unpleasant, but it was already expected, because... the play was noticeable. I started looking for options. And there aren’t really any options. Playing the lottery, no matter what you take, you will be lucky or unlucky. Maybe for 5t.km, or maybe even enough for 30-40. I read on the Internet about the Fenox HB1004P1
, with reviews 50 to 50. I decided to take it. (Spoiler: this is my last purchase of parts from this company)
Ordered, picked up. It looks like nothing. Box, aluminum impeller, seems to sit more firmly in the bearing, stamps, drainage and other points. In addition, I bought a Gates 5PK1885
.I removed the old one quickly, because I already had experience. I took off the belt, the pulley and with a little effort the pump came out.
Put a new one, a gasket, a little sealant and you're done.
I wanted to install a pulley, but I noticed that the pump did not spin at all. Fuck it, I thought for the second time
Stupor for 5-10 minutes, because I don’t understand what happened. I unscrew everything back, and I feel that the impeller is rubbing along the internal cavity. I took it off, began to compare it with the old one (to be honest, I didn’t even think that even such a setup could exist - a lesson for the future for attentiveness):
This time, fortunately, everything worked out perfectly. I filled the frieze, the belt, started it, everything is fine. Now I wonder how long this miracle will last. So far everything is working quietly. After HEPU it’s not even customary to hear silence.
There are still two options left for the future if this one dies, which I also read online: Metelli 240575 and DOLZ L120
These are the things to do. Among the upcoming things, I plan to sort out the generator. The reason is also in the bearings. They started howling. Before it’s too late, I’m thinking of going through and pressing in new ones.
Replacing the pump of a Niva Chevrolet car
Replacing the water pump on a Chevrolet Niva is done quite rarely - either after installing a defective product, or when the pump’s life has completely expired.
The most typical pump malfunctions:
- jamming;
- flow;
- severe wear of the pump blades;
- production of bearings on the shaft.
The main signs of pump failure are the appearance of a whistle or even a crunching sound in the engine compartment while driving.
Pump selection
The choice of pump depends on the presence of an air conditioning system in the car. Using an air conditioner requires increased power of the water pump. Otherwise, the pump simply will not cope with increased loads.
For Chevrolet Niva without air conditioning, it is recommended to purchase domestic pumps produced by Fenox or TZA. Their price, depending on the region, is 300–600 rubles.
For a Chevrolet Niva without air conditioning, a water pump from a VAZ “kopek” is also perfect - it’s not at all expensive.
For cars equipped with air conditioning, it is recommended to install German pumps, for example, those manufactured by HEPU. The increased performance of such pumps is due to enlarged impeller blades. You can buy a pump for no less than 900 rubles.
Pump location
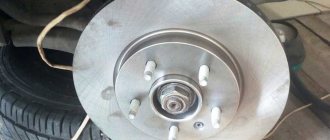
Since the pump impeller is rotated by the timing belt, the pump itself is located in the gas distribution system. To gain access to the pump, you will have to jack up the car, remove the right front wheel and timing case.
Required Tools
To replace the pump you will need a standard set of tools:
- open-end wrenches;
- flat blade screwdriver;
- silicone sealant.
In addition, you will need a container to drain the coolant.
Procedure for replacing the pump
Before starting work, it is recommended to drain the antifreeze. This is necessary for two reasons:
- the hose will not burst in your hands from strong pressure;
- Coolant will not leak out of the holes and pipes of the cooling system.
After this, with the car jacked up and securely fixed, the right front wheel is removed. Next, perform the following steps:
- The generator mount is loosened. The generator is moved as close to the engine as possible, the drive belt is loosened and removed from the pulley.
- The three bolts securing the pump pulley to the engine compartment are unscrewed.
- The pulley is removed from the pump shaft.
- The four nuts securing the pump are unscrewed.
- The pump is pulled out of the mounting socket. In this case, you can pry it off with a screwdriver.
- The landing site is cleared of remnants of old sealant and other contaminants.
- A layer of sealant is applied to the seat.
- A new rubber seal is installed.
- A new pump is installed on the seal.
- Without excessive effort, the pump is secured with four nuts.
- The generator pulley and belt return to their place.
- New antifreeze is added.
- The engine starts and warms up to operating temperature. If there is no coolant leakage and the car does not overheat, then the pump was replaced correctly.
Video: replacing the water pump
This scheme is suitable for Niva Chevrolet cars both with and without air conditioning. The only caveat concerns the removal of the alternator belt. On a car equipped with air conditioning, you can remove the pump pulley directly with the belt - this will not in any way affect the quality of the work performed.
Car fuses and relay box
The vehicle's power supply and consumption system ensures the correct functioning of components and assemblies and comfortable driving. The car's current source is the battery. The consumers are connected in parallel and combined into separate blocks with fuses.
On the Chevrolet Niva, the fuse box is mounted in a unit and is located in the passenger compartment. Fuses protect almost all electrical power circuits. They do not have such protection for the generator circuit, engine starting and battery charging.
The Niva fuse box is located on the driver's side under the dashboard. Access to the mounting block is closed with a lid.
To remove it, unscrew two screws.
We remove the cover from engagement with the instrument panel. Lift it up, remove the pins from the rubber bushings and remove.
In the photo you can see where the relay and fuse box is located.
Replacing the Chevrolet Niva water pump
Before starting repair work, it is important to conduct a thorough analysis of the causes of the breakdown.
Diagnosis of pump faults
Unfortunately, the life of the Chevrolet Niva's water pump is less than that of other cars. There are often cases when signs of breakdown appear already after a mileage of 10 thousand km. But as a rule, the pump does not fail suddenly. This gives the car owner time to fix the problem.
- decreasing coolant level in the expansion tank;
- extraneous noise in the engine compartment;
- coolant leak under the engine;
- engine overheating;
- a situation arises with a hot upper pipe and a cold lower one;
- coolant smell;
- pump pulley play.
When diagnosing a pump, it is important to correctly localize the problem area so as not to go down the wrong path. For example, antifreeze may leak from cracked pipes or a thermostat
For the same reason, a characteristic odor appears.
Pump location
Due to the ambiguity of signs of a pump malfunction, a final conclusion about its repairability is possible only after a thorough visual inspection of the device. The pump is installed on the right side of the engine, it is attached directly to the cylinder block at the bottom. Unfortunately, visual inspection from above is difficult due to the clutter of cooling pipes and the thermostat located above the pump. Therefore, to facilitate access to the pump, these elements will have to be dismantled.
For clarity, a photo is shown with the new pump already installed.
Preparing tools
To replace the pump you will need the following tools and materials:
- antifreeze;
- sealant;
- spanner set to “13”;
- socket wrench set to “13”;
- Phillips screwdriver.
To work, you will need two types of “13” keys and a Phillips screwdriver
Choosing a new pump
The range of commercially available pumps is very wide. Well-known pump manufacturers include Hepu (Germany), NK (Holland), Airtex (Spain), Graf (Italy), SKF (Germany - Spain). Among the manufacturers, it is worth highlighting Hepu and Graf. Pumps of these brands use large impellers made of cast iron. Such impellers last much longer than steel and plastic ones. The TZA 2123 pump for the Chevrolet Niva, with reinforced bearings and oil seal, has proven itself worthy. This brand is a leader in the budget segment. In fact, this is the same pump as on the VAZ Kopeyka. Unfortunately, there are many fakes of this pump on the market.
DIY pump replacement
It usually takes about two hours to dismantle the old pump and install the new one. The workplace does not require a lift or pit. All operations are performed from above in the following sequence:
- Remove the left air supply hose to the air filter.
The clamp securing the pipe is loosened with a Phillips screwdriver.
The spacer mounting bolt is unscrewed with a “10” wrench
The clamp screw is unscrewed
Removable air duct makes work area easier to access
After loosening the pump pipe clamp, the thermostat can be easily removed
Tension of the generator belt roller is done with a key set to “13”
The belt is removed after the tension on the roller is released.
Using a screwdriver, the pulley is blocked from turning.
The nuts are unscrewed with a wrench to “13”
Remove the pump cover complete with impeller
Wear of this gasket causes coolant leakage
When replacing the pump on cars equipped with air conditioning, additional difficulties arise. This is due to the fact that the compressor bracket is attached to the pump stud. This prevents the pump from being removed. Most people take the long route in this case and remove the compressor. But it is much easier to unscrew the stud using a locknut. And during assembly, replace it with a suitable bolt.
Read news about the new field
- Niva Chevrolet installation of air conditioning - Auto magazine MyDucato
- Niva Chevrolet installation of air conditioning - Auto magazine MyDucato
- Why the Chevrolet Niva air conditioner does not turn on: reasons and installation (diagram), belt replacement
- Niva Chevrolet installation of air conditioning - Auto magazine MyDucato
- Niva Chevrolet air conditioning installation - Online auto workshop
- Replacing a Chevrolet Niva heater radiator with air conditioning without removing the panel
- Niva Chevrolet installation of air conditioning - Auto magazine MyDucato
- Replacing a Chevrolet Niva heater radiator with air conditioning without removing the panel
Read news about the new Niva
- The modernized Lada Niva Legend (4x4) 2021 was shown on the Internet
- Lada 4×4 Bronto - sales stopped, new details » Lada.Online - all the most interesting and useful about LADA cars
- Description of the instrument panel Lada 4×4 (VAZ 2121, 2131) » Lada.Online - all the most interesting and useful about LADA cars
- Chevrolet Niva gasoline consumption per 100 km
- Buy LADA (VAZ) 2131 (4×4) 2021 in Rostov-on-Don, low price for Lada 2131 (4×4) 2021 on the Avto.ru website
- Fuses Niva 21214 injector «
- The new large Lada 4×4 Niva “Bigster” 2021-2022 based on the Dacia Bigster was shown for the first time. The SUV has changed beyond recognition
- New Niva Chevrolet Lux 2021 - review of GLC equipment
Chevrolet Niva 2004, engine Gasoline 1.7 liter., 80 hp, AWD drive, Manual - DIY
Comments 16
Good evening! I'm choosing a pump, the question is how long did it take?
3 years. This is about 90 t.km. mileage
I had a hard time with the nut number 3, but nothing from the existing tool fit in there. I could barely unscrew it.
Yes, it's disgusting. I have a 10mm L-shaped wrench just for these nuts.
I also recently changed it, only a little differently)))
Yes, it can be different here)
When I recently changed the belt, it got all dirty with coke, which stained my whole engine. Then I freaked out - the whole engine, where I could get to it, wiped it off with a rag until it was shiny)))) But at first I thought, if you loosen the genych, the belt will come off - oh no, Until I loosened the 3 nuts on the roller, I didn’t think about taking off the belt))) I also looked towards the pump, but I really hope that it will last for a long time - I really don’t want to do the Kama Sutra
I don’t rub it on purpose so that it can be seen if it leaks somewhere. 50 t.km. after the capital, nothing flows anywhere.
Good afternoon, what kind of pump is this (brand)?
Why do you need to remove the pump housing? You can immediately remove the pulley from it, and then the pump itself, by unscrewing the 4 nuts.
I thought that unscrewing 3 bolts and then calmly disassembling it on the table would be easier than unscrewing everything from below. You can get to the same goal in different ways))) I remember. The pulley was screwed on well, it was impossible to unscrew it on the car.
Finally, I changed the pump without a hole, drained the coolant from the thermostat, then removed the thermostat itself and took out the pump through this crotch and installed a new one. The business took about 2 hours with smoke breaks.
It's about an hour here, but that's when there is a pit or a lift.
Well, maybe I could have done it in an hour, but the first time I changed the pump without a murzilka, several times I just tightened the belt to unscrew the wheel on the pump))) then I figured out how to take the whole thing out.
It's about an hour here, but that's when there is a pit or a lift.
remove the cooler diffuser - if it is still there, of course. loosen the 3 bolts on the pulleys, remove the belt. remove the pulley, remove the half-pump, pull it up.
You drain the antifreeze from the block through a hose into a basin under the car. You pour the antifreeze into a canister through a funnel with a primitive filter so that fallen dirt does not get into the middle. An hour of work, but you only need to take off your tie and jacket.
Source
Replacing the pump
Replacing antifreeze
What is antifreeze and what is it used for? Antifreeze is a common name for all...
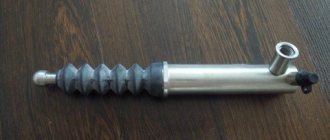
The pump is a special mechanical type engine cooling pump that is designed to circulate coolant throughout the cooling system. The pump is driven by transmitting torque from the crankshaft by a belt.
The pump is replaced if it is jammed, leaking (the bearing seal is broken) or insufficient cooling capacity caused by the small size of the pump petals, as well as the appearance of characteristic noise. After detecting the above-described faults, it is necessary to immediately replace the defective unit.
Repairing a pump on VAZ cars is a very complex process, and therefore its complete replacement is recommended.
When choosing a pump for the Niva VAZ, you should be extremely careful, since an incorrectly selected pump can cause it to jam (the pump petals are too large) or have poor circulation properties. Incorrect selection of a pump is determined by a manufacturing defect in the product or its mismatch with the car model (there are different engines with externally similar water pumps).
The process of replacing the Niva VAZ pump
- Drain the coolant into a previously prepared clean container.
- Loosen the alternator mounts and move it toward the engine to loosen the belt. Remove the alternator belt.
- Unscrew the 3 bolts intended for mounting the pump pulley and remove the pulley itself.
- Now unscrew the 4 nuts that secure the water pump and remove it. If it does not give in, you can resort to using a screwdriver or other flat tools.
- Throw away the old gasket. Clean the seating area of old sealant and make sure that no dust gets inside the cooling system. Lubricate the landing area, gasket and mounting side of the new pump with a small layer of new sealant.
- Reinstall the gasket and pump, tighten the nuts and leave the car overnight to allow the sealant to dry properly.
- Replace the pulley and tension the alternator belt. Tension the belt according to the standard and tighten the generator mounting bolts.
- Fill with coolant.
- Start the engine, then warm it up. If the coolant leak and noise are eliminated, and the car does not overheat, it means that the pump replacement was completed correctly.
That's all. As you have already noticed, replacing the pump on a Chevrolet Niva is not such a difficult operation and does not require special skills from you as an auto mechanic. The main thing is to have a basic
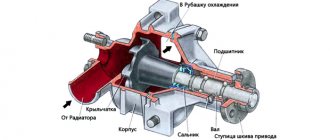
Design
Classic centrifugal pump of console type. The working shaft, mounted on bearings in an aluminum alloy housing, has a flange on one side for attaching the drive pulley. On the other side, an impeller with curved blades is rigidly fixed to the shaft. Single-row ball bearings, non-standardized, the inner race is the shaft itself, in which the ball raceways are made. The outer race of the bearings is common, pressed into the housing with an interference fit and is additionally secured with a screw. On the outside, the bearing is protected by a conventional cuff; on the impeller side, an oil seal of a complex design is installed, in a steel cage, with two protective rings. The bearings are lubricated at the factory; replenishment of lubricant is not provided for by the design.