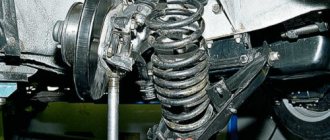
Replacing the door handle and its door lock on a VAZ 2106 is not very difficult, but you will need to be careful, because you will have to dismantle its trim.
Replacing the larva
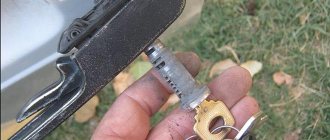
Very often it is the lock cylinder that fails, so we will look below in more detail about how to replace it. To do this, you will need a thin wire or needle and a flat-head screwdriver.
First of all, we remove the spring, which throws the key in the lock when opening. Just pry it off with a screwdriver and remove it, first remembering its position so that you can put it back in the same way:
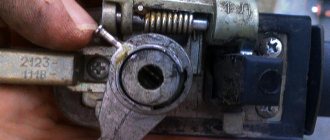
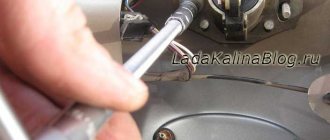
Now we take a thin wire and with its end we squeeze out the cylinder fixation rod, as shown in the photo below:
After which the upper ring is removed and the larva is removed from the reverse side:
The cylinders are replaced in pairs, on both the left and right doors, and also at the same time as the trunk lock, so that you have just one key for everything! Otherwise, you will have to carry several keys with you, which is not very convenient. The price of the set is 300 rubles maximum, so your wallet won’t be too empty.
We carry out the installation in reverse order; everything is not as complicated as it might seem at first glance.
Adjustment
To adjust the door lock on a VAZ 2106 car, you will need a “10” key.
NOTE
The front and rear door locks have the same design and are adjusted in the same way.
1. Outline the outline of the door lock latch.
2. Loosen the three bolts securing the door lock, adjust its position and tighten the fastening bolts.
NOTE
To ensure proper operation of the door lock, change the position of the lock latch on the body pillar if:
- the door closes too tightly - move the lock outward;
— if the door closes poorly, move the lock inward;
— if the door goes down when closing, move the lock up;
- if the door rises when closing (sags in the open position) - move the lock down.
How to change
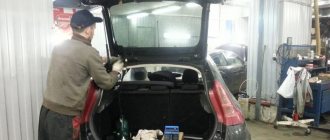
Raise the glass and remove the door trim (see Replacing the door trim).
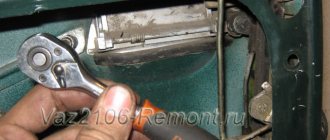
From the end side of the door, use a Phillips screwdriver to unscrew the two screws securing the rear groove...
...and, lowering it a little, we remove the tongue from the groove and move it to the side.
Use a slotted screwdriver or pliers to disconnect the lock release button rod.
The lock can also be removed with the rod by unscrewing the lock release button (see Replacing the door trim).
Disconnect the outer door handle lock switch rod.
Using an “8” wrench, unscrew the nut securing the front groove, move the plastic apron aside and, lowering the groove, remove it from engagement with the pillar of the rotating glass frame.
Remove the front groove from the door.
Using a Phillips screwdriver, unscrew the two screws securing the inner door handle...
...and recess the handle inside the door.
Using a Phillips screwdriver, unscrew the three screws securing the lock...
...and take it out of the door along with the rod and the internal handle.
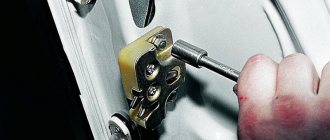
Having marked the position of the latch on the rack with a felt-tip pen, use a “10” wrench to unscrew the three fastening bolts...
...and remove the door lock from the pillar along with the adjusting shims. (We save them when installing a new clamp).
Lubricate the new lock with Litol-24 grease or technical petroleum jelly, connect a rod with a handle to it and install it on the car in the reverse order of removal. Install the lock. If necessary, loosen the clamp screws and move it along the rack within the slots for the screws. We achieve smooth operation of the lock. If there are no comments on the operation of the lock, we assemble the door.
Repair
Door locks form an entire system, which refers to the entire complex of mechanisms that allow you to close and open doors from the outside and inside, lock the doors from the inside and lock the front doors from the outside with a key. Patented cylinder locks (called cylinder locks) on both front doors share a common ignition key, trunk lid lock and fuel cap lock - if equipped. It must be emphasized here that patented locks are NEVER lubricated with oil. Their long-term, flawless operation is guaranteed if dirt is removed from it by rinsing in technical gasoline, and after drying, flake graphite is applied to the cams of the lock mechanism with a key. The interior lock is different for the front and rear doors, as well as for the left and right sides. The lock is installed in the door cavity with two screws accessible from the outside of the door. There is a profiled hole in the door leaf through which, when the door is closed, the lock latch mounted on the door post will pass through and slam into the lock. To increase sliding and reduce noise when locking doors, the contact surfaces of the lock (ratchet) with the latch have a plastic coating that increases resistance to abrasion.
When mounted on the body door frame pillar, the lock latch can move and this allows the door to be adjusted to the body. The lock can be operated using an external or internal handle. The external handle is folding with a plastic handrail that is moderately raised on the surface of the door, in the leaf of which there is a recess for the hand. The handle mechanism is connected to the lock directly, namely by a steel cable with a plastic tip. The outer door lock handles of the front doors have patented lock inserts. These locks, when turned with a key, put a handle on the safety. The lock is connected to the inner handle by a steel cable passed through a flexible shell.
The rear door locks have a so-called child safety lock, which, when activated, does not allow the doors to be opened from the inside.
The locks of all doors have two slamming positions and can be secured using a push-button safety device from the vehicle's cabin. The fuse is connected to the lock by a wire rod. The fuses for the rear doors and the front passenger door (but not the driver's) can be activated before the doors are closed. The design of the locks complies with the UNECC safety instructions. The locks do not allow the doors to open spontaneously in the event of an accident, since they are secured in the longitudinal and transverse directions.
The most popular car of the 90s, the sales leader among domestic cars of those years. The popular Zhiguli-1600 has long been removed from the assembly line, but still appears on our roads. The owners of such a car most likely received it by inheritance. Sometimes students buy it as their first means of transportation, since the price of the Zhiguli is more than attractive. Naturally, when purchasing such a car, the car owner is faced with a number of tasks: installing an alarm system, installing a central lock on a VAZ 2106, a trunk lock, power windows, and so on.
The scope for creativity is great, if there is a desire.
Zhiguli - 1600
You can make this car completely “for yourself”, or you can simply add the necessary options. Of course, specialists can install all this for you, but you can also handle it yourself.
Installing central locking on a VAZ 2106
In order to protect your car from theft, as well as to make driving it more convenient, you need to install a central lock. Thanks to this function, all the doors of your car will be closed by pressing a button on the key fob, and also opened.
There are two ways to solve the problem: installing any alarm system that will perform this function, or you simply buy a VAZ 2106 central locking system, later you can connect an alarm system to it if you feel the need for it.
Preparing for installation
Before purchasing the kit we need, it is important to know that they come in two types: mechanical and electronic. In the first case, the system will be activated when you turn the key in the driver's door. The remaining doors will close automatically. In the second option, control occurs thanks to a key fob with buttons. And, of course, the third option, linking the central locking to the alarm system.
We purchase the necessary central locking kit, which should consist of:
- Four engines. Three of them have two terminals, one for plus and the other for minus. And on the fourth there are four conclusions, two pluses, two minuses.
- Control block. With the help of it the entire mechanism will function.
- Circuit breakers.
- Wires and strips.
Central locking kit
For the car model we are considering, it is best to choose a universal central locking kit.
Tools need to be prepared in advance. In this work you will need a screwdriver, wires, electrical tape, drill, drill bits, etc.
Important! Before starting work, disconnect the negative terminal of the battery!
Lock installation
The locks for the VAZ 2106 have been purchased, all the necessary tools are available, now you can proceed directly to work. In order to install everything correctly, it is important to understand the very principle of operation of the device. When you press a button on the key fob, a signal is sent to the control unit, which redirects this impulse to the engines on the doors, and the locks close.
Let's divide our work into several parts. In the first part, we need to dismantle all unnecessary elements: door trim and panels between them.
Removing door trim
At the second stage, it is important to decide where exactly you want to place the control unit. It is recommended to do this in the lower left corner of the driver's door. This way, you will have enough space to install a window lift system if the desire suddenly arises. We also mount the remaining three engines. If there are no necessary holes in the door, they will have to be drilled.
Let's move on to the wiring. From each door it is necessary to stretch wires to the driver's room, where the main unit is located. You should not conduct them from the bottom of the door, this place collects a large amount of moisture. Once everything is connected, you need to check the entire system.
Now the VAZ 2106 locks are controlled from the key fob or by turning the keys in the driver's door. In the future, you can display a special control button on the dashboard. You can also connect the trunk lock to the central locking.
- Lay the wires through corrugated tubes, this way you will protect them from friction and external influences;
- To adjust the position of the central lock, you can bend the rod.
Front door lock device
Car locks are installed in the door cavity and fixed with two screws; the locking element is connected to the opening mechanism by rods. To reduce noise when opening and closing, high-density plastic coatings are installed on the ratchets, which reduces wear on the contact surface during operation. The design contains:
- retainer body;
- cracker spring, cracker;
- rotor;
- switch;
- traction: blocker, internal drive, switch;
- outside handle;
- levers: internal drive, blocker, external drive;
- lock button;
- ratchet;
- switch roller, central roller.
Cylinder locks or cylinders have become widespread. For the front doors, the locks can be combined with a common ignition key circuit.
Silent locks for VAZ 2106
If you were thinking about making the operation of your “swallow” even more comfortable, you can install silent locks. The doors on your car will close as quietly as on foreign cars.
Before installing silent locks on a VAZ 2106, we purchase the components we need and prepare the tools. We will need:
- 2 sets of silent locks (2 pieces in one set);
- Silent fingers;
- Hex screwdriver;
- Crosshead screwdriver.
Set of silent locks
Installation process
Before installation, we remove old locks from all doors. We take a new lock and carefully saw off the flag. We attach the lock to the door, mark the location of the hole, and then carefully drill it with a drill, adjusting it to the size we need. And finally, we install the new mechanism in its rightful place. We assemble the castle itself, connecting it to the “chocolate”.
After these manipulations, we try to close the door. It turned out great! It didn’t work out - let’s look and check what’s wrong. It may be necessary to recess the lock more, file it, or the problem is in the “chocolate”.
Installation of a silent lock
Let's move on to installing the screw. It must be installed on a stand. To do this, we will again resort to using a drill. In this case, it is very important to correctly and accurately measure where it should be.
Screw installation
We make holes in the front wall of the rack with a diameter of 11 millimeters and in the second with a diameter of 9. We cut the thread and tighten the screw. Now you can try closing and opening the door. If you took all the measurements carefully, then everything should be fine. But you may need small adjustments. In this case, everything is very individual.
Installation of drives, handles
The next step is to install the lock drives and handles. We take the side handle drive rod from the lock that we removed at the beginning. We bend it on both sides, on one side it should be ninety degrees, on the other - a ring. You can install it in place and check it.
Well, the last moment, we connect the internal handle. We drill out the pin in the internal door lock, run the cable and use clamps to make a loop. This is necessary to ensure that the lock does not open on its own while moving.
Loop on the lock
If the doors work properly, then we can congratulate you for doing it yourself. All is ready. If you had alarm activators installed on your old locks, you can safely connect them.
Setting the front left and right door locks
The adjustment begins with checking and reinstalling the lock latches. In 70% of cases, the doors stop locking and close the first time.
In other cases, the position of the handle is adjusted if the door does not open from the outside. To do this, you need to loosen the fastening screws, move the handle and bracket towards the front pillar. After adjustment, the screws are tightened.
On classic VAZ models, jamming and locking of the lock is often associated with stretched rods. The drives are removed, the tips are checked, and the creases are straightened.
Example of installing a silent lock
As the life of the vehicle increases, owners of the “sixes” begin to notice that they have to make more efforts to close the car doors tightly. When such defects are detected, motorists come to a VAZ service station to adjust the door locks. Here they refer to the operation of the VAZ 2114 door closing mechanisms, which, unlike the “six” ones, operate almost without unnecessary noise.
After adjusting the locking mechanism, after a while, car enthusiasts begin to become convinced of the pointlessness of carrying out repair operations. In this regard, car owners come up with one correct idea - to spend money once and install a silent lock on the VAZ 2106 in order to forget about this problem for a fairly long period.
Removing and installing the door
- Take an impact driver and loosen the mounting screws. If the screws do not budge, use a drill to drill out the screw heads. The drill should be ten millimeters in diameter, and the hole should be five to six millimeters strictly in the center. Then drill out the screw head with a drill with a diameter of eight millimeters. After removing the door from its hinges, take pliers and remove the remaining screws.
- Using the same pliers, clamp the opening limiter and remove it.
- After this, you can completely unscrew the hinges and dismantle the door.
Now you can repair or replace the door. Don't forget to adjust the gaps. If you are replacing an existing door, install door hinges around the outlined outlines. Set the gaps evenly around the perimeter of the door, and only then can you tighten the hinges.
Installation of general purpose silent locks
Installation of general-purpose silent locks requires adjustments to the door design, and this takes a fairly long period of time. After all, it is necessary not only to carry out preparatory work, dismantle the old product, manufacture the parts necessary for installing a silent lock, and make certain modifications to its design, filing at some points. It is also necessary to drill additional holes in the vehicle door with a drill.
Currently, silent locks VAZ 2106 are produced, the price of which reaches 5 thousand rubles, although you can find them somewhat cheaper. Removal and installation of locks is carried out as follows:
1. We dismantle the previously installed standard “six” product, for which:
- slightly unscrew the fasteners of the part from the top and bottom;
- pull out the lower fastening;
- unscrew the fasteners from the top a little, but not completely, to prevent the locking unit from falling inside the decorative door card and it will have to be dismantled to get the locking mechanism;
- screw in the lower fastener on which the lock will hang;
- dismantle the upper fastener along with the product.
2. We install the VAZ 2106 silent lock using the reverse algorithm to the dismantling of this product. 3. Next, we install the structural elements with latches into their seats. 4. Check the operation of the silent lock. If it works correctly, but you still need to make efforts to close the doors, then you should take care of the door hinges, which may “sag” over many years of operation of the vehicle. This will definitely affect the degree of fit of the car door to the car body.
At this point, the work on replacing the lock elements is completed, and on the Internet you can watch a video of VAZ 2106 silent locks, the video about the installation of which is quite instructive.
Recommendations for selecting and replacing handles
The standard front and rear door handles on VAZs can be replaced with non-original components, which are called Euro handles. After the repair, the doors begin to lock without effort; there is no need to slam or press on the part for the fuses or the main lock to work.
At the same time, drivers reinstall the lock, choosing silent models. Plastic components are used in the design of silent locking devices along with metal parts. During operation, plastic prevents metal joining, ensures silent operation of the mechanism and prevents rapid wear.
Installation of Euro handles is carried out in standard places; no additional drilling of holes is required during installation. Replacement is carried out after dismantling the casing. The part is installed with three screws. The average price of a set of 4 parts is from 1000 rubles.
When installing the Euro handle, it is necessary to loosen the fastening of the locks and check the tightness of the plastic latches, adjust the position of the handle stop and the ratchet.
Installation of door locks from VAZ 2114 to VAZ 2106
Some car enthusiasts take a more economical route and install silent locks from the VAZ 2114. This is done as follows:
- We saw off the “flag” of the lock.
- We dismantle the old locking mechanism of the “six” together with the connecting consoles and put it in the reserve area.
- Drill out the bottom door hole on the left. We apply the lock from the inner plane of the door, mark the drilling point where the lock sleeve of the upper fastening will be located. If necessary, we process the marking socket with a round file.
- We install the new locking unit in the landing position.
- We assemble the product. Perhaps the “chocolate” will interfere with assembly with its emphasis on the rack, but we’ll leave that for later.
- Using the same file, we adjust the right through hole from below, which will entail the correct operation of the door lock.
- We disconnect the outer lining of the product and slightly sharpen the 2 metal bushings at the end of the door, which are where the fasteners are installed.
- We sharpen the angle of fastening of the locking device, periodically checking the compliance of the angular values.
- We grind down the screw tops to tighten the locking device to a level below the plane, “flush”. Upon completion of the work, we assemble the locking mechanism. Next, we connect the rods to the lock handles.
- When closing the door and there is a problem with the protruding “chocolate”, it is necessary to make a high-quality adjustment of the locking device, after which we fix the screw connection.
- Using chalk marks, we determine the position of the screw connection when closing the car door.
- We drill the front plane of the rack, use a tap to apply an M 10 threaded connection along the hole with a step of “1”.
- Then we drill through holes in the front walls of the rack of the appropriate diameters, followed by cutting the internal threaded connection and installing the screw in the rack.
- We proceed to installing the lock drives and operating the device handles.
- We cut off the drive rod of the side-type handle from the removed device. We bend one end at a right angle, and bend the other into a ring configuration.
- We connect the internal action handle via a clamping cable.
After this, the VAZ 2106 locks will operate relatively silently.
How to replace a lock cylinder
Very often it is the lock cylinder that fails, so we will look below in more detail about how to replace it. To do this, you will need a thin wire or needle and a flat-head screwdriver.
First of all, we remove the spring, which throws the key in the lock when opening. Just pry it off with a screwdriver and remove it, first remembering its position so that you can put it back in the same way:
Now we take a thin wire and with its end we squeeze out the cylinder fixation rod, as shown in the photo below:
After which the upper ring is removed and the larva is removed from the reverse side:
The cylinders are replaced in pairs, on both the left and right doors, and also at the same time as the trunk lock, so that you have just one key for everything! Otherwise, you will have to carry several keys with you, which is not very convenient. The price of the set is 300 rubles maximum, so your wallet won’t be too empty.
We carry out the installation in reverse order; everything is not as complicated as it might seem at first glance.
Good day to all! From the very beginning I received the car with non-working locks. Initially, the driver's door was locked only from the inside, and the passenger door was not locked at all. The neighbor's children took advantage of this and the car repeatedly greeted me with its doors open. This annoying drawback was eliminated by me quite recently. Moreover, on the way to the salon there are a couple of goodies.
Until the summer, as I wrote above, the doors were not locked at all - both larvae refused to turn. With the onset of hot weather, a strange thing happened - the larvae began to scroll! It would seem that we should be happy, because the problem with non-locking doors has disappeared, aha, no matter how it is! The larvae were turned by any flat object, including even a screwdriver... But at least the appearance was already created that it had become at least more difficult to get into the car - after all, the doors were somehow locked! In short, this option, sowing anxiety in my soul, did not suit me at all and it was decided to replace the cylinders so that at least the car could be locked with one single key. No sooner said than done. A set of cylinders was purchased for all locks except the ignition switch:
The lock cylinder (lock cylinder) is a type of lock security mechanism, in the form of a cylinder, the working part of which can be rotated in the body only when a key is inserted into the cylinder hole. The uninterrupted operation of the lock cylinder protects the car from unauthorized entry and protects the owner’s property. Therefore, a malfunction of the lock cylinder is a serious concern that requires an immediate solution, and many car enthusiasts are seriously thinking about how to change the lock cylinder of a VAZ 2114 with their own hands.