The main reason for the unstable operation of the Lada Granta engine at idle is a malfunction of the regulator , throttle position sensor.
Note to the driver!
The Lada family, starting from the Priora, is equipped with an electronic throttle position control system. Previous models used a mechanical type of drive (cable).
Systematic use of equipment leads to wear and unstable operation. The process of self-prevention and replacement is simple, but requires attentiveness on the part of the master.
Using the example of a Lada Granta car, we will consider a step-by-step algorithm for replacing the idle speed sensor.
Signs of failure, need to replace IAC, TPS
- Difficulty starting the engine “cold” or “hot”;
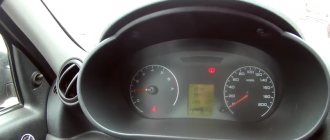
- floating idle , unstable engine operation;
- increased fuel consumption;
- the accelerator pedal is uninformative;
- vibration in the car interior, vibration of the steering wheel;
- reduced acceleration dynamics;
- the car stalls when driving downhill;
- when you press the accelerator pedal, periodic dips and speed jumps are noticeable;
- increased consumption at idle.
We determine the malfunction ourselves
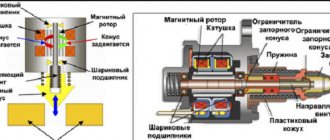
The regulator is designed to maintain idle speed in a given range and ensure correct and timely warming up of the engine.
Although malfunctions in the functioning of the engine in this mode rarely occur on the Lada Kalina, practice has made it possible to establish a certain set of signs indicating a malfunction of the regulator.
- difficulties starting the unit;
- when the gearbox is in the neutral position, “floating” engine speeds are observed;
- when switching transmission stages on the move, the engine stops without authorization;
- Once the unit begins to warm up at low outside temperatures, the speed is not able to overcome the 1500 per minute mark, which “delays” the time it takes to reach operating temperature.
Observant owners of Lada Kalina testify to a decrease in speed after turning on the air conditioning compressor. This often leads to the engine stopping, and the lubricant pressure symbol in the unit lights up on the instrument panel.
Causes of breakdowns of idle speed sensors
External air leakage is the first and main reason for unstable operation of the ignition system and fuel equipment. The electronic engine control unit (hereinafter referred to as the ECU), while scanning the readings, “does not know what to do with” the excess air.
The breakdown indicator lights up on the dashboard, the car speed fluctuates, and the air consumption increases.
The second most common reason is systematic jamming of the mechanisms in the ventilation valve. As a result, the tachometer needle shows speeds from 850 to 1250 rpm, and the idle speed is unstable.
Completes the “top three”: a lean mixture entering the cylinders for subsequent ignition.
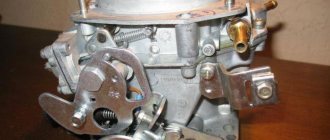
Sensor
Preparatory stage before installing the idle speed sensor
Necessary tools, materials:
- screwdriver with magnetic tip;
- calipers;
- tester;
- stationery knife;
- torque wrench;
- idle speed controller (hereinafter referred to as IAC);
- throttle position sensor (hereinafter referred to as TPS);
- rags;
- additional lighting;
- liquid for removing deposits and rust WD-40.
Torque
To change the amount of torque, the electronic control unit can change one or more parameters:
- throttle opening angle
- boost pressure (if the engine is turbocharged)
- ignition timing
- fuel injection timing
- turning on/off cylinders
The amount of torque is constantly adjusted and depends on the following factors:
- engine starting conditions
- stable idle speed
- O2 content in exhaust gases
- restrictions on power and number of revolutions
- Automatic transmission (when shifting gears)
- traction control when braking
- forced idle when braking
- equipment operation (climate control, air conditioning)
- cruise control (whether the mode is on)
Sequence of actions when independently replacing IAC and TPS sensors
- We place the machine on a level platform and ensure priority safety measures during repairs.
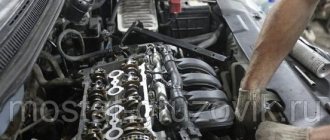
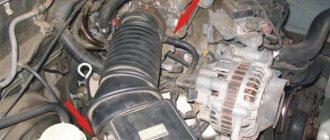
- We open the hood, an air duct with a receiver is laid above the engine. The Lada Granta with 8 and 16 valves has plastic, while in previous Lada models it is aluminum.
Air vent with receiver
- We press out the plastic clamp of the block with wires.
Plastic retainer
- Disconnect the contacts of the electronic gas pedal.
Electronic pedal contacts
- Using a Phillips screwdriver, unscrew the two screws securing the IAC to the throttle body.
- We remove the IAC from the cavity of the throttle assembly.
Removing the IAC
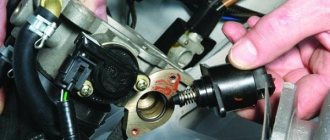
- Next, we proceed to unscrew the TPS, it is installed a few centimeters lower.
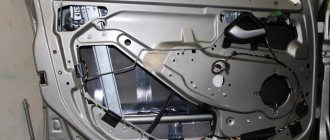
- We unscrew the two screws, remove the TPS, and disconnect the block with the wires.
Retrieving the TPS
Note to the driver! When removing the valve, be extremely careful not to lose the rubber bushing.
- We carry out troubleshooting of the seat of the IAC and TPS. We clean the rust deposits with a rag and use WD-40 aerosol as needed.
- Screw in each of the sensors one by one and connect the connectors with wires.
- We start the engine and check the idle speed.
of the idle speed sensor is complete.
Replacing the idle speed sensor
Repair
Diagnostics
The VAZ 2110 lambda probe has four outputs:
Pads for VAZ 21102
Checking the oxygen sensor heater comes down to a basic check of the heater circuit:
the presence of voltage at the power contact of the vehicle’s on-board network (if there is no voltage, check the entire circuit); presence of continuity of the negative contact circuit.
In the future, we are exclusively interested in the signal wire, or rather, the change in voltage passing along it from the sensor to the ECU during various engine operating modes. You can check the operation of the sensor in two ways:
- Using a voltmeter;
- Using an oscilloscope (motor tester).
Since this instruction is intended for the common man who simply cannot have professional equipment in principle, we will diagnose the sensor using a voltmeter.
Method one: reading trouble codes
In order to read the fault codes located in the controller’s memory, it is necessary to either connect special diagnostic equipment to the diagnostic block (located on the left side under the instrument panel console) (too simple - not for us), or close contact “B” to ground, which is so The same can be done by connecting contacts “A” and “B”.
Diagnostic block VAZ 2110
- “A” - contact connected to the vehicle ground;
- “B”—controller signal contact;
- “G” — control of the VAZ fuel pump;
- “M” is a contact for issuing information (serial data).
After these contacts are closed, turn the ignition key to position “III” (do not start the engine), observe the “CHECK” indicator, which should flash the number 12:
- Flash;
- 1-2 second pause;
- Flash;
- Flash;
- Long pause of 2-3 seconds;
- Double repetition of the above cycle.
Reading fault code number “12”
Attention! This code indicates that the self-diagnosis program is running, otherwise this program does not work. After this, the program displays codes of existing faults in a triple cycle (each code three times), in the absence of these, code “12” continues to be displayed constantly
After this, the program displays codes of existing faults in a triple cycle (each code three times), in the absence of these, code “12” continues to be displayed constantly.
Attention! When the diagnosis is completed, these contacts are allowed to be opened only after the ignition is turned off, after ten seconds. Erasing fault codes from the ECU memory in order to make sure that the fault has been eliminated occurs by turning off the controller's power for at least ten seconds.
The power is turned off either by disconnecting the negative terminal from the battery or by removing the controller fuse
Erasing fault codes from the ECU memory in order to make sure that the fault has been eliminated occurs by turning off the controller's power for at least ten seconds. The power is turned off either by disconnecting the negative terminal from the battery or by removing the controller fuse.
Equipment diagnostics
- We switch the tester to resistance testing mode (ohmmeter), measure the resistance at the regulator terminals according to the diagram: A - B, C - D. Data in the range from 0.040 to 0.080 Ohm.
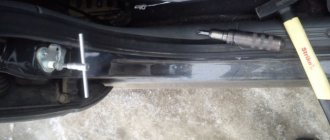
- Using a caliper, measure the distance between the end of the needle and the flange; it should not exceed 23 mm.
Measuring the distance
- We inspect the mounting socket for each of the sensors, clean it with a rag from dirt and dust.
- Before installation, lubricate the O-ring with engine oil.
- We tighten the screws of the regulators with a torque of 3 - 4 Nm.
What to choose?
When replacing, many more or less experienced car owners have a question about which regulator is better to install. After all, there are two types. Sensor type
Peculiarities
These sensors are usually factory installed. The service life of such a throttle position sensor is stated to be about 55 thousand kilometers, but in practice it has to be changed more often
The operation of such a device is based on the magnetic-resistive phenomenon; a Hall element is used. The cost is noticeably higher than the first option, but it is unlikely to have to be changed. Huge resource, high reliability
In pursuit of savings, many forget about the importance of quality. But it should be in the first place when choosing spare parts when repairing a car.
TPS is an important, but easy to replace device. The repair operation will take you no more than an hour, even if you are just beginning to learn the joys of repairing your car yourself.
But under no circumstances delay repairing the sensor, otherwise this may negatively affect the operation of the engine, its service life and the cost of fuel, which you will overuse due to incorrect data from the sensor to the ECU.
Useful for car enthusiasts - everything about cars
Addresses of companies providing installation/replacement services (Moscow, St. Petersburg, Kyiv region)
| № | Name | Address |
| 1. | "Oiler" | https://oiler.ua/ Kyiv, V. Lobanovsky Ave., 119D, Goloseevsky district |
| 2. | "AUTOKLONDAYK" | https://auto-vaz.com.ua/ TO AUTOKLONDAYK, Kyrylivska street, 60P, of. 1, Kyiv, 04080 |
| 3. | "Star - D" | https://star-d.ru/ st. Savushkina, 89, not far from the Staraya Derevnya metro station, 200 meters from the St. Petersburg - Finland highway (from Primorsky Prospekt). |
| 4. | "OSA" - Society for Assistance to Motorists" | Address: 190013, St. Petersburg, st. Vvedensky Canal, 7, BC “Farvater”, office 210 |
| 5. | "Auto Mechanic" | Address: Rostokinsky pr-d, 3с61 |
| 6. | "PaAlex" | Address: st. Ozernaya, 46k2s2 |
We perform a diagnostic examination
So, the part has been removed, now you can visually diagnose the problem yourself and determine whether replacement is needed, or whether cleaning will be sufficient. If you do not find any mechanical damage, and the device does not cause suspicion or desire to replace it, then you just need to clean the deposits that have formed. All you need for this manipulation is a (clean) rag and carburetor cleaner. Pour the product into all holes, wipe with a rag and let dry. When the regulator becomes cleaner, inspect it again for mechanical damage.
After cleaning, the IAC must be correctly installed in its rightful place. Everything needs to be done step by step, as during dismantling, but, of course, in the reverse order.
It is important to know that when you install the IAC and start the Lada Priora with 16 valves, the engine speed will immediately reach its highest level. You should not be afraid of this, because the sensor needs to be adjusted to normal operation. When you restart the engine, this will no longer happen, since the IAC will operate in the correct mode for itself.
List of online stores providing goods (Moscow, St. Petersburg, Kyiv region)
| № | Name | Address |
| 1. | "Existential" | https://exist.ua/ |
| 2. | "Klondike" | https://autoklondayk.com.ua/ |
| 3. | "Major-auto" | https://www.major-auto.ru/ |
| 4. | "AvtoRus" | https://www.autorus.ru/ |
| 5. | "How much" | https://www.avtostore.spb.ru/ |
| 6. | "PulseCen" | https://spb.pulscen.ru/ |
How to distinguish counterfeit pxx from the original?
- You should not buy a regulator from the first person you come across. Buy in official VAZ showrooms, in specialized stores, where you will be offered a guarantee and a sales receipt.
- Pay close attention to the appearance of the product and original packaging.
- The absence of the latter is 100% counterfeit.
- Examine the body of the product; there should be no signs of “clumsiness” on it, the rivets on the surface should have heads, the original spring is always black and has fewer turns than on the fake.
- The body of a counterfeit product is most often 1 - 1.5 mm shorter than the original.
- Pay attention to the little things, and you are very likely to purchase an original and high-quality regulator.
Review of prices from different manufacturers
| Manufacturer article number | Price, rub.) | Resource (Thousand km) |
| Idle speed regulator 2190 KZTA1148300-02 | From 695 | 85 – 95 |
| 2190-1148300-03 | From 700 | —/— |
| Throttle position sensor 2190 VTN 05435435 | From 250 | 65 – 75 |
| Omega 465656 | —/— | —/— |
| Ricor Electronics | —/— | —/— |
| KRAFT NEW | —/— | —/— |
*prices are current as of November 3, 2018.
Elimination of floating speeds
- heads with a ratchet, and their size should be 6 and 8;
- neutral sealant, when purchasing, pay special attention to ensure that it is odorless;
You need to disconnect and remove the throttle cable stopper from the lever. This work must be done specifically on the throttle assembly. Next you will need to remove the resonator and air pipe. Using TORX T-25 heads and bits that were previously purchased, you need to unscrew the air filter shell. To be able to carry out this work with maximum convenience, you need to remove the wire from the exhaust receiver and all associated fasteners going to the throttle assembly.
Now, having removed the obstacle from the throttle assembly, unscrew all the bolt heads using a ratchet head to do this job. Only after this will it be possible to remove the remote control and remove the rubber rings that serve as a seal at the two ends of the throttle valve. All grooves need to be cleaned as much as possible and the FUM tape should be wound around them in a circle, about 15 times, and on the small pipe - about 10 times.
Only after completing this work can you begin to fully assemble the elements into a single whole. It would also be useful to use a clamp when securing the channel hose and the tube leading to the vacuum booster. This is necessary to further prevent air leaks in the connections.
New Lada: battery charging lamp is on/flashing! — Page 9
To check whether the speed on the Lada Granta is floating, look at the IAC sensor. It is located on the throttle body, therefore, in the same place as the sensor responsible for the throttle position. It is secured with two mounting screws. In order to verify its functionality, one multimeter will be enough.
If the vehicle readings are normal, it should be within approximately 80 ohms. In the same case, if the indicators turned out to be significantly higher than the IAC norm, it will be necessary to replace it.
At the moment when the ignition is turned on directly, the rod located on the regulator fully extends and rests against a specially made calibration hole. It is located directly in the throttle pipe. After this, the sensor begins to count steps until the required time and returns the valve to its original state upon completion of operation.
Recommendations for choosing components
Insufficient driver experience and a wide range of spare parts are the main factors that make it difficult to select and purchase components for the Lada Granta.
Cheapness is the first sign of low quality workmanship.
When purchasing, carefully check the catalog items and search indexes with the actual data specified in the operating instructions. If you do not have experience in servicing equipment, use the services of certified service stations and demand a quality guarantee for the work performed.
Insufficient compression
In addition, do not forget about the possibility of low compression in the cylinders, which is less than 1.0 MPa. To find out the reasons for this phenomenon, it is necessary to disassemble the motor. This will make it clear whether the cylinder head gaskets or pistons have burned out, or whether the piston rings have broken or stuck. Among other things, the cause of such compression may be poor adjustment of the timing valves. If the engine has already covered a sufficient mileage, then we are talking about natural wear and tear on the engine components.
New Lada: LADA Granta maintenance calculator
On an 8-valve Lada Granta engine, it is necessary to measure compression only after adjusting the valves!
The compression on the Lada Granta should be at least 12-13 atmospheres. If it is more, about 15, then most likely it is necessary to replace the oil scraper rings. If the compression is less, the engine is worn out, it needs to be repaired, it will not develop sufficient traction!
Compression gauge - it is used to measure the compression in the engine
Reviews
| № | Positive |
| 1. | Vasily: I’ve been driving a car for a year and a half, I haven’t made any capital investments, except for the purchase of consumables. I regularly maintain it, buy good oils, and fill it with high-octane fuel. |
| 2. | Gennady: at 30,000 km I cleaned the idle air regulator once, and since then I forgot about the malfunctions. In winter, the car starts with a half turn. |
| 3. | Ivan: I recently went to a service station, the car started to be difficult to start. After diagnostics, the technician discovered poor contact between the block and the wires on the throttle position sensor. Now the Lada Granta works like a watch. |
| 4. | Vladlen: I have no complaints about the quality of the machine, because it is a budget option. Yes, breakdowns do occur, but they are minor and can be repaired independently. |
| 5. | Gennady: a year has passed since the purchase of the equipment, there are no comments. I tighten the fastenings in small ways, check the wiring, otherwise no comments. |
| 6. | Dmitry: for two years of operation of the car there were no major breakdowns, minor ones were fixed independently, and I did not contact the service center. |
| 7. | Valery: I am satisfied with the quality of workmanship and assembly of the machine. After the purchase, I immediately tightened all the fasteners, the interior is quiet, the plastic does not make noise. |
| Negative | |
| 8. | Victor: the first time the regulator flew 40,000 km, I contacted the service center and had it replaced. At 65,000 km the TPS began to act up. I decided to sell the car and will buy a Renault Logan. |
| 9. | Georgy: after a year of operation, the car began to crumble, I visited the service station twice unscheduled. I am dissatisfied with the quality of workmanship and assembly and plan to sell the car. |
| 10. | Vladislav: I used the car actively for six months, it started to fall apart, I had it repaired twice under warranty. I do not recommend Lada Granta for purchase. |
Adjusting valves without leaving marks
In addition to the classic method of adjustment with setting TDC, there is the following practice:
- Jack up the right side of the car and hang the wheel.
- Remove the valve cover and install the retainer in the rocker arm.
- Rotate the wheel until the piston is at top dead center.
- We measure the valve clearance and determine the size of the metal washer that needs to be installed.
- We press the cam (device) on the surface of the valve, remove the worn washer, and install a new one.
- By analogy, we repair the remaining cylinders.
This adjustment method is good on the road when there are no service stations nearby.
Conclusion
The performance of idle speed sensors is influenced by many factors, including:
- fuel quality;
- level of dust and gas contamination of the territory;
- filter replacement frequency;
- car driving style.
In most cases, breakdowns are caused by violation of the operating conditions of the technical equipment by the driver. Purchasing cheap, non-original spare parts and unprofessional installation are the main factors that create the preconditions for premature wear of parts.
How to check TPS
The most convenient way to check the operation of the Niva Chevrolet TPS is by testing . For this you will need a multimeter. The goal is to determine the presence of power at the sensor contacts, measure the voltage and identify the causes of the breakdown. They may be a malfunction of the unit itself, poor contact between the slider and the resistor track, or problems in the vehicle's electrical network.
Availability of "ground"
The purpose of the test is to measure the “negative” power supply, the sensor:
- Disconnect the power cord from the connector.
- Inspect for the presence of dirt , oxidation or mechanical damage.
- Set the multimeter to 20V DC voltage (DCV).
- Turn the ignition key to the ON position (do not start the engine).
- Connect the red probe of the multimeter to the “plus” on the battery.
- Touch each of the three contacts on the wiring connected to the sensor with black.
On one of the contacts the device screen will show a voltage of 12V . This means that there is a ground on the sensor. If power is not displayed on any of them, the reason for the malfunction of the Niva Chevrolet throttle sensor is the absence of a “ground”.
Powered by reference voltage
The purpose of the test is to measure the power supplied to the TPS. The operation of the mechanism will be disrupted if there is insufficient or missing voltage :
- Connect the black probe of the multimeter to ground.
- Turn the ignition key to the ON position. Do not start the engine.
- Connect the red probe to each of the remaining two contacts of the sensor.
- One of them will display a power supply of about five V. The third wire will be the signal wire.
If voltage is not detected on any of the wires , the cause of the Niva Chevrolet TPS malfunction is in the electrical wiring.
Cleaning algorithm
Now we will give a step-by-step algorithm for properly cleaning the throttle valve.
- First of all, you need to get to the damper itself. The design is different in different engines. But as a rule, to do this you need to remove the air duct that runs from the damper to the air filter.
- Dismantle the damper. To do this, unscrew several mounting bolts (2-4 pieces), and also disconnect the necessary connectors (for example, the connector from the absorber purge valve).
- To clean, you must use a carburetor cleaner. There is a wide variety of them, and in auto stores you can easily find a product in accordance with your preferences and capabilities (we will talk about them later).
- Using a rag and the mentioned product, you must thoroughly wipe the damper outside and inside.
- You also need to clean the protective grille (if your car has one).
- Assembly of the unit is carried out in the reverse order.
An easy way to clean your throttle body
The correct way to clean the throttle body
Examination
3 popular ways to diagnose the causes of a malfunction
Among professionals and car enthusiasts, there are many ways to check the performance of the sensor. But we will dwell in detail only on the most effective and simple methods:
- First method. The point of this method is to check the operation of the sensor itself. To do this, you need to remove the product from its mounting location, take it in your hand, connect the power contact block to it (if it is not connected) and start the car engine. In this case, on a working device, when the engine starts, the sensor needle should extend. If this does not happen, then its operation is impaired or the device is faulty.
- Second method. Assumes the use of a voltmeter. The task is to check that the correct voltage is supplied to the sensor. To do this, the sensor is disconnected from the contact chip, and a measuring device is connected to its terminals. After which, the ignition is turned on, and all the terminals of the contact chip are analyzed one by one. The operating resistance parameters should be about fifty ohms or tend to infinity. The voltage level should be 12 volts. If the voltage reading is less, this indicates improper operation of the battery or the cause is related to an open circuit or operation of the computer.
- The third approach involves checking the resistance of the external and internal windings of the sensor. Measuring work should be done using a multimeter. The contact parameters after measurements should be in the range from 40 to 80 Ohms. If there is a deviation or zero values of the device during measurements, the IAC must be replaced.
Coolant temperature sensor Lada Granta
The main functions of this part include measuring and monitoring the temperature of the coolant in the engine cooling system. Based on the data provided by the DTOZH, the ECU corrects the frequency at which the crankshaft rotates, and the system also corrects the ignition timing and the composition of the air-fuel mixture. Thus, this element must ensure rapid heating of the motor when it starts, and it is also responsible for maintaining the temperature required for each operating mode.
In general, the DTOZH on Grant is not prone to breakdowns, but sometimes it can provide incorrect information. Install them on the thermostat covers.
DTOZH are thermistors that have negative temperature coefficients; their resistance level becomes lower as the temperature increases. Thanks to the controller, the DTOZH receives a stabilized voltage; after it drops, the element calculates the coolant temperature. The ECU will alert the car owner if any of its circuits are broken, then the controller will activate the cooling system fan. Temperature readings in such cases are calculated using a workaround algorithm.
The sensor influences the starting of the motor and its subsequent operation. The car owner will learn about its possible breakdown by noting the presence of the following symptoms:
- problems when starting the engine in cold weather;
- exceeding fuel consumption standards;
- poor exhaust from a still unheated engine;
- periodic malfunctions in the functioning of the cooling system, in particular during fan operation.