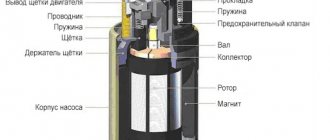
The VAZ 2101 fuel pump rod is the main part of the membrane drive
Now we’ll talk about what a VAZ 2101 fuel pump rod is, and what problems it can cause for a car driver. If you have not yet come across such a detail, then be sure to read it, a lot of interesting things will be told. Moreover, this is worth reading not only for owners of kopecks, but also for nines and tens, with carburetor engines.
The principle of driving the fuel pump is the same for all. And all the breakdowns, accordingly, are also the same, despite the obvious differences between the cars. Of course, the reliability of engines of eights, nines and tens is higher, but the rod still tends to wear out. Let's start with what a fuel pump on a VAZ 2101 is, and how it pumps fuel through itself.
A little about the design of the fuel pump
The inner world of a penny gas pump
The VAZ 2101 fuel pump housing consists of two halves. On the bottom there is a diaphragm drive lever. There are two small valves in the top cover - inlet and outlet. By the way, they are included in the repair kit. But it is better not to use it, since the effectiveness of replacing several components and gaskets is extremely low. As practice shows, even highly professional repairs will not give good results.
The fuel pump will still not work as it should. And if you think that the electric fuel pump on the VAZ 2101 can save the situation, then you are mistaken. These are unnecessary problems that you simply don't need. Such a fuel pump must be installed if an engine with a two- or seven-wheel drive (injection) is being installed. In all other cases, it is useless to do this - there are a lot of costs, there is no effect.
Therefore, the only correct solution is to completely replace the VAZ 2101 fuel pump. Its price in stores is 450-500 rubles, no more. The repair kit is cheaper, but the guarantee that it will pump the pump is small. But if you install a new one, the problem will disappear for several years. According to reviews from car owners, the most reliable fuel pumps for the VAZ 2101 are those produced by DAAZ. But it is worth noting that Pekar and Weber are also praised by drivers. True, it doesn’t happen every once in a while, sometimes a true G (marriage, in the sense) comes across. With repair kits the situation is even worse.
External view of the fuel pump of a VAZ 2101-2107 car
And if there is a chance to purchase a low-quality fuel pump, but it is small, then you can buy a repair kit of a very low grade. From my own experience, I will say that I personally purchased kits in which the valves either did not fit into their grooves at all, or fell into them like a spoon in a mug. I don’t know, it’s quite possible that fate doesn’t like me very much, but this happened not only to me. Therefore, I decided that the best way to fix the VAZ 2101 fuel pump is to purchase a new one. And install a new rod. And gaskets.
Symptoms that clearly indicate a faulty pump and rod
Fuel pump and gasket set
The main sign of a faulty fuel pump is that the engine begins to stall at high temperatures, and after stopping it does not start. It sits for a while, cools down, and only then is it possible to start the engine. Of course, another breakdown has a similar symptom - a violation of valve adjustment. Only in this case does it feel as if the engine is trying with all its might to pull the car, but cannot, it is beyond its capabilities. And when the fuel pump starts to malfunction, the engine simply stalls.
The reason for this is excessive heating. As we said, the VAZ 2101 fuel pump consists of two valves. Well, one or both became warped due to heating and stopped opening. Cool them slightly and you can continue moving. Remember how often you saw a wet rag thrown over a gas pump? Now you know what purpose this is for.
But there is also a VAZ 2101 fuel pump rod, a truly wonderful contraption. It is made of steel. And if in the Soviet years it was hardened, now no one needs it. The price of the stock is at least 25 rubles. Well, who will spend kilowatts of energy on a part whose final cost is 25 rubles? Nobody! What happens then? But an unpleasant picture emerges - the fuel pump lever simply erases the rod, reducing its length.
And if you have gaskets under the fuel pump housing, then you are just lucky! When you pull one out, the rod will protrude from the insert more. And that’s it, the pump will continue to pump gasoline normally. But what if there are no gaskets? Who knows what could happen, for example, they forgot to put them on? And that’s why the rod was worn out. What to do then? Try taking it out and inserting it the other way. You know, this action helped several times.
A sign that the fuel pump rod has worn out is that the car accelerates to a certain speed. I had such a thing that I drove around the city normally, but as soon as I got on the highway, my maximum speed was 90 km/h, and that’s all. You step on the gas, but the engine stalls, it doesn’t have enough gasoline. I released the pedal a little - it drives calmly and shows no signs of breakdown. Moreover, a pump rod malfunction cannot always be detected when driving around the city or at idle speed. A short-term increase in engine speed will not give the same effect as long-term driving at high speed.
Replacing the fuel pump rod
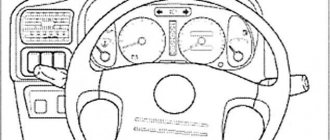
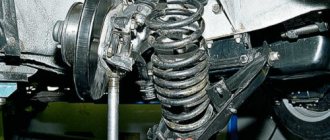
Installation location of the gasoline pump on a VAZ 2101 car
So, you need two gaskets to replace - thin and thick. To be honest, I don’t remember the exact thickness, but if you say so in a store, the seller will understand you. The fact is that there are usually no other gaskets available J. The main thing is to ensure that the new rod protrudes beyond the spacer by no more than 1.3 mm. But it is unacceptable for the protrusion of the rod to be less than 0.8 mm. Take the average value - one millimeter. This will be quite enough for the normal operation of the fuel system.
The fact is that with a larger rod overhang, the likelihood that the diaphragm in the VAZ 2101 fuel pump will break increases. Well, if the protrusion is smaller than 0.8 millimeters, then all the symptoms described above will appear. Please note that the gaskets are placed between the spacer and the engine block. There is no need to install them under the fuel pump housing. You can easily confuse them; they will easily fit there too.
That’s probably all that can be said about the VAZ 2101 fuel pump rod. All that remains is to mention a few words about increasing reliability. Before installation, heat it red-hot over a fire, this will slightly increase the strength of the metal and make it not so sensitive to the influence of the diaphragm drive lever.
The VAZ 2106 automobile fuel pump is one of the main components of the fuel supply system, which pumps fuel from the tank to the carburetor. Directly in the carburetor unit, an aerosol mixture of fuel and air is formed, which enters the power plant.
Self-diagnosis and repair
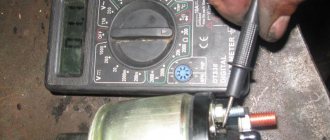
The simplest way to check the operating condition of the pump, proven by more than one generation of drivers, is to disconnect the hose from the outlet and manually pump it. Only on Honor, in order for the bleeding lever to move, the diaphragm must be at its highest point, and the pusher at the bottom of the eccentric.
If they are stopped in the reverse position, one turn of the manual winding handle will be enough to return the diaphragm and pusher to the desired position.
When manually pumping, fuel should be supplied from the pump in a stream in time with the movement of the hand lever. The main thing when carrying out this procedure is to place a rag on the engine so that gasoline does not splash around the engine compartment.
To correct internal defects, the pump must be dismantled. The procedure is not complicated. It is enough to disconnect the supply hoses of the fuel line and unscrew the two fastening nuts with a “13” wrench.
READ Replacing stabilizer bushings for Opel Astra h
When removing the pump, be careful not to damage the gaskets. There are three of them under the fuel pump. First comes a gasket with a thickness of about 0.3 mm, then comes a gasket that provides thermal insulation of the pump from heating the cylinder block, after which a thin gasket-seal is laid again, but only 0.75 mm thick.
By selecting the thickness of the gaskets, the height of the pusher exit is determined, which should be within the range of 0.8 mm. up to 1.3 mm. But between the base of the gas pump and the thermal insulating gasket there should always be a gasket with a thickness of no more than 0.33 mm.
Beginning drivers need to remember that when the fuel pump on a VAZ 2106 does not pump and it has been disassembled for repairs, reassembly does not guarantee its functionality. For correct assembly installation of this part, certain experience and skills are required, especially in terms of removing gaps between mating parts.
Why doesn't it download?
After making sure that there is fuel, that the filters are clean and that the fuel line is clear, you can begin diagnosing the pump. The reasons for its failure can be caused by:
natural wear and tear from long-term use;
stretching of the spring and loss of its elastic properties;
loss of filter capacity due to clogging;
The owner of a VAZ 2106 is faced with a choice - which path to take in order to restore the functionality of the pump.
The first option is the simplest and most reliable, but expensive in terms of cost. Any decent service station has equipment that, in a minimum amount of time, will not only measure the pressure at the inlet and the vacuum at the outlet of the fuel pump, but also identify the part causing defects in the operation of the equipment.
The second option is not the simplest, not as fast, but practically free, except for the time spent on it - do all the diagnostic and repair work yourself in the garage.
The simplest way to check the operating condition of the pump, proven by more than one generation of drivers, is to disconnect the hose from the outlet and manually pump it. Only on Honor, in order for the bleeding lever to move, the diaphragm must be at its highest point, and the pusher at the bottom of the eccentric.
If they are stopped in the reverse position, one turn of the manual winding handle will be enough to return the diaphragm and pusher to the desired position.
When manually pumping, fuel should be supplied from the pump in a stream in time with the movement of the hand lever. The main thing when carrying out this procedure is to place a rag on the engine so that gasoline does not splash around the engine compartment.
To correct internal defects, the pump must be dismantled. The procedure is not complicated. It is enough to disconnect the supply hoses of the fuel line and unscrew the two fastening nuts with a “13” wrench.
When removing the pump, be careful not to damage the gaskets. There are three of them under the fuel pump. First comes a gasket with a thickness of about 0.3 mm, then comes a gasket that provides thermal insulation of the pump from heating the cylinder block, after which a thin gasket-seal is laid again, but only 0.75 mm thick.
By selecting the thickness of the gaskets, the height of the pusher exit is determined, which should be in the range from 0.8 mm to 1.3 mm. But between the base of the gas pump and the thermal insulating gasket there should always be a gasket with a thickness of no more than 0.33 mm.
Novice drivers need to remember that when the fuel pump on a VAZ does not pump 2106
and it was disassembled for repair, reassembly does not guarantee its functionality. For correct assembly installation of this part, certain experience and skills are required, especially in terms of removing gaps between mating parts.
Design and principle of operation of a fuel pump
The basic design of the VAZ 2106 fuel pump can be seen below.
According to its principle of operation, the “six” gasoline pump is focused on creating excess pressure, which, regardless of the stage of engine operation, must constantly maintain the required level of gasoline in the float-type fuel chamber. The diaphragm is designed and developed such that fuel flow is stopped or reduced when the fuel line reaches a pressure limit.
The standard fuel pump is located on the left on a special boss of the engine block and is secured with studs through a thermal spacer and an adjusting gasket. This spacer also serves as a guide element for the VAZ 2106 fuel pump pusher, driven by an eccentric through the fuel pump drive, powered by the gas distribution mechanism in use. The length of the new fuel pump rod is 82.5 mm, the permissible value for operation is 81.8 mm; if this parameter is reduced, the product must be adjusted by selecting installation spacers or replaced with a new spare part.
For manual supply of gasoline using the pumping method, the product has a special lever, which is recommended to be used after a long period of use of the vehicle to fill the fuel line with fuel. It is capable of creating a pressure of 20-30 kPa with an injection rate of at least 60 l/h at a frequency of 2000 frictions (pumping) per minute.
Our online resource describes the design of the VAZ 2106 fuel pump under the nomenclature number 2101-1106010, produced at DAAZ in Dimitrovgrad. As an alternative, you can use a Pekar gasoline pump manufactured at the Saratov Fuel Equipment Plant. The design and development of the product was carried out by Pekar JSC from St. Petersburg.
By the way, many car enthusiasts praise the so-called. “VAZ 2106 plunger fuel pump”, which improves vehicle starting and operates with a high degree of reliability. A product of this type is nothing more than a Pekar gasoline pump, the top cover of which is made in a high style and resembles 2 cylinders connected to each other, on the end parts of which arrows in the direction of gasoline flow are stamped. The valves inside the product are very similar to plunger pairs, and with the light hand of car enthusiasts they began to be called “six” plunger fuel pumps.
Signs of fuel pump defects
Many car enthusiasts know that the fuel pump is a component of the V6 fuel system that repeatedly malfunctions or, in simple words, it malfunctions. Reasons: low-quality gasoline, clogged and lately replaced fuel filter, high loads on product parts, exposure to active ingredients due to oil and antifreeze leaks, low-quality rubber components, etc.
The main malfunctions of the fuel pump are a violation of the sealed conditions of the fuel pump, gasoline leakage and “the VAZ 2106 fuel pump does not pump,” i.e. failure of the product membrane. In this case, repairs “in the field” are possible, when drivers have, for example, to install high-density cellophane instead of the standard membrane, which allows them to get to their destination. A more civilized repair of the fuel pump for the “six” is to purchase a repair kit for the fuel pump and replace worn parts.
Frequent breakdowns
A fuel pump malfunction can be caused by: poor quality fuel, clogged fuel filter, simple emptying of the gas tank, or how intensively the vehicle is used. Mechanical damage to internal components due to wear or poor quality of workmanship and materials cannot be ruled out.
Helping the fuel pump last longer is within the capabilities of any car enthusiast who follows a number of rules:
- refuel with high-quality fuel at proven gas stations;
- change the fuel filter in a timely manner;
- periodically clean the gas tank from accumulated impurities;
- Make sure that the fuel level in the tank is sufficient for the system to operate.
The last point is due to the fact that running the pump idle will lead to overheating and failure.
Replacing the fuel pump in a VAZ 2106 car
We carry out preparatory work, concentrate in one place the necessary plumbing tools and the new product to be installed. The fuel pump is replaced in the following order:
- We loosen the fastening clamps with a figured screwdriver or wrench.
- We disconnect the ends of the fuel line from the fittings of the product and then plug them to prevent fuel leakage.
- We dismantle the fuel pump using a wrench.
- We dismantle the thermal insulation spacer and the installation gasket.
- The installation gasket should be changed, and the thermal spacer should be cleaned and placed in its original mounting location.
- If repair of the fuel pump is required, it must be disassembled and worn components replaced.
- If the product assembly needs to be replaced, then we place the gasket on the mounting studs, then install the “six” fuel pump.
The final installation of the fuel pump on the VAZ 2106 is carried out in the reverse order.
Replacing the fuel pump on a VAZ 2110 injector
Before replacing the fuel pump on a VAZ 2110 with an injector injection system, you should prepare a new spare part and the tools necessary for the job. With the right approach, the procedure itself will not take much time, 20–30 minutes, a maximum of an hour if things don’t go quite smoothly.
Tools
The set of tools for replacing a fuel pump is small, but should be on hand so that during the repair process you don’t have to run around and look for a suitable wrench or screwdriver.
When dismantling and installing a new fuel pump you will need:
- a wrench for loosening the terminals on the battery, the size depends on the installed fasteners;
- flathead and Phillips screwdrivers;
- key to 17;
- tubular wrench or deep socket 7 with ratchet or wrench.
Having prepared the tool and a new part, you can begin metalwork.
How to choose a new part
The standard fuel pump installed on injection engines has catalog number 2112-1139009. If desired, you can replace it with a similar part from other manufacturers. In some cases, such a choice will be dictated by the greater reliability of analogues, in others - by relatively affordable cost.
The following are offered for replacement:
- Bosch 0 560 454 035, which has higher quality and wear resistance;
- Fenox EFM33006O7 with low cost;
- Ween 192-0262, inexpensive like Fenox;
- Pekar 2112-1139009 - will be slightly more expensive than the previous ones, but cheaper than the original;
- ATS 53453 has a higher cost, but car owners do not complain about the quality.
Which one is better, the car owner will have to choose on his own, based on his own preferences, requests, and availability of funds.
Removing the old fuel pump
The procedure for dismantling the VAZ ten electric fuel pump is standard for the entire family of the series.
Step by step steps to eliminate the faulty part:
- The terminal on the battery is disconnected.
- The pressure in the fuel system is checked and, if necessary, released through a special valve on the ramp, covered with a protective cap.
- The rear seat cushion is removed and the trimmed part of the carpet is moved away.
- The hatch cover is retracted to the side. To do this, unscrew two mounting screws.
- The power supply is disconnected by separating the wire block from the connector.
- The fuel line clamp is loosened or removed.
- Use a key to unscrew the two lines from the fuel pump.
- The gaskets at the ends of the fuel lines must be replaced.
- The 8 fastening bolts are unscrewed.
- The pressure ring is removed and the fuel pump housing is carefully pulled out.
- The seal is removed and inspected. If necessary, it is replaced.
Particular attention should be paid to compliance with safety regulations, including fire safety.
Installing a new
Installation of a new electric fuel pump is carried out in the reverse order.
The following actions are performed sequentially:
- The seal is installed.
- The new pump is carefully inserted.
- The pressure ring is installed and 8 fastening bolts are tightened.
- The fuel lines are screwed on.
- The power supply is connected to the connector.
- The hatch cover is installed and closed with the folded carpet flap.
- The rear seat cushion is installed.
- The battery terminals are connected.
When installing, remember that the arrow stamped on the housing must be directed backwards.
Removing and installing the fuel pump.
The fuel pump plays an important role in the car's power system and is an important link in the fuel supply chain from the tank to the carburetor. Removing and installing the fuel pump , as well as adjusting it, will require some plumbing tools. You will need a Phillips screwdriver, two centimeter rulers, an open-end wrench, or better yet, a 13mm spanner.
1. Loosen the clamp and remove the injection hose from the fuel pump nozzle.
2. Loosen the clamp and remove the suction hose from the fuel pump nozzle. 3. Using bolts whose outer diameter matches the inner diameter of the hoses, plug the hoses and tighten the clamps.
4.Unscrew the fastening nuts, and carefully trying not to damage the gasket, remove the fuel pump.
Pay special attention to the fact that each time after removing the fuel pump and replacing the adjusting shims, it is necessary to correctly adjust its position. Incorrect adjustment of the fuel pump can lead to a lack of fuel supply, or, conversely, to an increased supply and, as a consequence, to carburetor malfunction.
The numbers in the image show, under number one, a sealing gasket with a thickness of 0.27-0.33 mm. Under number two is a spacer designed for thermal insulation, that is, the simpleton does not allow the pump to heat up from the engine block. Under the number three an adjusting shim with a thickness of 1.10-1.30 mm or 0.70-0.80 mm is shown.
Install a new gasket before making adjustments.
Install the pusher into the heat-insulating spacer. As shown in the image, install the spacer assembly with the pusher on the studs. Place an adjusting shim 0.70-0.80 mm thick onto the pump mounting studs.
Press the gaskets installed on the studs and the heat-insulating spacer tightly to the cylinder block. Rotate the crankshaft and install the pusher so that it protrudes minimally.
The fuel pump is adjusted based on the diagram and indicators described below. As shown in the image, use rulers to set the protrusion length of the pusher. The length of the protrusion of the pusher is marked with the letter A. If dimension A is less than 0.8 mm, replace the adjusting shim with a thickness of 0.70-0.80 mm with another one with a thickness of 0.27-0.33 mm. If dimension A exceeds 1.3mm, replace the adjusting shim with a size of 0.70-0.80mm with another shim of increased thickness 1.10-1.30mm. Install the pump in the reverse order of removal.
Checking, repairing and replacing a mechanical fuel pump
Methods for diagnosing fuel pumps for carburetor and injection engines of Zhiguli are also different. Checking a mechanical pump consists of determining its performance, as well as assessing the condition and performance of its component elements.
Replacement procedure
If you decide not to repair the fuel pump, but to replace it with a new one, it is even easier. The replacement process will not take more than 30 minutes. Tools you will need:
- crosshead screwdriver;
- key to 13;
- dry, clean rag;
- small capacity.
- In the engine compartment we find the fuel pump.
- Unscrew the screws of the clamps, loosen them, and remove both fuel hoses from the pump fittings.
Loosen the clamps, remove the fuel hoses from the fittings
Using a 13mm wrench, unscrew the pump mounting nuts
We dismantle the pump and drain the gasoline from it.
Assessment of the condition and performance of component parts
The following pump elements must be checked:
- intake and exhaust valves;
- mesh filter;
- diaphragms;
- pusher (rod).
- crosshead screwdriver;
- slotted screwdriver;
- key to 10;
- key to 13;
- caliper or ruler.
- Loosen the screws of the clamps of the inlet and outlet fittings of the pump, remove the hoses from them. We place a finger on the outlet fitting, and with the other hand we press the manual pumping lever several times. You should feel the air escaping under pressure with your finger. Next, plug the inlet fitting with your finger and pump it up manually again. A vacuum should be felt at the pump inlet, i.e. the finger should be sucked inside the fitting. If nothing like this happens, the valves of the device are faulty and must be replaced.
Checking the valves consists of determining the air pressure at the outlet fitting and the vacuum at the intake
The mesh filter should not show signs of damage or deformation
If the pump diaphragms are damaged or deformed, they must be replaced.
Checking the protection devices for the electrical circuit of the fuel pump on injection VAZs of the Zhiguli family
If there is a problem with the electrical equipment of the fuel pump circuit, it usually does not turn on at all. Turn on the car's ignition without starting the engine and listen. First, you should hear a click from the relay, and then a characteristic “squeal” emitted by the pump’s electric motor. If you don’t hear anything like this, start diagnosing with the electrical circuit of the device.
The pump circuit is connected to the on-board network via a separate relay, and its protection is provided by a fuse. Both of these devices are located in the vehicle's optional mounting block. You will find it under the glove box. It contains 3 relays and 3 fuses. The fuel pump relay (indicated R2 in the diagram) is located in the middle, and the fuse (F3) is to the left of it. We pull the fuse out of its seat and check it by “ringing” it with a tester. If a malfunction is detected, we replace it, not forgetting to comply with the rating (15 A).
READ Suzuki j20a what oil to use
You can check the functionality of the relay by installing a known working device in its place. Instead, replace it with the relay located to the right of the one being diagnosed, which is responsible for the radiator fan circuit. If this option does not suit you, turn on the ignition and measure the voltage between the pink wire going to the relay and the vehicle ground. The device should show 12 V. This means that the device is powered. After this, you need to connect the pink wire with the gray one at the relay terminals. So we will connect the fuel pump directly to the battery. If it works (that same “squealing” sound will be heard), simply replace the relay.
The fuel pump relay is located in the middle (R2), and the fuse is located to the left of it (F3)
Do-it-yourself repair of a mechanical fuel pump
It is not advisable to purchase faulty fuel pump parts separately. It is much more profitable to purchase a repair kit, which includes elements that may fail, namely:
- valves;
- set of diaphragms;
- pusher;
- thermal spacer;
- gaskets and washers.
Repairing a fuel pump involves dismantling and disassembling it. They are produced according to the same algorithm that was described earlier in the diagnostics section. If, after disassembling the fuel pump body, you find that there is dirty deposits or debris on its walls or on the inner surfaces of the fittings, clean them with carburetor cleaning fluid and a piece of coarse cloth. When removing plaque, use a small wooden spatula and toothpicks. It is highly undesirable to use metal objects for these purposes.
To replace the pump valves, they will need to be removed from their seats. To do this, using a thin slotted screwdriver or knife, you need to knock out three cored areas in each of the sockets, after which the valves will come out of them freely. Having installed new parts in place of the faulty ones, the sockets must be cored again by hitting the edge with a core (screwdriver) in three places.
Important: when replacing valves, do not confuse the intake and exhaust!
In order to replace the diaphragms, you need to unscrew the nut in the upper part of the rod on which they are mounted with a 10mm wrench, then remove them and install new ones in their place in a certain order. The lowest diaphragm is the safety diaphragm. This is followed by a small and large spacer, and on top of them are two other (working) membranes.
As for the thermal spacer, it rarely fails. More often there is a manufacturing defect, which manifests itself in the unevenness of the mating plane to which the pump housing is attached. This may cause oil leakage. To replace the spacer, remove the old one from its seat, remove the old gasket from under it, and install a new spacer with the corresponding gasket from the repair kit.
The DAAZ fuel pump repair kit includes three gaskets of different thicknesses:
- 0.27–0.3 mm (A);
- 0.7–0.8 mm (B);
- 1.1–1.3 mm (C).
Gasket “A” is installed between the cylinder block and the thermal spacer, and the other two are used to adjust the protrusion of the pusher (rod) above the mating plane of the spacer.
We install the new rod in place, and slowly turn the engine crankshaft (using the wrench on the pulley nut), select the position when the rod is extended to its minimum length. We place gasket “B” on the mating plane of the spacer and measure the amount of rod overhang above it with a caliper. It should be 0.8–1.3 mm. If the offset is greater, instead of spacer “B” you need to install spacer “C”, and if it is less, swap the first and second positions. Having achieved the result, install the fuel pump
into place and secure it with nuts. For greater tightness of the joint, the gaskets can be lubricated with a thin layer of automotive sealant.
How to check the performance of a mechanical fuel pump
The productivity of the DAAZ mechanical pump is 1 liter per minute. To check the amount of pumped fuel you will need:
- a piece of gas-resistant hose (50–80 cm);
- 2 clean containers with a volume of at least 2 liters (plastic bottles are acceptable);
- 1.5 liters of gasoline;
- watch with stopwatch;
- crosshead screwdriver;
- assistant.
- Using a screwdriver, unscrew the screw on the clamp of the pump outlet fitting. We remove the hose from it.
Remove the fuel hose from the outlet fitting
We estimate the amount of fuel pumped by the pump per minute
If the amount of gasoline is less than 1 liter, the fuel pump is faulty.