Starter problems and their elimination
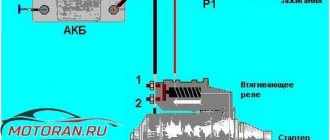
If the traction relay clicks and the car does not start, then the culprit of the situation is most often not the starter, but a discharged battery. Its charge is not enough to start the power plant. In addition, the problem may be hidden in oxidized contacts or damaged wires.
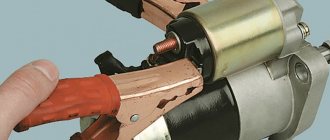
The weak point of the unit is the power wire loop connecting the electric motor and the traction relay. It does not connect securely to the terminal and is prone to oxidation and rot. If it breaks, the starter does not turn, despite the fact that a characteristic click of the traction relay is heard from the engine compartment.
To fix the problem, it is recommended to solder a new copper conductor to replace the damaged one. Some car owners resort to welding. To increase the reliability of the unit, some drivers add an additional connection between the relay and the electric motor even before installing a new starter.
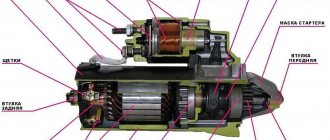
The weak link in the electrical circuit of the VAZ 2121 starter is the brushes. They are the most susceptible to wear, so the unit often loses its functionality due to their insufficient length. To determine the remaining life, you need to take out the brushes and measure their size. It must exceed 4 mm.
A large current flows through the brush assembly. This causes heating and thermal destruction of the elements. Upon visual inspection, you can often detect melting of the brushes and the appearance of chips. Minor defects can be eliminated by grinding. In case of serious damage, the brush must be replaced.
Damage to the armature is also found in VAZ 2121 starters. Among the most popular breakdowns is a breakdown of the winding to the housing. The malfunction can be identified by “continuous testing” with a multimeter or ohmmeter. If the specified devices are not available, the breakdown should be checked with a regular lamp. You need to assemble a circuit as shown in the image below. Its ends should be connected to the commutator plate and the armature core. If the light comes on, it means that there is a breakdown in the winding. It is extremely difficult to repair insulation damage, so such an anchor must be replaced.
The collector is also subject to wear. If there is minor damage, the defects can be removed by grinding. If the collector plates are seriously worn or burned out, the armature must be replaced.
How to remove the Niva 21214 starter in 10 minutes. The cause of the malfunction of the removed starter NIVA VAZ 21214
Published on August 29, 2016
Preparation for quick removal of the starter in extreme conditions. Quickly removing the starter and eliminating the cause of a possible malfunction. How to remove the acoustic pipe from a Niva receiver Why is an acoustic pipe needed? As you noticed, the lower bolt of the starter was deliberately never screwed in again, after the first removal of the starter during the initial period of operation of the car. Also, the heat shield of the starter, whose lower mounting bolt quickly sticks when driving through mud, was not put in place. Because of this, in order to remove the screen, you have to cut off the lower attachment point or tear the screen itself. I don't want to go through this procedure a second time. The fact that there is no lower mounting bolt for the starter and a heat shield has its advantage for field drivers who often operate their vehicles, for example, in the conditions of Siberian swamps, river fords and frosts. Very often the cause of a starter malfunction is simple. For example, as in this video, or even funnier - the red wire (also shown in the video) from the solenoid relay has simply oxidized or weakened. It is enough to MOVE it and the starter will spin. You can make the starter spin if the nickels in the solenoid relay are burned by closing (carefully, with something not large in size, but massive and iron, without touching the mass of the engine body) the power wires on the solenoid relay. It's easy to do all this without a screen. And if necessary, the starter can be easily removed. It happens, for example, that the starter breaks down, and the car is parked at the entrance, and it’s -30 outside! Yes, even in the summer! You still need to remove the starter. Negotiate with your neighbor about a garage? Or take it to service? But you can remove it EASILY AND QUICKLY yourself, right at the entrance. Buy a new starter or solenoid relay from your local store. And an hour later the car drove off. And if the car is parked in a puddle or mud, then crawl under the car and turn the bottom bolt? In short, there are many life situations where the absence of a bolt and a heat shield will greatly simplify your life. The author of the video does not pretend that others will perceive his opinion and his proposed method of solving the problem as the only correct one. Solve this for yourself. The author simply suggested the option: “How to remove the Niva 21214 starter in 10 minutes and determine the cause of the malfunction of the removed Niva 21214 starter.” Solutions to encountered problems in the Niva on the channel will also be proposed. If you are interested, subscribe.
It's better to put up protection. Otherwise, in the heat, the starter will overheat and catch the wedge.
For + Stanislav G. I don’t argue. But according to my experience of operating several fields, in the difficult mountain conditions of Altai in the summer, in the hottest months. Constantly reduced, etc. And from morning to evening we move through the mountains and swamps. All this summer, having come on vacation from Siberia on a field, I exploited a field in the Krasnodar region, stood in traffic jams in the heat for 2-3 hours, getting to the sea and from the sea back to friends in Krasnodar. The engine was not turned off. And so the whole vacation. So in the Krasnodar region, in the heat and in traffic jams, without a screen on the starter, there have been no problems yet. I have been using Niva for 25 years in both Siberian frosts and heat. The starter never caught a wedge. The statistics of my use so far are as follows: the absence of a screen did not affect the operation of the starter. The downside may be this: without a screen, the lubricant inside the starter dries out faster. But usually the starter fails due to something other than dry lubricant. In some fields, starters worked for 5-10 years without problems, without a screen. Then the car was sold. It is difficult to judge further statistics. I initially received all the Nivas (mostly) with good mileage. In addition to the first one bought back in the USSR and another one, which he himself drove from Tolyatti to Siberia. Again, I don't insist. Decide for yourself.
It's a bullshit - remove it from a new field in 10 minutes, plus take out the protection from there.
please remove how to change cardan crosspieces
All the videos are very informative, it’s a pity that the video didn’t have the paint on this screen, I had a problem with the paint on removing this screen, which unfortunately didn’t work out, but I managed to screw everything up by touch.
Andrey, you are a sweetheart in nature, respect to you, I watched your video and fixed my horse myself. Handsome, everything is intelligible and understandable, I’m a beginner driver, your videos have helped me more than once, Like
There would be more videos about electricians in the field
Article number and approximate price for the original VAZ 2121 starter
The original starters for the VAZ 2121 can be either independently started units or purchased from third-party manufacturers. The starter with the factory number 35.3708 is widely popular in cars. It has a rated power of 1.3 kW. The unit goes on retail sale with article numbers 2213708000 and 57223708. The price for the product starts from 2400 rubles.
Also, a more powerful 1.55 kW starter is installed on the VAZ 2121 car. It has the factory number 5722.3708. It is quite difficult to find this starter in retail sales. The cost of the unit is from 3400 rubles.
On export versions of the VAZ 2121, a diesel power unit is installed, which comes with a 2.2 kW starter. The VAZ company does not produce this unit independently. The branded original product is the products of the VALEO PHC and HC Parts brands. In free sale, these units are found with article numbers 436068 and D9R122. The price for a native 2.2 kW starter starts at 5,600 rubles.
Selection of components
The original starter is produced by LADA and comes in the original blue packaging. It is marked with article number 21214-3708010-01. The cost of this part is from four to five thousand rubles, depending on the store.
To avoid stumbling upon a fake, carefully examine the box. The presence of extraneous logos, absence of an article number on the box, or color mismatch is unacceptable. The low price should alert you.
Alternative options are produced by companies such as Fenox, Krauf, Valeo. The listed brands are distinguished by high quality products and fairly affordable prices. The price for starters varies from 2200 to 4700 rubles.
What original or analogue can I supply?
If the starter does not turn, you can simply replace it. Typically, in a store, the buyer has a choice between two options:
- original;
- analogue
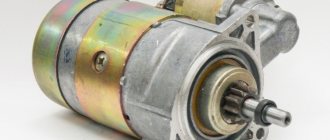
They differ not only in their quality, but also in their durability. The easiest way to study visual differences is in the photo.
But the cost of the original starter is usually at least 3.5 thousand rubles. That’s why many people opt for analogues. There are many other manufacturers on the Russian market that are not certified by AvtoVAZ. If possible, you should choose well-established brands.
It is important to remember: all starters have different resources and may differ in size. It is advisable to arm yourself with a ruler and tape measure before going to the store. This will allow you to avoid purchasing a device that is not suitable in size. Some manufacturers produce equipment that can be installed on various vehicle models. The price depends significantly on the manufacturer.
Before purchasing an analogue, you need to familiarize yourself with the brand. For example, Bosch has proven itself to be good. The equipment he produces is durable and does not cause difficulties in repair. There is a list of manufacturing companies recommended by AvtoVAZ itself. It is advisable to familiarize yourself with all the nuances and subtleties of installation in advance. This will allow you to select it at the start and install it later yourself.
This is interesting: Spare parts for foreign cars
Catalog number and cost of a good starter for VAZ 2121
Original VAZ 2121 starters are of unstable quality, so experienced car owners do not recommend installing them. It is more advisable to purchase an analogue from a third-party manufacturer. The table below presents brands that produce decent starters at an attractive price.
Table - Good analogues of the original VAZ 2121 starter
| Manufacturer | vendor code | Approximate cost, ruble |
| Startvolt | LST0101 | 2600-3400 |
| Krauf | STB0139 | 2400-3100 |
| As-pl | S0128 | 3500-4900 |
| Bosch | 986011910 | 3900-5500 |
| Unit | 1100352 | 3000-4100 |
How to remove the starter thermal cover on a Chevrolet Niva
Based on the experience of Chevrolet Niva owners, it turns out that there are two ways to dismantle the ill-fated casing - pick it out with a pry bar and dispose of it, but then the starter will be left without protection, or spend several hours dismantling it.
The starter is more expensive, so we proceed to dismantling using this technology:
Remove the engine protection.
Now that we have the casing in our hands, we assess the degree of damage - if the eyes are simply broken off, we can either weld them well to the casing or put them on bolts, this is more reliable.
Option without air conditioning
In some cases (if the car does not have air conditioning), you can do without dismantling the exhaust pipe. To do this, you need to unscrew the engine mount and jack it up, resting one end of a wooden block on the exhaust manifold closer to the cylinder block, and the other on the jack.
So you can try to bring the heat shield back, besides this there is another way - dismantling the exhaust manifold. Without a collector, the shield can be easily removed.
Good luck to everyone and enjoy your travels!
Source
Required Tools
In order to remove or install the starter on a VAZ 2121, you need tools, the list of which is presented in the table below. Table - Tools required to replace the front strut
| Name | Note |
| open-end wrench | "at 13" |
| Head | "at 15" |
| Ratchet | With extension |
| Penetrating lubricant | For example, WD-40 |
| Metal brush and rags | For cleaning fasteners |
Starter replacement process
In order for the replacement of the starter on a VAZ 2121 to be successful, it is recommended to use the step-by-step instructions given below.
- Secure the vehicle by applying the parking brake to the rear wheels.
- To gain access to the place where the starter is located, you must open the hood.
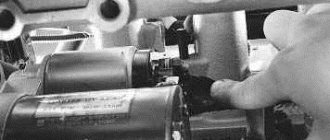
- The starter is located under the exhaust manifold. Use a ratchet with an extension to unscrew the nuts securing the terminals.
- Remove the wires from the stud.
- Remove the bolts that secure the starter to the gearbox, as shown in the photo below.
- Remove the starter from the engine compartment.
- Install the new starter in the reverse order of removal.
- Check operation by starting the power unit.
Chevrolet Niva Sochi GLS › Logbook › Replacing the starter shield and engine mount
I have already removed this shield a couple of times due to chattering at 2000-2500 rpm.
They welded and boiled, but sooner or later something fell off again, and the musical accompaniment continued. This time the ear on the bracket broke off and the support pad bent in a strange way, and there were cracks on the top washer. Take off the shield, you'll still have hemorrhoids. First I decided to remove the support and bracket, then it will be easier to remove the shield. To do this, you need to lift the engine, conveniently twist a couple of bolts into the block and through a wooden spacer, lift it with a jack.
You can also jack it under the pallet, but it’s not entirely convenient in a pit. The process itself is not complicated, we unscrew the support from the upper and lower brackets, lift the engine and turn out the support. Next, remove the bracket from the block. Now there is space to pull the shield forward, towards the radiator. Without a shield, the starter is clearly hot. I see the objections of those who filmed it 1-2-5-8 years ago, and everything is fine with them. I’m happy for you!
The cushion, the top washer is broken, the rubber is intact.
The ear of the bracket broke off.
Comparison of the old and new screen, the new one is single, the bottom is slightly cut off, the metal is thicker.
I welded the ear, bought a new pillow and started assembling. I immediately screwed the pillow to the bracket, so it’s easier to insert. When assembling, you need to pay attention that the thickening on the studs fits into the groove on the bottom bracket.
Everything is assembled, tested, the engine hesitates less at idle, the paint on the dashboard burns, and it stinks terribly.
I haven’t started reinforcing the ears of the shield yet, if they fall off I’ll do it, fortunately, removing it now is not such a difficult task as on the old one.