Note! Before starting work, we advise you to stock up on a strobe light, because without it, checking the ignition timing will not be very convenient! (What is a car strobe light?)
When should ignition timing be set? Due to incorrectly set ignition timing, the following changes will occur in the car engine:
- Firstly, the car will lose its speed qualities, that is, it will drive worse.
- The car will also respond worse to the gas pedal, and small dips will appear when you press it.
- To all this can be added unstable engine operation at idle.
- It may also be difficult to start the engine.
- Also, the car’s engine may overheat more often.
- And in conclusion, I would like to note that the engine’s fuel consumption may also increase.
How to set the ignition timing on a VAZ 2108-VAZ 21099?
Setting the ignition timing and checking it:
Note! Before you start, be sure to keep one fact in mind. The ignition is installed strictly at idle speed, while the crankshaft rotation should be in the region of “820-900” rpm!
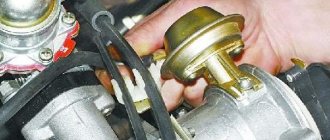
1) First, disconnect the thin hose from the vacuum regulator fitting.
2) Next, in order to check the ignition timing, perform the following operations:
• Connect the “positive” clamp that comes from the strobe light to the “plus” terminal located on the battery.
• Then connect everything to the same battery, but only this time to the “minus” terminal, the “ground” clamp that comes from the strobe light.
- How to properly adjust the ignition on a VAZ 2109
• Next, disconnect the tip of the high-voltage wire from the terminal of the “first cylinder” distributor cover.
Note! You can see where the “first cylinder” output is located on the distributor cap by the markings on the cap itself, see the photo for more details:
• Now connect the sensor that comes from the strobe light to the terminal of the “first cylinder”, and after the sensor is connected, install a high-voltage wire on this sensor.
• Then remove the rubber plug that covers the hole in the clutch housing to prevent dirt from getting into it.
• Then insert a screwdriver into the hole in the clutch housing, and then rotate the flywheel until the mark on the flywheel is between the cutout and the division. (Where the mark is located, as well as the cutout and division, look at the photo just below, which is located above the “Note!” section)
- How to adjust the carburetor on a VAZ 2109? VAZ 2109 diagram. VAZ carburetor
• Next, start the car’s engine, and then point the flashing strobe light at the hole in the clutch boat.
• While the strobe light is flashing, the mark that is stamped on the flywheel should visually appear motionless at this time.
Note! If the ignition on your car is installed correctly, then in this case the mark indicated by the number “1” must necessarily be located between the cutout “2” and the division “3”. If your “1” mark is placed outside the cutout and division, then adjust the ignition timing!
3) After all operations, if your ignition timing is not correct, then first loosen the three nuts that secure the distributor.
4) And then turn the distributor itself until the marks align as desired.
- Ignition timing: features, rules and recommendations
Note! If you need to increase the ignition timing, then gradually turn the distributor slightly towards o. And if, on the contrary, you need to reduce the ignition timing, then in this case turn the distributor closer to o. In these “plus” and “minus” intervals, set the ignition angle that will correspond to your car!
5) When the ignition timing is set, install all previously parts in their place.
Additional information: To make it clearer for you, watch the video in which “Nail” describes everything in detail:
Probably every motorist who owns a car of the VAZ 2108-09 family has encountered problems with the ignition system. Very often, these malfunctions are caused by a trivial reason - an incorrectly set ignition. It is the question of how to set the ignition on a VAZ 2109 carburetor and injector that we will talk about below.
Now comes the fun part - installing a new belt.
We check that all marks match. We first place the belt on the crankshaft and pump. Then we tighten the right descending branch of the belt and put it on the camshaft pulley and tension roller. We check all the marks again and tighten the belt with a roller. The tension is considered sufficient if, with the force of two fingers, you can twist the longest branch of the belt by a maximum of 90 degrees. It’s easier to take the right branch of the belt with two fingers and twist it, if more than 90 is not very bad, but less is very bad. An overtightened belt will wear out quickly and will also reduce the life of the pump.
We place the bottom protective plastic cover. And on the crankshaft pulley we mark the twentieth tooth after skipping two teeth. We count counterclockwise.
This mark corresponds to the top dead center of the first cylinder. We put the pulley in place and the mark should be against the crankshaft position sensor. More precisely, against the small iron core of the sensor. Sometimes it gets into the gap between the teeth, this is considered acceptable. We tighten the pulley in the same way as we unscrewed it, with the help of a partner.
We turn the crankshaft two turns and check the marks; this is where our mark on the pulley comes in handy.
If everything is in trouble, we collect everything that we took apart. As they say in smart books, install the parts in the reverse order of removal. Don't forget to add antifreeze.
We start the car, accept congratulations from family and friends and head off to adventure.
System design
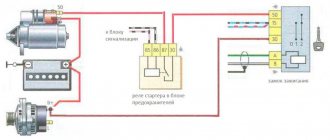
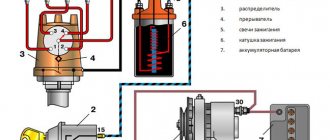
Before we begin to consider the adjustment process, we consider it necessary to understand the diagram and principle of operation of the system. Vehicles of the VAZ 2109 model range are equipped with a non-contact ignition system. The connection diagram of all elements is as follows:
The operating principle of the system is not complicated. In order for a spark to begin to be produced, the motor shaft must turn. Simultaneously with its rotation, the camshaft will also turn. As a result of this, the sensor generates a signal that will be sent to the switch. The “K” terminal of the coil will connect to the common wire (to “ground”), as a result of which a spark will occur on the main wire. At the moment when the working distributor slider connects the main wire with one or another high-voltage wire on the corresponding spark plug, a spark will appear and the car engine will start.
If the setting is made incorrectly, the candles work in the wrong time modes. Consequently, such a violation becomes the cause of unstable operation of the entire power unit.
Preparatory activities and necessary tools
Installing the ignition of a VAZ 2109 carburetor begins with preparatory activities. In particular, you need:
- Warm up the car engine;
- Set the parking brake and install wheel chocks under the rear wheels.
Remember that you cannot ignore safety rules, because a car is a highly dangerous vehicle, and failure to comply with safety rules when driving, servicing and repairing it can cost you dearly.
An important point: before you start work, you should make sure that the carburetor is correctly configured on the car. It would not be superfluous to carry out a visual inspection of all elements of the system. If we are talking about a carburetor car, special attention should be paid to inspecting the condition of the distributor.
If you have a car with an injection engine, it is worth checking the ignition module for serviceability. The thing is that, as practice shows, it is this module that fails most often and is the reason for the inoperability of the entire system.
To complete the work we need:
- strobe;
- a set of keys.
Sequence of doing the work yourself
Before starting work, remember that all the parts inside are stained with oil in the VAZ 2109 distributor. After dismantling, it should be washed and dried.
1. Dismantling the distributor begins with removing the negative wire, which is connected to the battery terminal.
2. Then we disconnect the high-voltage wires from it, then the vacuum hose with which the distributor is connected to the vacuum corrector.
3. The next stage of work will be removing the cable from the holder. It is used to drive the dampers.
4. Remove the bracket, which is a clamp for the wires. Complete with all the studs and those wires that were attached here.
5. Unscrew the fastening nut, making sure that the washer installed under it does not get lost. This work is carried out in several stages: Special marks are applied to the drive of auxiliary devices, on the one hand, and the distributor housing, on the other. This must be done so that when assembling the product, you can maintain the starting ignition timing without making new adjustments.
6. Using a screwdriver, press the lock on the distributor and remove the ignition wiring harness.
7. Remove the rubber plug from the car clutch housing.
8. By rotating the crankshaft, we achieve alignment of the piston in the 1st cylinder at TDC.
9. The mark marked on the flywheel, visible in the hole, must coincide with the division marked in the middle of the housing scale.
10. Remove the distributor, having first unscrewed the nuts holding it.
11. Installation is carried out in reverse order.
12. When installing the slider, it is necessary to check the position of the roller. The latter should be placed so that its external contact is located opposite the terminal that corresponds to the 1st cylinder.
13. The terminal is on the cover.
14. Be sure to align the marks mentioned above.
Below you can watch a video on how to remove and install the distributor on a VAZ 2108-09.
How to correctly set the ignition on a VAZ 2109 carburetor - detailed instructions
The setup process is as follows:
1. Start the car engine and ensure that the engine speed is approximately 800 rpm. To set the idle speed within such limits, it is enough to use a slotted screwdriver to adjust the screw responsible for the amount of fuel mixture in the carburetor.
2. After setting the idle speed to the above value, turn off the car engine.
3. Disconnect the rubber hose from the vacuum corrector. Carefully bend the hose approximately in the middle or plug it with a screw of a suitable diameter.
4. Connect the positive terminal of the strobe to the “+” terminal of the battery;
5. Connect the negative wire of the strobe to the “-” terminal of the battery;
6. Disconnect the spark plug wire from the socket of the first cylinder as shown in the image:
Disconnect the spark plug wire
7. Install the strobe sensor into the socket and connect the high-voltage wire to it;
8. Remove the plug from the clutch housing hatch:
Removing the stub
9. Turn on the ignition and start the engine. We direct the actively changing luminous flux generated by the strobe into the clutch housing hatch:
We direct the strobe into the clutch housing hatch
10. When the light is flashing, it seems that the mark located on the flywheel is stationary. If the ignition is installed correctly, the first mark should be between the technological notch and the previous mark on the scale.
Tags
11. If after the described operations it was discovered that the ignition adjustment of the VAZ 2109 is incorrect, we continue to work.
12. Using an open-end wrench, slightly loosen the fastening nuts of the ignition system distributor:
Mounting nuts
13. After loosening the fastening nuts, turn the distributor body to the right side - if it is necessary to increase the ignition angle, and to the left side, if it is necessary to decrease the angle.
14. Connect a rubber tube to the vacuum corrector and check that the ignition is installed correctly. If the normal result is not achieved, we make repeated adjustments. How to check the correct operation of the system will be described below.
Begin
Everything we need.
We unscrew the three ten bolts securing the protective timing cover and remove it.
Next, loosen the nut thirteen that secure the generator and unscrew the tension bolt ten.
We take the generator to the engine and remove the belt.
Remove the engine protection and drain the antifreeze. We set the camshaft mark by turning the crankshaft clockwise. The ebb on the pulley should be opposite the bend of the protective cover fastening.
Unscrew the crankshaft pulley mounting bolt. We put the assistant in the cabin and force him to engage fifth gear and press the brake. And at this time we easily and naturally unscrew the bolt using a 19 meter head and a pipe of one and a half meters. It must be screwed properly, and some craftsmen lubricate it with sealant and then wait for kind words addressed to them.
On the left side we see the crankshaft position sensor. We will need it to subsequently check the correct installation of the timing belt. We remove the crankshaft pulley and see that the marks match.
Unscrew the nut on the tension roller 17 and remove it along with the belt. Then unscrew the camshaft pulley bolt and remove the last one. Be careful not to lose the key. We unscrew everything that secures the protective metal shield, namely one ten-point nut and a bolt securing the cover, three bolts securing the pump.
Remove the protective cover and pump. Antifreeze remaining in the block may leak out if you have not drained it. Carefully, it's sweet.
Incandescent lamp instead of strobe light
Many car owners will ask a completely fair question: how to adjust the ignition of a VAZ 2109 in the absence of a strobe light. Of course, it is more correct to work with a strobe, especially since in this case it is possible to carry out adjustment and adjustment work as accurately as possible. However, there is another method that is useful for those who, for one reason or another, do not want to purchase a strobe.
To work, we need an ordinary incandescent lamp designed for an operating voltage of 12V. The entire algorithm of actions is as follows:
- Disconnect the wire from the distributor that goes to the ignition coil
- We connect one terminal of an incandescent light bulb to the wire. We connect the second wire from the lamp to ground.
- As in the case when setting the ignition of a VAZ 2109 using a strobe light, use a spanner to loosen the distributor fastening nuts.
- Turn on the ignition. The incandescent lamp should light up.
- Gradually turn the distributor until the lamp stops glowing. After this, turn the distributor slightly in the other direction. As soon as the lamp starts to glow again, you can tighten the fastening nuts.
Of course, the method described above cannot provide the highest possible adjustment accuracy. However, with its help it is quite possible to achieve more or less correct and stable operation of the power unit.
Settings
The strobe is used like this:
- the red wire is applied to the “plus” on the coil;
- black – to the body;
- the clamp is connected to the veins installed on cylinder number 4.
After this, the actual adjustment begins.
The work is carried out in the following order:
- start the engine, bring its speed up to 800 and no more (measurements are made with a tachometer);
- the beam from the strobe is aimed at the inspection hatch;
- the long line is placed in the zero position (scale in degrees).
The angle is adjusted by rotating to the right - this increases the angle, respectively, movement in the opposite direction decreases it.
It is not difficult to find out the exact direction - it is indicated by the scale marked on the distributor (there is an o and a “plus” there). Each division corresponds to 8 degrees. For this reason, adjustment is slow. After finding the desired position, the distributor is secured.
How to adjust the ignition on a VAZ 2109 - an alternative method
In addition to the adjustment methods described above using a strobe and a light bulb, you should remember one more method - adjustment using a standard tachometer. We emphasize that this method, like the method using a light bulb, cannot provide high accuracy of adjustment. Moreover, it is characterized by one significant drawback - it is impossible to carry out the adjustment yourself; you will need to hire an assistant. So:
- Your assistant is located behind the wheel of the car. He turns on the ignition and monitors the readings of the standard tachometer on the instrument panel.
- You loosen the nuts securing the distributor and turn it a little.
- Your assistant turns the ignition key. The tachometer needle should quickly deflect and return to zero.
- You need to ensure that the distributor remains in a position in which the tachometer needle deflects.
You may notice that this method requires patience and quite a lot of time. As practice shows, it is not possible to adjust the ignition quickly and the first time using this method . Therefore, we recommend using it only in extreme cases.
Possible causes of failure
There are a number of reasons why the distributor mechanism may break down and after which there is a need for urgent replacement of the part.
- Cracks appear on the surface of the cover;
- Damage to the Hall Sensor;
- Burnt out “runner”;
- Burnt contacts in the cover;
- Loose bearing that holds the Hall Sensor;
- Poor connection of contacts in sensor plugs.
There are also reasons why the mechanism may malfunction.
Here are some of them:
- It happens that the ventilation hole becomes dirty and gases escape through the roller, oiling the slider.
- Sometimes ground breakdowns occur due to small cracks in the distributor cap.
- If the assembly is of poor quality, the mechanism quickly fails (in particular, individual parts).
- The bearing may become loose.
Any of these situations (not including poor contact with sensors) require prompt replacement of the distributor part. But sometimes it is enough to simply adjust some defects in the ignition systems and this will instantly return the engine to working condition.
There are a number of reasons that may indicate such a situation.
For example:
- Detonation is too strong. This problem occurs due to early ignition due to which the rings (piston) are deformed. One of the symptoms is a ringing noise when pressing on the gas pedal.
- Dark smoke coming out of the chimney while the car is running is a consequence of the ignition being turned on early.
- Fuel is consumed much more, but engine performance has become less. In this case, the ignition starts too late.
- Uneven engine operation can be caused by both early and late ignition.
In order for you to be able to regulate the condition (position) of the distributor, you will need to purchase:
- Slotted screwdriver;
- Strobe;
- Spanners;
- Tachometer.
How to set the ignition on a VAZ 2109 injector
Above we described the process of adjusting carburetor engines. However, there are VAZ modifications equipped with injection power units. How to set the ignition on a VAZ 2109 with such an engine?
First of all, you should pay attention that in the case of injection engines, they do not have a distributor and a Hall sensor. At the same time, the system provides two ignition coils at once, and, accordingly, two switches. The main difference between the injection system and the classic one is that the control signals are generated by a special electronic unit. The operating principle is as follows:
Operating principle of the injection system
Thus, there is simply no need for a distributor, because it is the electronic control unit that determines in which cylinder and at what point in time there should be a spark. Signals from the control unit are supplied to the inputs of the switches, and from them to the ignition coils. One switch is responsible for sparking in the first and third cylinders, and the second - in the second and fourth.
As in the case of engines with a carburetor fuel system, adjustment is carried out according to special technological risks. The ignition marks of the VAZ 2109 injector are shown in the photo below:
Ignition marks VAZ 2109 injector
Please note that it is not possible to configure the injection engine system yourself. The thing is that this operation involves making changes to the software of the microcontroller of the electronic control unit. Of course, each specific microcontroller has its own specific firmware. Moreover, there are also non-standard firmwares, for example, with settings for a sporty driving style.
Only an experienced specialist with certain knowledge can flash an electronic control unit. Therefore, if malfunctions occur in the ignition system of an injection engine, you should seek help from a trusted car service center.
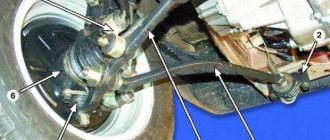
Chassis
The suspension allows you to soften shocks to the body that occur while driving. Not only the comfort of movement, but also safety depends on its operation. The car should feel confident on the road and also withstand potholes and bumps well. The suspension helps absorb impacts, therefore extending the life of the car body. Tuning the VAZ 2109 suspension allows you to improve its characteristics, therefore it is relevant and in demand.
You can improve the chassis as follows:
- replace shock absorbers with gas-oil ones. It is recommended to buy shock absorbers and springs as a set. Monroe and Plaza sports shock absorbers are suitable for standard springs. For aggressive highway driving, Koni Sport or Bilstein Sport shock absorbers are more suitable. To improve the car's handling, it is enough to install a Monroe Gaz-Matic or Plaza;
Improvement of the car brake system is as follows:
- replacing rear drums with disc brakes;
- installation of a larger disc-caliper pair;
- replacing the master brake cylinder. This must be done with the obligatory implementation of the two previous options, since the standard cylinder will not be able to cope with the task.