CORRECTOR DEVICE
The headlight hydraulic corrector is a one-piece, one-piece device that is designed to change the position of the light beam by changing the fluid pressure inside the pipes. For cars of this family, the corrector unit has a one-piece design, so it cannot even be repaired, much less independently. If it fails, you need to replace the broken elements with new ones and adjust the headlights to the standard.
Most designs of hydraulic correctors on the VAZ 2114 have the following form:
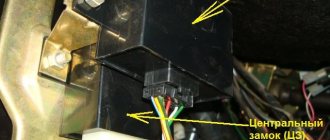
- Master cylinder, which is mounted under the dashboard;
- Small working cylinders that are attached under the headlights; they are needed to raise the headlights on a VAZ 2114;
- Working fluid that is resistant to low and very high temperatures;
- Pipelines that contain this liquid. Always secured with clamps.
OPERATING PRINCIPLE
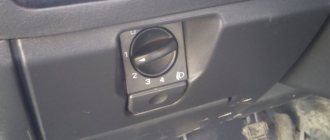
When the driver decides that the headlights need to be adjusted, he turns a special knob inside the car to do this. It controls the pressure in the corrector piping system. Accordingly, when you need the headlights to go down, everything happens as follows:
- The handle turns down;
The switch in the cabin looks like this - The pressure in the system drops;
- The operating rod enters the housing;
- The headlight goes down.
Based on this, we can say that most of the time high pressure is maintained in the working mechanisms; this is necessary to maintain the horizontal position of the headlight.
In winter, or during the transition period, when the temperatures outside and in the engine compartment are very different from each other, pipelines and rubber seals can delaminate, and working fluid can leak out. In this case, the headlight range control will most likely fail, and the working cylinders will jam and require complete replacement.
In terms of calibrating the device, the instructions from any domestic hydrocorrector will do. This is due to the fact that structurally they are all made very similar and you can figure out any of them yourself.
INDEPENDENT REPAIR
If the hydraulic corrector completely fails, all that can be done is to completely replace it with a new one and that’s it. But if the headlight hydrocorrector does not work, then you can carry out certain manipulations and find out exactly what is the cause of the breakdown, and perhaps you will be able to return them to functionality without wasting money on new components.
So, if the machine has changed its tilt angle, but it is not possible to change the direction of the light beam, then the performance is checked in this way:
- First of all, you need to carefully examine the condition of all the tubes and rubber bands. Even the slightest smudges are unacceptable;
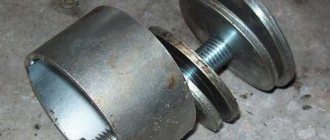
- If no leaks were found or their elimination did not bring results, then you need to examine the condition of each working cylinder. To make it more convenient to adjust the headlights, you need to remove the working cylinders from each headlight. Then the stroke of each rod is measured - under normal conditions it is 6.5 - 7.5 mm;
- If these diagnostic measures did not force the VAZ 2114 headlight hydraulic corrector to work normally, then the breakdown lies in the main unit, and then it is better to simply replace the entire mechanism with a new one.
Hydrocorrector malfunctions
Among the most likely causes of a non-working headlight hydrocorrector is depressurization of the joints of tubes and sealing cuffs. The consequence of loose connections is loss of working fluid and air being sucked into the system. For the working pistons to move properly, the system must be completely filled with liquid. The manufacturer does not suggest repairing the hydraulic corrector, so if the system fails, the assembly is replaced. Nevertheless, the article “Repairing a hydraulic corrector” shows that the system can be troubleshooted and restored.
This is interesting: Error P0135: causes and troubleshooting of the oxygen sensor heating circuit
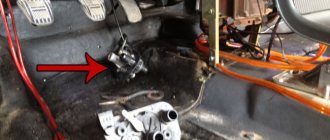
Where is the lamp hydraulic corrector located? Each headlight unit has an actuator that acts on a reflector, from which 2 tubes go into the cabin. Through a technological hole in the engine shield, the tubes go to the master cylinder and the switch on the dashboard.
Reasons for failure of the hydraulic regulator
If, when turning the headlight adjustment knob, the light beam does not change direction, this indicates a failure of the hydraulic corrector. There are several reasons for the malfunction:
- One of the working cylinders is jammed. In this case, the corresponding reflector will not rotate.
- The connecting tubes were damaged and the system depressurized.
- Failure of sealing due to damage or wear of seals.
If the system is depressurized, it is impossible to regulate both lamps. Most often, they lower and take a lower position, as a result, the headlights only illuminate the road next to the car. At night, this increases the risk of an emergency. You can try adjusting the hydraulic device rod.
Manufacturers of hydraulic correctors did not provide for the repair of the closed system as a whole and individual elements. Therefore, if the device fails, it is necessary to either install a new hydraulic regulator or replace the hydraulic device with an electric one.
Some car enthusiasts try to repair the regulator, but this does not bring long-term results. For example, they replace the working rod with a self-tapping screw of a suitable diameter with the sharp end removed. This makes it possible to fix the reflectors in a certain position. It will be impossible to make adjustments from the interior.
If, during a visual inspection of the hydraulic regulator, cracks are found in the connecting tubes, the repair will consist of eliminating them. The cause of cracks is temperature changes in the engine compartment of the car. If the crack is close to the main or working cylinder, cut off the cracked end. The tube damaged in the middle is completely replaced by pumping with antifreeze.
INSTALLATION OF A NEW DEVICE
If you decide to install a new headlight range control unit, then there are detailed instructions for this as well. We will look at the order in which to remove the old hydraulic corrector and how to adjust the headlights on a VAZ 2114, and simply install the new one exactly the opposite way. So, the step-by-step instructions look like this:
- We find all the clamps that secure the pipelines with the working fluid and remove them by unscrewing the bolts;
- We return to the cabin, where we carefully remove the rotating handle from its seat on the main cylinder;
- We unscrew all the bolts that hold the main cylinder and remove it;
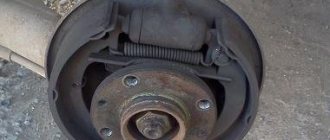
- We remove the working cylinders from the headlights and pull them out through the interior;
Is it possible to repair a hydraulic corrector?
Manufacturers of correctors for the Lada Granta did not provide for the possibility of restoring the device. It is assumed that the driver should make a change. However, it is possible to repair the hydraulic corrector yourself, although it eliminates the problem only for a while. It is impossible to achieve full functionality, however, the lampshades are installed in the working position and secured in it.
This is interesting: Replacing the CV joint on a VAZ 2114 and the outer boot with your own hands
The choice between an electric corrector or a hydraulic regulator is based on several parameters:
- cost – hydraulics will cost much less than an electric corrector;
- operating conditions - when the car often finds itself in situations with sudden temperature changes, it is worth paying more, but getting a reliable adjustment system;
- car model - not all cars allow you to connect an electric corrector, however, it is possible to install one on a Lada.
Barbaric repair method
Many drivers do not burden themselves with either repair or replacement of the hydraulic corrector. When the headlights begin to shine downwards, they simply screw in screws from the back of the working cylinder. Adjustment of the position of the rod and the level of tilt of the headlights is carried out by screwing in and unscrewing the screws.
After such a repair, the concept of a headlight range control is no longer applicable to the system, since the possibility of quickly adjusting the angle of the headlight reflector from the passenger compartment disappears. But such repairs have a right to life if the malfunction caught you on the road and there is simply no other way to raise the headlights.
Recovery without removal
- Pull the actuators out of the headlight assembly.
- Remove the tubes from their seats, and then secure the tubes so that the remaining working fluid does not leak out of them. It is better to preheat the landing site, but you can simply cut the tubes at the edge of the landing sites. Check the stroke of the actuator cylinders by moving them by the rod using pliers. The pistons should move without jamming.
- Each actuator has a plug for bleeding the system, which must first be pulled out.
- Turn the switch on the dashboard to position O. Fill the tubes with antifreeze so that a small drop remains on top, then put them on the fittings of the actuators.
- Position the slave cylinder bodies so that the bleeder hole is the highest point.
- Holding the rod in the maximum retracted position, fill the working cylinder with liquid until a small “hill” forms above the bleeder hole.
- Close the plug.
The system should work, but since the seals of the connections at the main cylinder, the regulator at the dashboard and the seals of the working cylinders were not checked, one cannot be sure of the long service life of the hydraulic corrector after such repairs. This restoration method will not work if the system is airy at the master cylinder in the cabin.
Restoration of headlight hydraulic corrector
You need to know where the headlight hydraulic corrector is located and how to remove it, since for a complete troubleshooting you will need to dismantle the working cylinders and the main adjustment mechanism. Take 2 small pieces of tube to connect the working cylinders to the main mechanism after removal, fill the system with water. If the device is operational, set the switch to the maximum headlight raise mode and leave the mechanisms in this position for several hours. If no leaks have appeared during this time, the system can be filled with antifreeze and installed on the car. If the leak does not appear in the pipe connections, it is better to replace the hydraulic corrector with a new one or install an electric corrector instead.
This is interesting: The trunk lock is jammed - Lada Granta: expert advice on how to get out of an unpleasant situation
Only new coolant should be used so that dirt particles do not interfere with the normal movement of the pistons. Remember that the system must be completely filled with working fluid. To restore, you will need a syringe and a blunt needle so as not to damage the cylinder seals. Do-it-yourself repairs, the assembly and disassembly process are perfectly shown in the video.
DEVELOPING THE CORRECTOR WITH YOUR OWN HANDS
During scheduled maintenance, you may also need to adjust the VAZ 2114 headlights yourself. Most often this happens when the hydraulic corrector stops working properly, but does not fail completely.
The most common reason for such partial failure is the lack of normal engagement of the lever and rod in the working cylinder. Under normal conditions, the end of the rod should be engaged with a lever, the other end of which rests on another rod. The latter acts on the headlight itself, moving it in the desired direction. Simply put, this mechanism resembles a kind of swing, the fulcrum of which is on the adjusting bolt.
Adjusting VAZ headlights with your own hands consists of checking the position of this bolt. If it was screwed all the way, then the end of the lever on one side or the other could simply pop out. Also, the bolt must be set so that it can be lowered and raised with minimal effort for the driver.
REPLACING THE CORRECTOR WITH A MORE PERFECT one
On cars of the VAZ 2114 series, a standard hydraulic corrector for the position of lighting devices is installed. And new cars already use an electric corrector. Many drivers replace the standard one with a new one in order to improve the headlights of the VAZ 2114. The main difference from the hydraulic one here is the complete absence of a hose with working fluid - electric motors do all the work here. Replacing the VAZ 2114 headlight hydraulic corrector is very easy, since it occupies the proper place of the hydraulic corrector.
Replacement occurs according to the following algorithm:
- We remove the battery terminal so that we do not get an electric shock;
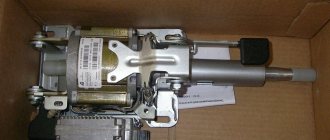
- Having unscrewed the main cylinder under the panel, rotating it counterclockwise, remove the device and its lever;
- We replace the sealing ring of the transition from the cabin to the engine compartment;
- We screw the electrical corrector onto the vacant space;
- From the main device, we attach the negative wire to the body, and attach the positive wire to terminal number 20 of the cable block under the car panel;
- Along the cables we lay the wiring to the executive motors on the headlights;
- We connect the negative terminal of the battery back and check what we got.
Now we know how to independently adjust the headlights on a VAZ 2114 and henceforth there should be no difficulties.
Replacing a hydraulic corrector with an electric corrector
From the name it becomes clear that the electric corrector operates using electricity, that is, it requires connection to a battery.
There is no need to spend a long time looking for reasons for such decisions from the owners of the domestic “ten”, since the electric corrector is reliable and highly efficient. Its breakdown occurs much less frequently compared to a hydraulic corrector.
We recommend: Pros and cons of a contract motor
Many owners of the model doubt whether it is possible to make such a replacement and use an electric corrector where a hydraulic unit previously functioned. Of course you can. For this purpose, it is possible to use a standard device or a device borrowed from another car.
The procedure itself requires several successive steps.
- Disconnect the negative cable from the battery.
- Remove the hydraulic corrector cylinder from the headlight, as we described in the previous section.
- Be sure to install a new O-ring during the replacement process.
- Once inside your car, remove the control knob for the hydraulic corrector master cylinder. It is held on by a 21 mm nut.
- The positive wiring harness is connected to the 20th socket of the Ш2 block in the mounting block of your car.
- The minus of the electric corrector is mounted on a body stud. There are several of them and they are located under the dashboard.
- The harness of the new regulator can be laid along the previously used tubes of the old hydraulic corrector.
- The harness pads are connected to the actuators.
- Return the negative cable to the battery and check how the new device works.
The cost of an electric corrector today is about 1-1.5 thousand rubles. Depending on the model you choose, you will have a certain number of adjustment positions. There are at least two of them, but the most common ones include 4, 12 and 15 positions.