Step-by-step instructions for replacing the headlight adjuster on a Lada Granta
On my car Lada Grante, the headlights began to shine too low.
At first I raised the beam of light by adjusting the hydraulic corrector, but after a while the headlights dropped again. The adjustment reached the maximum level, but the light fell low. This question comes up among owners of cars equipped with hydraulic headlight leveling. To replace the headlight hydraulic corrector on a Lada Granta car, you will need a wrench (head 21). Algorithm of actions:
- The adjustment knob on the dashboard is removed. There is a nut behind it that can be unscrewed with a knob. Afterwards you can pull out the main cylinder.
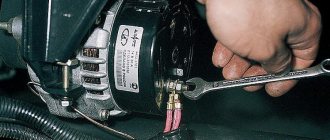
- Under the hood, the clamps holding the hydraulic mechanisms are pressed out. To pull them out, you need to turn the cylinders counterclockwise.
- The connecting tubes are secured with clamps having screw clamps. They need to be unfastened and brought into the car interior using the hole previously hidden by the seal.
After dismantling the old device, a replacement should be installed.
Installation of both hydraulic and electrical correctors is carried out through the vehicle interior. First, the device is pulled through the hole in the shield, then mounted in its usual place.
To electric
A more reliable and attractive electric headlight corrector on the Lada Granta is installed as follows:
- Before installing the headlight electric corrector, it is necessary to dismantle the failed device - first by disconnecting the main cylinder, then by disconnecting the hydraulics and leading the pipes through the passenger compartment.
- The negative terminal is disconnected from the battery.
- Electrical mechanisms are located where the working cylinders were installed. If the O-rings are worn out, they are replaced.
- The negative wire is connected to ground, the positive wire is connected to terminal 20.
- The wiring runs in the space previously occupied by connecting pipes.
The corrector lever is dismantled when installing the element.
Having finished with the wiring, you need to return the terminal to negative. The performance of the new system must be tested.
To hydraulic
If the owner is satisfied with the hydraulics, then replacing the headlight hydraulic corrector on the Grant is done in the same way:
- the old system is dismantled, connecting pipes are removed;
- new elements are installed in the same way in place of failed elements;
- O-rings are checked;
- Full testing is carried out.
Hydrocorrectors first appeared on classic rear-wheel drive VAZs. More modern cars from the Volzhsky plant are also equipped with hydraulic regulators for the direction of the light beam. Although at one time they began to install more reliable electrical correctors. They perform the same functions, but operate thanks to electric motors powered from the on-board network.
Installing automatic headlight leveling
Let's look at the basic installation rules and connection diagram using the example of the Zenit universal automatic headlight leveler. The kit includes:
- electronic control unit;
- 1 or 2 vehicle axle load sensors.
If your car does not have an electrical corrector installed, then 3-pin servos, a switch on the dashboard, connectors and a register will have to be purchased separately. The main task during self-installation is to correctly install the vehicle axle load sensor. The sensor must be positioned in such a way as to ensure approximately uniform stroke of the rod along the vertical axis.
During the initial calibration, the basic position of the body is set (full tank, only a basic set of the most necessary things in the trunk). Changing the position of the rod relative to the base level will lead to automatic adjustment of the cut-off line. You can see detailed installation instructions on the manufacturer's website.
Example of sensor installation.
For example, compare the type of standard automatic headlight leveler that the owner equipped the car with with his own hands.
What to do
There is a simple way to return the headlights to their normal state. You need to remove the hydraulic corrector by rotating it counterclockwise.
The work of the Lada Granta proofreader is as follows. When you turn the regulator inside the car, the rod extends from the cylinder and raises the headlight.
When the fluid pressure decreases, the rod is completely immersed inside the cylinder and becomes shorter. The headlights go down and the regulator no longer works.
I suggest increasing the length of the rod with a plastic tube. To do this, you can use a dowel-nail for construction work.
8 – diameter, 80 – length. The part with the cap is used. First, we measure 15 mm from the dowel-nail, which were determined through experiments.
This will maintain the factory settings. If the length is longer, the setting will be disrupted. Do not cut it off right away to make it easier to put it on the hydraulic corrector rod. The tube fits tightly onto the rod, so to make work easier, heat it with a lighter for 2 seconds.
I melted the edges with a lighter flame so that they were not sharp. The stem mates with the cup, and this rounded shape suits it better. Now you can install it in place. Similar to withdrawal. There is no need to press the latch; insert and rotate clockwise.
The same procedure must be carried out with another headlight. There is also no need to remove anything; you can easily get to the hydraulic corrector. After lengthening the corrector rods, you need to adjust the headlights.
Adjustment
There are 2 types of settings:
- Plastic white nut - up, down.
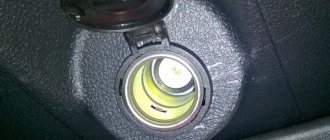
You need to rotate it through the hole shown in the photo.
To do this, you will need a long hex wrench with a ball on the end, since the hole does not coincide slightly with the location of the nut. Therefore, the ball will help turn the key at a certain angle. You can use a hexagon with a small cardan, size H6.
We insert it into the indicated hole, get into the nut and rotate it. First, adjust the low beam of the left headlight. It is recommended to do this on the road with an oncoming car. The beam of light must be raised up so that it does not hit the windshield of an oncoming car. Otherwise, your headlights will blind the driver.
The light should fall approximately at the level of the bumper with a small margin in height. If there are passengers in the rear seats, the car will sit down and the beam of light will rise. For this you need a headroom.
After adjusting the left headlight of the Lada Granta, park the car near the wall. Then adjust the height of the right headlight beam to the level of the left one, focusing on the edge of the light. This completes the adjustment, good luck to everyone on the roads! We look forward to your comments and opinions on this issue!
Checking and adjusting Lada Granta headlights
Adjusting headlights, both left and right, is necessary both on a new car and after repair.
Left headlight of Lada Granta
The methods used for checking and adjusting the light are identical for different car models. The Lada Granta has two headlights with halogen lamps. The function of adjusting the light of the lamps from the interior of the Lada Granta is performed by a hydraulic corrector; there is a delay function for turning off the low beam after turning off the ignition after 45 seconds.
To carry out the adjustment, you need to prepare the following materials and tools:
- a set of keys;
- Phillips screwdriver;
- spare wheel;
- full tank of gasoline.
The last two points are needed to give the machine a full load. To check, the car must be installed horizontally (video author - Autonakat).
Further actions consist of the following steps:
- First you need to start the engine and let it idle. To fix the position, you need to put the car on the handbrake.
- Next, you should check the tire pressure and bring it back to normal.
- In front of the car, at a distance of about 3 meters, you need to install a special wall 1.8-2 m high and apply markings on it.
- You need to place a weight of up to 70 kg on the driver's seat to align the low beam line with the bulbs.
- To remove vibrations from the shock absorbers and body, the car should be slightly rocked.
- The light correction control must be set to the “one person” position, which corresponds to the load on the driver’s seat.
- Next, you need to turn on the low beam and adjust the left and right headlights separately. Both the left and right headlights need to be adjusted using a corrector. The rays of light from the light bulbs should shine according to the markings.
Low beam adjustment circuit
You also need to set up the light-off hold function. If desired, you can turn off the function within 45 seconds.
Headlight adjustment (adjustment dials)
Using the thumbwheel, you adjust the low beam horizontally, and using the hex bolt, you adjust the light in the vertical plane. You can raise or lower the beams from the headlights if, for example, the rear of the car is loaded. Ideally, the light beams should exactly match the markings on the wall.
After adjusting the low beam, you need to perform a test drive in order to check the correctness of the adjustment after repair. The light from the headlights should not blind drivers on oncoming vehicles.
Recommendations for quality improvement
To properly adjust the low beam, you need to check the body. There should not be any deformations on it, as they can affect the quality of light; the rays from the lamps will shine scatteredly. If the body has flaws, it needs to be repaired. In addition, in order for the bulbs to shine brightly, you need to check the cleanliness of the glass on the headlights. Dust that has accumulated on them can be removed with a vacuum cleaner.
During use, scratches may appear on the glass. In this case, it is not necessary to change the headlight; you can polish the glass surface. If problems are identified with the reflector, it cannot be repaired and should be replaced with a new one. To make the adjustment correctly, the machine must have lamps of the same power and size.
Halogen lamp for car
You can distinguish a car from the crowd using tuning:
- install eyelashes;
- dim the headlights;
- install lensed headlights;
- make lighting from LEDs.
The simplest tuning option is to purchase ready-made eyelashes and stick them on the top of the Lada Granta headlights. You can give the eyelashes the desired shape using a stationery knife. Tuning can be done with eyelashes made yourself. The materials used to make eyelashes can be different; film materials are suitable.
You can buy vinyl film, cut a template out of paper, and then cut out the eyelashes from vinyl. Tuning is done by gluing eyelashes onto an applied soap solution. You can perform tuning with plastic eyelashes.
Tuning - eyelashes on headlights
There are many tuning options used during car repairs. It all depends on the capabilities and imagination of the driver.
How to replace the headlight hydraulic corrector on a VAZ 2190?
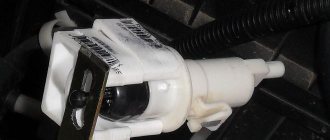
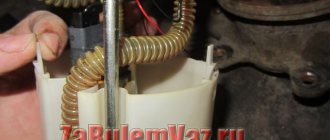
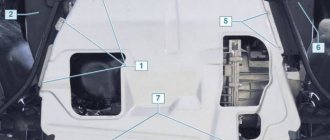
Removal: 1) Removing the corrector is easy and difficult can arise only with pulling it out, this is all done as follows, first remove the cover of the mounting block by hand, which is attached to four latches (see photo 1), as soon as the cover is removed, you need to move will be to the working cylinders of the corrector (these are the ones that are located on the headlight) and both will have to be disconnected; they are disconnected by pressing the latch (there is a latch on each cylinder that secures them to the headlamp unit) and turning counterclockwise and then pulled out (see photo 2) , after which you need to move again to the salon and there you need to remove the headlight range control knob by pulling it (see.
2) The hydro-corrector of the headlights is removed by leading it into the car interior, that is, at the beginning, as shown in the small photo, the hose seal is brought out into the cabin (Indicated by a red arrow) and behind it the hoses with the working cylinders are brought out and thereby the headlight range control is removed from the car.
Installation: The new hydraulic headlight corrector is installed in exactly the same way; it is inserted through the passenger compartment and thereby brought out into the engine compartment, where the working cylinders of the corrector are connected to the headlight unit, while the hole in the engine shield is closed with a hose seal and the other end (which is in interior) is inserted into the hole and then tightened with a nut, while the headlight range control knob and the mounting block cover are installed in their place.
Additional video clip: You can clearly see the process of replacing the headlight range control in the video below, using the example of a car such as a VAZ 2110; the replacement procedure is not particularly different on a Lada Grant or on dozens.
How to turn on near or far
The light switch on the Grant is located below the left of the steering wheel - similar to the tenth family.
Switching the handle clockwise gives the headlight and low beam modes.
To turn on long range:
- turn the light knob to the extreme right clockwise - the low beam will turn on;
- push the left steering column switch forward (the one that controls the turn signals);
- your high beam will light up - and a blue headlight icon will appear on the panel - keep an eye on it so as not to leave the car with high beam when it is no longer needed.
This icon indicates that the high beam is on.
Is it possible to repair the Lada Granta hydraulic corrector?
The direction of the light flux changes when the car trunk is occupied by any cargo. The sag of the rear end causes the headlights to point upward, causing oncoming drivers to be dazzled and the road surface to be poorly illuminated. To change the direction of the light beam, you do not have to get out of the car; this is done by a hydraulic regulator or electric corrector.
Hydrocorrectors for headlights were introduced on rear-wheel drive cars from VAZ of the classic type. Today, instead of hydraulic systems, car enthusiasts install Granta electric headlight correctors, which allows them not to worry about the integrity and tightness of the connecting tubes. However, the manufacturer often equips the car with hydraulics.
Manufacturers of correctors for the Lada Granta did not provide for the possibility of restoring the device. It is assumed that the driver should make a change. However, it is possible to repair the hydraulic corrector yourself, although it eliminates the problem only for a while. It is impossible to achieve full functionality, however, the lampshades are installed in the working position and secured in it.
The choice between an electric corrector or a hydraulic regulator is based on several parameters:
- cost – hydraulics will cost much less than an electric corrector;
- operating conditions - when the car often finds itself in situations with sudden temperature changes, it is worth paying more, but getting a reliable adjustment system;
- car model - not all cars allow you to connect an electric corrector, however, it is possible to install one on a Lada.
Step by Step Actions
The first step is to assess the general condition and find the cause of the problem. If the tubes are damaged - cracks or breaks are noticeable, the connecting elements must be replaced. When the crack is located near the corrector, the tube is bitten off; if the damage site is not nearby, the entire length is replaced. Next, the system is pumped with antifreeze:
- The corrector plug is removed.
- The actuator rod extends.
- Using a syringe, antifreeze is introduced into the system, the entry of air is strictly excluded.
- Instead of a plug, a self-tapping screw without a sharp part is installed.
If there is no adjustment because the rod is damaged or broken off, extension is carried out.
If one or both headlights stop responding to turns of the adjustment knob, you need to think that the hydraulic device has failed. There may be several reasons:
- jamming of the working cylinder (one lamp does not turn);
- depressurization of the system due to failure of sealing elements;
- depressurization due to damage to connecting pipes.
In the last two cases, both reflectors do not rotate. In most cases, they “fall”, that is, they occupy the lowest position.
Manufacturers of headlight correctors for the VAZ 2114 are very similar to the headlight correctors for the Lada Grant; they also did not provide for the possibility of repairing the closed hydraulic system itself, as well as its individual elements. In this case, you can only replace the device. Attempts to repair the hydraulic corrector still take place.
How does headlight hydrocorrector work on Grant?
By extending a special actuator directly built into the rod mechanism, the so-called headlight range control changes the angle of the lighting.
The mechanism is driven directly by an electric drive or a certain level of pressure from the hydraulic fluid filled. As it turned out experimentally, a short time after purchasing a new Lada Granta, a device such as the headlight hydrocorrector fails, and many people have a logical question: how to carry out the repair yourself? However, we will talk about this below. Experts have identified several obvious signs that indicate a malfunction of the mechanism we have identified:
- The connecting tubes on the device are damaged in some way (possibly cracks have formed).
- The tightness of the regulation system is broken.
- One of the existing cylinders is jammed.
Generator for Kalina
Do-it-yourself clutch adjustment on Kalina
Lada Kalina does not start, the starter does not turn
If the tubes are damaged, then there will be no adjustment at all, and the light illuminates the road around the car. Such lighting does not correspond to the safety of driving directly at night. Consequently, many owners of the domestic Lada Granta are beginning to look for all sorts of ways to fix this problem.
Finding the cause of the problem is quite quick, since every experienced driver can understand that it is the headlight range control unit that is to blame for this problem. Many car owners are concerned with the question: is it possible to do it yourself in this case? If your car is still under warranty, the issue will be resolved automatically, since you will receive a free replacement under warranty. However, in most cases, the problem occurs when the car is no longer under warranty. What to do in this case? Also, not everyone can urgently go to the automobile center; driving a personal vehicle is necessary, but it is not safe. Therefore, you will have to carry out the repairs yourself. There is nothing super complicated about this.
Repairing the device, as mentioned above, is not difficult and does not require you to have special devices or any improvised tools. It is enough to take with you a sharp awl, the most ordinary pliers, some antifreeze, and a self-tapping screw, the sharp end of which must first be cut off.
What does a hydraulic corrector consist of and how does it work?
The design of the adjustment device is non-separable and simple; the hydrocorrector of the Lada Granta headlights consists of the following elements:
- the main cylinder located under the dashboard;
- a working cylinder located on each headlamp;
- reflector regulating mechanisms;
- connecting components.
A knob for controlling modes is displayed on the instrument panel, helping the owner change the pressure in the master cylinder. A change in pressure causes the reflector to rotate, and therefore the direction of the light flux.
The change in pressure in the main cylinder is transmitted to the working elements, causing the pistons to rotate, changing the angle of inclination of the reflector. Electrical correctors operate using on-board electricity and therefore do not depend on the ambient temperature. More reliable devices of this type are more expensive.
The hydraulic device, thanks to which you can adjust the angle of the light beam from the interior, consists of the following main parts:
- master cylinder located under the dashboard;
- working cylinders, one on each headlamp;
- tubes connecting the above devices.
The hydraulic corrector system is closed and at the same time sealed (normal). The changed pressure is transmitted through the tubes to the working cylinders. This leads to a change in the position of the pistons and the rods connected to them. They use a special lever mechanism to influence the angle of rotation of the reflector. This is the operating principle of the hydraulic headlight adjuster for the Lada Granta.
The electric corrector differs in that the desired position of the lampshades is ensured by mechanisms powered by on-board electricity. Their operation is not affected by changes in ambient temperature, so they are much more reliable than hydraulic devices. Their only “minus” is the cost, which is several times higher.