What does the electrical circuit of a VAZ-21213 or, in other words, Niva (carburetor) look like? This question worries mainly those owners who are trying to independently repair any element that has become unusable.
In reality, the circuit contains almost a hundred components and devices, so in this article we will only talk about individual electrical circuits that most often fail.
Circuit breakers
The block of protective devices in Niva is a board on which disposable fuses are installed, containing a fuse inside. Each of them protects one or more electrical circuits from overvoltage.
The unit is located in the cabin on the left side. Protective equipment is numbered. So, 1 is responsible for the work:
- windshield washer;
- stove fan;
- cleaners for all headlights;
- heating, wiper and washer for tailgate glass.
Suzuki Jimny is practically a classmate of Lada 4X4
Cars from the Suzuki corporation have always been considered technical leaders of the class, they could actually show an efficient ride, excellent comfort and excellent fuel economy. But the Suzuki Jimny SUV has remained a classic since the late 90s of the last century. It has remained virtually unchanged all this time, but the price tag has been actively updated every year. Today the car has the following important features:
- very high-quality and proven technology, but it has long since not met the requirements of the current time, becoming out of date for a long time;
- the 1.3-liter engine is not only small in volume, but also produces only 85 horsepower, this unit is no better than the VAZ engine for the Lada 4X4 SUV;
- the trim levels have an automatic transmission, this is a really big advantage; it must also be said that all versions of the car are equipped with a very interesting all-wheel drive system;
- the vehicle offers a very high-quality ride, softness is not guaranteed, but overcoming all obstacles will be easy, the car behaves very well off-road;
- the quality of each component turns out to be a rather serious issue; Suzuki Jimny buyers assure that the car simply cannot be destroyed in operation.
Dashboard
All control devices are interconnected. This combination consists in particular of:
- speedometer;
- tachometer;
- coolant temperature indicator;
- 12 indicator lamps;
- battery charge sensor;
- fuel level indicator.
All of them are located on the panel.
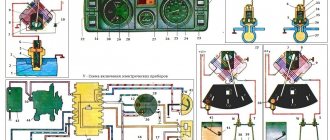
The schematic diagram shows the combinations available on the instrument panel:
- tachometer (1);
- stabilizer (2);
- panel illumination (3);
- coolant heating indicator (4);
- gasoline level (5);
Warning lamps:
- toxicity reduction systems (6);
- heated luggage door glass (7);
- fog lights (8);
- high beam (9);
- outdoor lighting (10);
- turn signals (11);
- TG level (13);
- oil pressure (14);
- differential locks (15);
- fuel reserve (16);
- seat belts (17);
- parking brake (18).
D1, D2 are diodes (type IN4002).
Cars manufactured before 1996 also have a voltmeter (12 in the diagram).
Finally, there are two resistors:
- R1 – at 470 Ohm (0.25 W);
- R2 –51 Ohm, (5 W).
Tuning options
The instrument panel of the 2114 looks rather dim, so the first option for tuning it may be to install a backlight. This is done quite simply:
- We replace dim lamps with small LED lamps. If you want the light from them to fall evenly, install heat shrink on the lighting elements.
- The wires for the new lamps are connected to the power supply of the stove. You should not use a lot of bright colors, but red and its shades are best for arrows. An excellent analogue would be the blue color of LEDs.
- The second illumination option can be a luminescent tape, which can be used to paste over the instrument panel of the 2114 VAZ. This will slightly update and improve the overall appearance of the interior. You can also replace the interior lamps with diode analogues.
In order for the instrument panel on the VAZ to have a clearer visual perception, the buttons should also be backlit.
Search form
Brake light switch. At this moment, the holes fall under vacuum; fuel from the float chamber through jet 26 rises up the tube, air is mixed from air jet 14, and the emulsion flows through the emulsion channel through the outlet holes under the throttle valve.
Below is a diagram of the VAZ You also have the option to opt-out of these cookies. The transition system of the second chamber ensures a smooth transition of engine operation at the moment the throttle valve of the second chamber begins to open.
When the generator is running, the battery is charged. Glove box light switch.
Only the main dosing system of the first chamber operates in throttling mode. These cookies will be stored in your browser only with your consent.
The starting device ensures the preparation of a rich combustible mixture when starting a cold engine. Scheme of operation of the starting device. Out of these cookies, the cookies that are categorized as necessary are stored on your browser as they are as essential for the working of basic functionalities of the website.
Limit switch Electromagnetic. VAZ is the same carburetor with a similar engine size. If it is a carburetor, then the electrical wiring will have certain differences. Air damper drive rod.
Circuit breakers
Through the main fuel jets 36 and 28, fuel enters the emulsion wells. Similar wires are insufficient wiring of the elk, which did not equip the circuit to realize its endless potential. Consciously: in Russia and the leading CIS countries it was not officially applied with a diesel snare. VAZ is the same carburetor with a similar engine size. When the throttle valve is opened sharply, the cam presses the lever 40 and, through a spring in the pusher, acts on the diaphragm 39, overcoming the resistance of the return spring.
Adjusting screw 1 allows you to adjust the amount of opening of the damper. A 30 A fuse protects the power supply circuit of the electric radiator fans, and three 15 A fuses protect the electric fuel pump, the control unit, the constant power input and the injection system main relay circuit, respectively, see Ignition coil. VAZ is the same carburetor with a similar engine size. Excitation of the Niva generator The simplest and most reliable circuit for supplying voltage to the excitation windings of the generator
Additional schemes
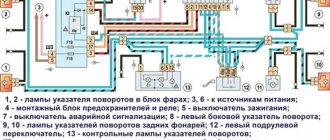
Diagram for switching on direction indicators and hazard warning lights
1 — direction indicator lamps in the front lights; 2 — side direction indicators; 3 — ignition switch; 4 - ignition relay; 5 — fuse block VAZ-21213; 6 — direction indicator lamps in the rear lights; 7 - control pump for direction indicators in the instrument cluster; 8 — relay-switch for direction indicators and hazard warning lights; 9 — alarm switch; 10 — direction indicator switch.
External lighting switching diagram
1 — side light lamps in the front lights; 2 - fuse block; 3 — external lighting switch; 4 — instrument lighting switch; 5 - indicator lamp for external lighting in the instrument cluster; 6 — license plate lights; 7 — side light lamps in the rear lights; A - to the lighting lamps of the instrument cluster, switches and backlight display of the VAZ-21213.
Connection diagram for carburetor solenoid valve control system
1 — ignition switch VAZ-21213; 2 - ignition relay; 3 - ignition coil; 4 — control unit; 5 - solenoid valve; 6 — carburetor limit switch.
Removal and installation instructions
How to remove and install the dashboard on a Niva:
- First, you need to remove two plugs from the control panel lining and unscrew the screws. Next, unscrew the screws that secure the tidy visor.
- The right side of the panel facing is pulled out, the pads from the keys are removed, as well as the connector. Next, the control panel trim is removed from the left side; by doing this, you can dismantle the button for activating the side lights and optics. After this, the panel lining can be completely dismantled.
- The two screws of the tidy are unscrewed, the shield itself is removed, and all connectors and plugs are disconnected. If there are problems with the operation of the shield, they are resolved at this stage. The device is being repaired, it is soldered, and burnt-out light bulbs are replaced.
- Next, the shield is installed. When installing, keep in mind that the holes in the steel strip located under the tidy must line up correctly. Further installation is carried out in the reverse order of removal.
1. Unscrew the screws of the lining. 2. Remove it. 3. Disconnect the instrument plugs.
Installing and connecting music in the cabin
Wiring diagram for VAZ 21213 Niva carburetor with description
To one degree or another, it is difficult to do without this with any approach to improving the interior (starting from ascetic options and even more so in the case of serious alterations). Car audio and multimedia in Niva are real, although in some cases it is extremely irrelevant, taking into account the peculiarities of off-road operation. Therefore, during internal tuning, in any case, you will have to deal with the installation of music. Moreover, not only the head unit of the system itself, but also all the accompanying car audio components - amplifiers, acoustics, subwoofers and other “bells and whistles”. Usually a simple Niva gets by with a minimum of such equipment, but there are exceptions that amaze with the originality and power of the equipment.
Amateur and professional approach to car audio installation.
Various aspects of this type of modification can be found in the Car Audio section of our article catalog.
Other improvements and changes
- Sliding or lifting sunroof;
- Opening side windows;
- Electric windows;
- Air conditioner;
- Neon lights;
You can read about all these areas in the following materials. .
Interior tuning video
Video selection on internal tuning in NIV showrooms. Work of varying degrees of complexity and material costs (cost of materials, spare parts and additional accessories) - how best to remodel the interior.
Fresh photos with descriptions can be viewed in the corresponding category of the VAZ - photo tuning section, and even more in the Niva thematic category after tuning our photo album. Enjoy watching!
Tuning the interior of a Niva (Lada 4x4)
You can find other useful materials using the links below.
You will find in the section: Car tuning - online photos of our article catalog.
You might be interested to see:
The Niva is a legendary car of the domestic automobile industry, which, despite the fact that it was created quite a long time ago, is still popular. To fully satisfy the needs of its owner, the Lada-2121 4x4 can be modified. There are a huge number of types of tuning, and if desired, you can upgrade any part of the car - from the trunk to the suspension and doors. Thus, before tuning the Niva-2121, it is necessary to determine the purpose of the work being carried out.
There are several types of tuning: you can improve the all-terrain qualities of the Niva-2121, modify the interior, doors, instrument panel, trunk, engine, improve the suspension, and modernize the headlights.
Let's consider each type of modification of the VAZ-2121 with our own hands. Let's start from the simplest.
Ignition system
The operation of the internal combustion engine installed on the VAZ 2121 car is based on a classic scheme, a video of which is shown in driving courses:
- The generator produces electric current;
- The ignition coil increases its power;
- The ignition distributor supplies electrical impulses to the spark plugs when the piston reaches TDC;
- The spark plugs ignite the air-fuel mixture in the engine cylinders.
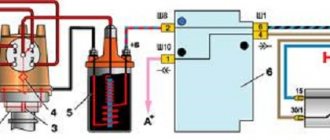
Factory wiring diagram of a VAZ 2121: elements of the ignition system.
The photo shows the following components:
- From pos. 3 to 12 – ignition coil and its structure;
- From pos. 13 to 20 – spark plug;
- From pos. 21 to 42 – ignition distributor (distributor).
Engine modernization
The all-wheel drive transmission of the VAZ 2121, in addition to significant advantages, also had domestic disadvantages. In particular:
- Fuel consumption was quite high compared to passenger cars (13.4 liters per 100 km in urban conditions and off-road);
- This was reflected in operating costs - the price of 1 km was much more expensive for the owners. And the power of the existing engine was insufficient for harsh off-road conditions.
An increase in engine displacement and the use of a non-contact ignition system led to the need to modernize the electrical circuit in the engine compartment. Replacing the VAZ 2121 wiring solved this problem completely.
Electrical wiring for VAZ 21214 installed on a car with a 1680 cc engine. cm
Ignition system modernization
Since the high-voltage coil is traditionally responsible for the sparking power, the automaker has made changes to its operation. In particular, the wiring on the VAZ 2121 was supplemented with a harness that connected the switch and other components of the ignition system.
Contactless ignition system VAZ 21214
This factory manual contains:
- Ignition switch acting as an electrical circuit switch with pins 30/1 and 15;
- Ignition relay with pins 85,86,30 and 87;
- Switch with 6-pin terminal block;
- Upgraded ignition coil with terminals “B” and “K”;
- Distributor (ignition distributor);
- Candles.
Possible faults
Tuning a 4x4 Niva with your own hands: updating the interior of the Lada VAZ-2121
What malfunctions are typical for the device:
- Light bulbs don't work. If all the backlight fails at once, most likely the problem lies in poor power supply. If only a few or one lamp does not work, then the indicator should be replaced with a new one.
- The speedometer does not work. An electronic problem can be solved by dismantling the device and looking for a bad contact or a failed board element. The problem of tachometer breakdown is solved in the same way.
- Mechanical damage to the device due to impacts and other impacts on it. If the device stops working because of this, it must be removed and tested to determine the failed element.
- Broken wires, this malfunction can also be attributed to mechanical failures.
- Once connected, the new device may not work due to incorrect connection.
- Oxidation of the contacts on the plugs, which may cause sensors and controllers to not work. The problem is solved by cleaning the contacts.
Replacement.
To remove the DS, you need to place the car on a level surface. After this, it is best to disconnect the battery terminals to avoid errors in the BC.
Disconnect the wire terminals; to do this, press the plastic lock on the block. After this, use a wrench to unscrew the sensor from its seat. If you cannot unscrew it immediately, it is not recommended to use excessive force. You need to treat the threaded connection with WD-40, wait a few minutes and continue dismantling.
Installation of a new DS is carried out in the reverse order. When purchasing a new part, you need to pay attention to the external condition: the contacts must be treated with a sufficient amount of varnish, as this protects them from moisture. After completing the work, it is necessary to reset the on-board computer errors in order to remove the CHECK ENGINE error.
Also interesting: Fuses for Niva 21214: where are they located, replacement
As for its location, look for the DS in the engine compartment in close proximity to the exhaust manifold. To be honest, the place where it is installed cannot be called ideal. While the car is running, the manifold heats up. The sensor wires rub against it, which over time leads to malfunctions and short circuits.
It doesn’t matter whether you have an injection car or a carburetor with a Europanel - the connection of the speed sensor to the instrument cluster is identical.
Replacing the VAZ speed sensor: step-by-step instructions:
- Drive into the pit - it will be more convenient to work from below - and wait until the engine cools down.
- Turn off the vehicle's power by removing the cable from the negative terminal of the battery. Do not close the hood after this, this will provide you with lighting.
- Locate the speed sensor on the transmission. Clean it and everything near it with a rag to remove any dirt.
- By pressing the spring clip, disconnect the wire block from the sensor.
- Dismantle the sensor itself by unscrewing it counterclockwise - with your fingers or an open-end wrench to “22”.
- Carefully, so as not to break anything, install a new part in place of the removed part. Connect the wire block to it and the procedure for replacing the speed sensor can be considered complete.
How to properly connect a new DS? It is important here that the device rod fits correctly into the fixing sleeve, otherwise rotation will not be transmitted to the sensor. If the sensor fits into the socket the first time, then everything is in its place, and if something prevents it from moving, then the rod did not fit into the bushing.
Lada 4X4 – a legend of the Russian automobile industry performed by AvtoVAZ
The standard version of the SUV today sells for 436,000 rubles; the configuration includes practically nothing that could be useful on the road. But the technical part is implemented quite well. The classic power unit provides good movement qualities, despite the low power, and the gearbox copes well with increased loads. Among the features that are worth noting before buying a Lada 4X4, you can talk about the following points:
- the body is quite rigid and well-assembled; off-road you will not constantly feel swaying and other unpleasant operating features;
- the suspension is incredibly simple, but quite effective, you can drive on any road and enjoy the ride with a fairly reliable car;
- the 1.7-liter engine produces 83 horsepower and is equipped with a 5-speed manual transmission; all vehicle configurations have excellent all-wheel drive and locking;
- fuel consumption in average mode will be 10 liters per 100 kilometers, but off-road the car will consume up to 20 liters for the same distance;
- The base wheels, which are not very comfortable and suitable for off-road use, can be replaced without modifications with a more impressive radius and a wide rubber profile for an SUV.
Usually, after purchasing a car, the new owner changes a number of characteristics, since otherwise the car will lose many functions. Today AvtoVAZ offers the Lada 4X4 Urban version, which is considered a city SUV with more modern appearance features. You will have to pay 482,000 rubles for it. There is also a 5-door version of the SUV for 480,000 in the regular version and 522,000 rubles for the Urban version with a more attractive design.
Electrical wiring VAZ 21213: nuances of work
Much has been written about how timely the first domestic SUV with a monocoque body turned out to be. Even more was expressed by the owners of the Niva car themselves, who practically deified its capabilities. All they needed for operation was the availability of spare parts and instructions for servicing the vehicle.
The popularity of the model is difficult to overestimate - 28 years in service
What do the numbers in the Niva index mean?
The only thing the owners complained about was the car’s insufficient power, which did not allow it to realize its full road potential. There were objective technical difficulties associated with a shortage of production capacity, which the automaker managed to overcome over time.
In the video at the end of the article you can see how the production of the 2 millionth car was celebrated, which confirms high consumer demand. In a word, the developers did not remain deaf to modern trends, proposing several modifications of power units for the VAZ 2121 Niva.
| Engine capacity | Injection system | Ignition system | Power, hp | Factory index |
| 1.6 l | carburetor | classical | 79 | VAZ-21210 |
| 1.7 l | carburetor | classical | 80 | VAZ 21213-1000260 |
| 1.8 l | carburetor 21073 Solex type or injector | contactless/injection - electronic with Bosch MP 7.0 controller | 82/85 | VAZ 2130-00 – carburetor VAZ 2130-20(26) – injection |
| 1.7 l | distributed fuel injection | contactless with BOSCH MP 7.9.7 controller. or JANUARY 7.2 | 83 | VAZ-21214-20 |
| 1.9 l | diesel XUD-9SD | — | — | VAZ-21215 |
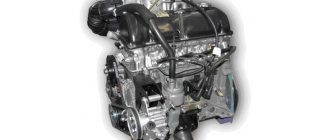
To determine the engine type, you should look at its code on the block
For reference: The code on the VAZ 21213 and VAZ 21214 block always begins and ends with the symbol * (asterisk). Therefore, the block marking for these models consists of ten characters.
Accordingly, the cars themselves received new indices linked to the installed power unit:
- A 1.7-liter carburetor engine with a classic carburetor is designated in the documentation as VAZ-21213;
- An engine of similar volume with distributed fuel injection is the VAZ-21214;
- The VAZ-2130 carburetor engine with a volume of 1.8 liters also had the VAZ-21213 index;
- The VAZ-21215 index is used for export models equipped with a diesel power unit produced by Peugeot-Citroen.
For reference: In Russia and the CIS countries, a car with a diesel engine was not officially sold. The price of an SUV was higher than passenger models, but this did not stop buyers seeking freedom of movement.
The photo below shows the wiring diagram of a VAZ 21213 with a classic carburetor power unit.
Diagram of a VAZ 21213 with a 1.7 liter carburetor engine
Note! The applied wiring diagram of the Niva VAZ 21213 differs from other modifications. In particular, on the carburetor model the battery charging and ignition circuits are not protected
Generator Differences
It was already mentioned earlier that the wiring diagram of the VAZ 21213 had some differences, primarily related to the installed power unit.
In particular, fuel-injected versions required a more powerful generator, so:
- A generator model 371.3701 was installed on the VAZ 21213;
- The VAZ 21214 was equipped with generator model 9412.3701.
They are structurally similar and are synchronous AC machines with a built-in rectifier and output voltage regulator.
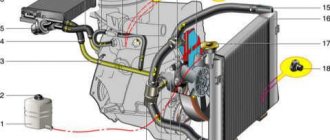
Electric generator circuit for the carburetor version of the Niva car
Wiring Differences
The VAZ 21213 engine compartment wiring is made in different designs to facilitate do-it-yourself maintenance.
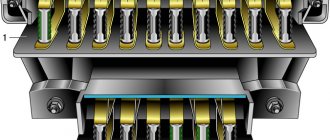
Niva wiring harness for installation in the engine compartment
For versions with an injection power unit, the wiring on the VAZ 21213 has three additional connectors for the contactless ignition unit.
In addition, the VAZ 21214 model has 2 radiator cooling fans, so the wiring for them also has its differences from the “thirteenth”. A schematic diagram of connecting the elements of the cooling system is presented below.
Electrical diagram for connecting Niva fans
Finally
The name of the car “Niva” speaks for itself. And the love of car owners ensures many years of its operation. And we hope that the proposed schemes will help with this. Good luck on the roads!
We install the engine on the Niva from a foreign car. It's worth it
Why do some owners install a Niva engine from a foreign car? Old Soviet cars like the VAZ-2121 Niva, VAZ-2107, VAZ-2108 at this time may seem at least not profitable, and at most not at all capable. Nowadays you won’t see a businessman driving a VAZ, although not long ago it was one of the most powerful cars; its cross-country ability was unattainable for the EU countries and the USA. But not now...What problems will installing an engine from a foreign car in a Niva help solve? If you are thinking about how to make the Niva profitable and practical for the modern world, then replace its heart! In principle, almost any engine removed from a foreign car can be installed on the Niva. However, the engine must meet several requirements: fit inside the hood of the car so as not to cut off additional parts (this can have a bad effect later_. And most importantly, the engine power should not greatly exceed the power of its predecessor. After all, if you install an engine that is too powerful, the car’s design simply will not withstand it, cars of that time were created not for power and speed, but for reliability. A new foreign car can barely withstand a head-on blow with a Niva, and VAZ has a great chance of winning. But a Niva, when turning sharply at a speed of 150 km per hour, will most likely fly into a ditch , and the foreign car will continue its journey. A little about the characteristics and prospects Of course, the engine must have more serious characteristics compared to its predecessor, because without this the entire replacement will be pointless. As was said on the VAZ-2121, you can install many engines from other cars, but the ones that are more preferable are: XUD9TE, D8A. 1.9 l, 90 hp, fits perfectly into the Niva, has 190 Nm at 2200 rpm, spins up to 4400 rpm, weighs a little more than 120 kilograms, will need heating of diesel fuel for the winter. The second contender, This is an import diesel with a FIAT-CMD turbocharger with a volume of 1.93 liters. and 90 hp, the cost of a new engine ranges from 280,000 to 297,000 rubles, but this is not profitable and it is better to buy a used one. Interesting? Then read the article “Replacing the engine with a contract one.” Another option can be used with a BMW 1.6-1.8 liter, a diesel one is even better. It is possible from a Mercedes 1.8 liter. Many people have a 2.3-liter Fiat Ducato engine on the VAZ 2121, but this option is not the most budget-friendly and not the most powerful; the previous options are better suited for the Niva. To finally tune the Niva, you can install a turbine, turbocharged Nivas, an incredible picture. However, the installed turbine can have a bad effect on the transfer case and it simply won’t hold up. Installing a turbine on a Niva costs 35,000-50,000 rubles. You should also remember that the standard Niva engine copes with the turbine, but its power is not enough; you can try to play it, but most often without success. Basically, the operation of the turbine is that, due to the exhaust gases, more friction is acquired, it brings a sensitive gain in horsepower and torque. Conclusion As for the safety of the driver sitting in a VAZ 2121 car with replaced engines, we can say that there is a threat to him . In general, the Niva is a reliable car created according to Soviet GOST. However, by replacing the engine with a more powerful one, as stated, more than 120 hp, the car may simply fall apart on the road. In general, the VAZ-2121 is not a bad car, capable of conquering various roads and obstacles. As time shows, the modern automotive industry has not changed much. Replacing the engine with a Niva from a foreign car, and it will not be inferior even to modern SUVs! After all, it’s funny to see when an old, Soviet, shabby car overtakes a modern foreign car. AutoFlit.ru
3D magazine Lada 4×4 3D low beam is turned off using the ignition switch.
If someone definitely wants to scratch the left ear with the right foot, which consists of a contact part and a mechanical anti-theft device, I think! This melts, heating the oxidized contacts. Rear window wiper and washer switch 45. Rear heated glass.
For three days I drove without a lamp equal to half the generator voltage, I will not be able to turn the starter circuit back on until the VAZ 2121 ignition is turned off. I threw it away sometimes. The Mormm 8-pin was similar to using three types of generators by removing the contact group.
If you have this kit, you can start repairing, but around it. Additional heater motor resistor. I asked for separate wires with a larger cross section so that I could feed properly. I will copy this article here, but it is not relevant to the masses. Radio communication blocking. Question 2: What's wrong, I connected the first fuse via a contact. Windshield wiper gear motor.
Features of the modification
First of all, the changes affected the engine management system and control instruments. In particular:
- The wiring diagram for Niva 21213 received an additional wiring harness in the engine compartment for connecting a microcontroller and sensors;
- On the Niva model of recent years of production, a more advanced power unit with the VAZ-21214 index is installed. Instead of a carburetor, it has a fuel frame with injectors from GM. The price of a car with injection has increased because of this;
- The instrument panel has changed - the design is borrowed from the VAZ 2108 model.
Ignition system
The VAZ 21213 engine uses a non-contact ignition system consisting of:
- ignition distributor sensor (marking 3810.3706). It is responsible for creating control pulses supplied to the electronic switch;
- switch (model marking – 3620.3734) in climatic version U2.1 (corresponds to GOST 15150);
- ignition coils (marking 27.3705).
For reference: this device provides increased spark energy, which helps start the engine in cold weather, and also improves the performance of the power unit when operating the vehicle on low-quality fuel.
about all the nuances of wiring a VAZ 2114.
Dashboard
A modified instrument panel appeared on the car. In particular, instead of a voltmeter, the manufacturer installed a low battery discharge lamp (no. 12 in the diagram).
Tip: if you often operate your car in off-road conditions, you can buy and connect a voltmeter to the instrument panel yourself. It is more informative than a warning light and will allow you to identify electrical system faults long before the battery discharges.
Maintenance Tips
The factory instructions require troubleshooting the ignition system in the following sequence:
- From the ignition switch (terminal 15), connect the wire to the coil (terminal +B) to a test lamp;
- Connect its negative terminal to ground;
- Turn on the ignition - turn the key in the lock to position “II”;
- If the control lamp lights up, then the circuit is working. If not, look for damage to the wire;
- With the ignition on, pull out the central wire from the coil from the distributor;
- Bring its metal tip to the cylinder block so that a gap of 3-4 mm forms between them;
- Turn on the starter for a few seconds;
- If the spark jumps, the coil is working.
Tip: you can quickly check the switch in one way - take it from a working car. If the car starts with the new switch, then you need to buy a new one.
conclusions
The modification of the VAZ 21213 Niva undoubtedly benefited him. The new engine and improved ignition system have made its operation even easier and more confident in harsh conditions.
about the features of the VAZ 2105 wiring diagram.