A beautiful car is the ultimate dream of any man. How nice it is when you are driving along the road in an expensive and sports car, and girls turn their attention to you. Any man in his life strives to accumulate as much financial resources as possible in order to buy himself a powerful, iron horse. The wind in the face and tremendous speed, that’s what excites a man’s blood.
Sometimes we inherit a car (for example, a VAZ 2101) and in order to keep it neat, the man constantly looks after it, changing worn out parts.
But what if you go further and, having saved a certain amount of money, tune your steel friend yourself? Moreover, on the Internet you can find a large number of photos of tuning a vase with your own hands.
Easy tuning of a car hood
The simplest options for tuning a hood with your own hands, which even a beginner can handle, are pasting it with special materials, installing additional emblems or a spoiler on the vehicle.
Pasting with vinyl film
If the hood of your car has defects and scratches, or you just want to make it original, you can tune it using special adhesive films. It will be much cheaper than painting the part. This upgrade will give your hood an original look.
There are special vinyl films that can be purchased on the market or at any car store. They come in different types: matte, glossy, carbon fiber, plain or with different patterns. Everyone can choose a product according to their own color and taste.
It is advisable to use two people to paste the film. Before starting work, you must thoroughly wash and degrease the hood using a solvent. To begin, fix the film in the center of the product. One person heats the film with a hairdryer, the other carefully stretches it and straightens it from the center to the sides using a spatula with a soft tip. Thus, you will receive a new tuned body element without defects or scratches.
Tuning using a deflector
Deflectors are especially popular when tuning the hood. You can install them yourself by purchasing them in the store. It is very easy to install a deflector or spoiler on a car according to the instructions and special fasteners that come with the kit. There are also deflectors that are made of soft plastic and are installed by gluing.
The deflector, on the one hand, decorates the car and makes it original, on the other hand, it performs protective functions. It protects the vehicle windows and hood from damage from small stones. The deflector is also popularly called a fly swatter, since, in addition to stones, it also reflects insects flying towards it.
Experts recommend purchasing hood deflectors from VIP tuning, which are of good quality and reliability. By installing a deflector on your car, you will protect the hood and windshield from dirt and corrosion as much as possible, and also add brightness and originality to your car.
https://youtube.com/watch?v=jnFwPgBR2u4
Hood locks as a tuning element
Often, as a tuning element, car owners use sports hood locks, which give the vehicle an aggressive and predatory look. They are most often used on sports cars that participate in racing and rallies, however, they can be installed on any car model.
Sports locks are both a decorative element and a protective device against opening the hood while the car is moving. You can install the locks yourself using step-by-step instructions for them.
To install the hood locks, you need to drill several holes in the hood cover and frame. Therefore, before starting work, read the installation instructions very carefully and check the markings several times to ensure that the body part is not damaged. Before installing the lock, cover the surface near the hole with masking tape so as not to damage the car’s paintwork during operation. The locks are secured using specific fasteners that are included in the kit.
Greeted by clothes
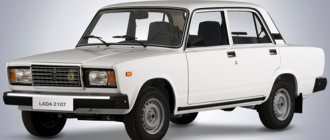
Even the traffic police inspector, seeing a car that is middle-aged but shining with unfading beauty, softens towards the offender. What can we say about the general public? Having seen the first of the "Ladas" - namely, the "troika" in the popular understanding was awarded the name "Lada" - people are eager to feel pride in the past of their country. Car owners are able to provide them with this pleasure!
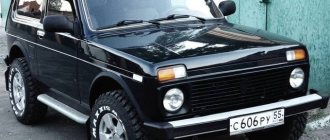
Look how prettier the serial “troika” has become after the “sportivization” of its appearance! The radically black paint color gives the car a serious - if not harsh - look. The shield covering the headlights, complemented by two fog lights, is in perfect harmony with the front aerodynamic “skirt”. Alloy wheels of geometrically strict shape emphasize the weighty character of the car. A wonderful example of VAZ 2103 tuning!
Another example can be considered conditionally successful. Futuristic forms of body kits, matte blackening instead of shiny moldings, laconic design of the sides - but also an overload of relief details on the front end; disproportionately small - although massive in appearance - wheels; and most importantly, it’s not a particularly good color. A discreet gloss of a warm beige shade is good for the top. The volumetric body block of the lower part of the car should have been painted either in a contrasting dark green color or in a brown tone consonant with beige.
Some attempts to modernize the third model Zhiguli by reshaping the front of the car are frankly unsuccessful. Headlights rising from hatches on the hood are a great idea. The rounded front bumper still adds dynamism to the car. But this car cannot be called beautiful! Perhaps installing fog lights would correct the impression - however, tuning operations need to be performed more carefully...
Decorative tuning of the VAZ 2103 sometimes turns out to be very bold, but not very justified. Lighting devices, presumably, are hidden behind a wide radiator grille. Even if they illuminate the road sufficiently (which is doubtful), the visual indistinguishability of the headlights causes the viewer to perceive the car as “blind”. Such observations only inspire alarm - meanwhile, the tuning performed is clearly designed to create a strong aesthetic response.
Before designing the architecture of body parts, you should consider several options for the location of openings and devices. Take a look: the white “paws” of the wipers are an excellent design solution! However, the headlights interlocked with an axis tilt and the “nostrils” spaced apart in width make the expression of the car’s “face” extremely dull. The smart “antennae” of the triangular holes covered with white mesh under the headlights does not change the impression.
Remodeling the exterior of a car can be undeniably successful. Large sculptural “sculpting” of details, calculated proportions, thoughtful color, extraordinary coating texture. There is no doubt - once assembled, this car will be a success!
But large details are by no means a guarantee of success. One of the characters in the comedy "Garage" wore a sign with the inscription: "I'll show you!" He could express the same thought by driving through the streets in a car like this...
The laconic design may well become the basis for the expressiveness of the car. The asymmetrical opening of the carburetor air intake is balanced by the shifted license plate. A spoiler that matches the body color visually makes the front heavier - and in reality it probably turns out to be useful.
The sense of style, expressed in the unmistakable selection of the bumper shape, exquisite emphasis on finishing, and artistically precise choice of colors, reveals the deep aristocracy of the model.
"Bad Boy" for VAZ 2110
Today, a very popular type of tuning for VAZ cars is the production of a “Bad Boy” hood.
This gives the car an aggressive and assertive style. Let’s look at how to make a “Bad Boy” hood on your own on a VAZ 2110. You can, of course, turn to car service specialists for help. However, keep in mind that financial costs in this case will be 5 times higher. Tuning the hood “Bad Boy” To cope with the work, you need to have metal working skills. The step-by-step process is as follows:
- Using a grinder, cut out 2 triangles from sheet metal for the front part.
- We process them so that they are absolutely symmetrical, and attach them to the hood using self-tapping screws.
- Using a welding machine, we weld them and remove the self-tapping screws.
- Grind the weld seams.
- Using an angle grinder we level the surface.
- We carry out puttying using putty with carbon fiber.
- After drying, sand it.
- Cover with soil.
- We paint with a spray gun and wait for it to dry.
- After the paint has dried, we can consider the work of tuning the VAZ 2110 completed.
Soviet beast
VAZ 2101 and all subsequent models that were released in this car series are truly fighters of the old school.
For example, the now legendary “kopek” was first released in 1970, and the last car of this brand was rolled off the assembly line in 1988. That is why, even the most young car already requires some kind of tuning.
Installing protection on a car yourself
If you decide to install and purchase the specified product, let’s take a closer look at the installation procedure.
Necessary conditions for installation of molding:
– cleaned and degreased surface of the element installation;
– the air temperature should not be less than 21 degrees.
Step by step procedure:
1. Remove the protective film from it, first exposing the mounting tape.
Please note that only the corners of the molding are freed from the tape. In this case, the ribbon must extend beyond the part
Attention, make no mistake. It is forbidden to completely remove the protective film
This way you make it harder for yourself to move parts.
2. After correctly removing the tape from the corners, move it.
3. Treat the area where the molding is installed with a primer. This product will react with the glue on the mounting tape. This will improve the adhesive properties.
4. Complete the final installation of the element in its intended place. To do this, you need to pull the edge that sticks out and remove it from the mounting tape.
5. Press the bar firmly against the body.
6. In order to improve the adhesive properties, keep it for 24 hours in a warm room.
This procedure completes the installation of the new product. To secure the adhesion of the element to the vehicle body, it is recommended to keep it for 24 hours in a warm place and not to wet the body.
Nothing is impossible
But still, tuning a VAZ 2110 with your own hands can be done if you plan to make minor improvements in the car’s simple equipment, improve some of its parts or replace and improve the audio system, install a convenient trunk, replace the car’s wheels and much more.
https://youtube.com/watch?v=f7bBjiWTNhU
These simple jobs can be done independently or with an assistant; here, tuning a VAZ 2110 with your own hands becomes a realistically feasible task, provided that you have the necessary knowledge base.
And in order to get this knowledge base, I offer you a multimedia manual, Tuning a VAZ 2110 with your own hands, which will teach you how to do many jobs yourself, and maybe more.
This manual contains complete information on tuning VAZ-2110, VAZ-2111, VAZ-2112 cars, so it will be of interest to a wide range of VAZ car owners.
Video tuning VAZ 2110 - what can be achieved.
Since tuning the VAZ 2110 engine and VAZ 2111, 2112 cars is a very complex process, it is not specifically covered in this manual.
The main issues that are discussed in it are those that will allow car enthusiasts to tune the VAZ 2110 with their own hands without the involvement of high-level specialists. And you understand that the higher class the specialist is, the more money he should be paid.
I hope you understand that tuning a VAZ 2110 with your own hands is an expensive undertaking and it is not worth doing it right away and in full. Tuning the VAZ 2110 engine should be carried out separately, since it is very expensive and entails a number of additional works to change the gas distribution mechanism and transmission.
Tuning of the remaining components and assemblies of the VAZ 2110 can be carried out separately, depending on how much your budget allows.
In the presented manual you will find the entire necessary list of works with drawings and diagrams, color illustrations, thanks to which tuning a VAZ 2110 with your own hands will not be a chore for you, but an interesting hobby.
Make your car unique. Good luck everyone.
- Format: Multimedia;
- Language: Russian only;
- Car brands covered by the manual: VAZ-2110, VAZ-2111, VAZ-2112;
- Medicine: not required.
- Size: 108 MB.
Video of reupholstering the interior of a VAZ 2110-12 car.
Tuning a VAZ 2110 with your own hands - the file was deleted at the request of the copyright holder, we apologize.
Read on the topic: Tuning the car interior.
Average prices
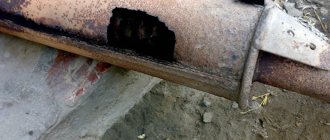
For a VAZ 2111, re-welding the thresholds from a corrugated pipe will cost up to 1,500 rubles. for self-repair, provided that you have a semi-automatic welding machine. Prices for consumables:
- pipe - from 700 rub. for 3 meters;
- bitumen mastic - 500 rub. jar;
- primer, putty - 300 rub.
The installation of decorative overlays on a metal structure will add originality and style. Plastic covers with backlight, shagreen, chrome, etc. can be installed in 30 minutes.
Prices for repairs at a car service center start from 10,000 rubles. The price includes replacement of a body element, use of original replicas, putty, painting. In most cases, owners have to pay extra for reinforcement of the bottom, since part of the body on half of the models requires repair.
What are the main functions of eyelashes on a car?
If you are looking for an answer to this question, then the main reason for using eyelashes on a car is to improve the design because after their installation, the vehicle begins to seem more brutal and even aggressive. Well, another advantage of installing a bad boy hood with eyelashes is the increase in density between the headlights and the hood.
You can also purchase special, ready-made hoods with the bad boy style, which already have headlights.
Read more about how to make a BadBoy hood for a VAZ car
The bad boy hood style is increasingly gaining popularity among VAZ car owners. But it is very rare to find a similar hood on a VAZ 2110. After this, a similar question arises: is it difficult to make the same hood for a VAZ 2110 with your own hands?
ATTENTION! To do work of this level in a garage, you must have at least some experience in tin work or invite an assistant who has already done similar work. Otherwise, you are more likely to waste your money.
So, step by step instructions:
- We make the hood by extending metal pieces that need to be taken from another similar car. Using a grinder, cut out the right side of the hood to the desired size. We check whether the right part of the metal sheet fits in place and if so, then cut out the same part, only for the left side (it is at this stage that you can give the car an evil or good look by changing pieces of metal);
- After the above, you should attach the cut metal pieces on the hood. Do not forget to measure the distance to the middle of both sides, they must be secured symmetrically;
- Using self-tapping screws, fix the metal sheets and then weld them with a welding machine (once this step is completed, the screws must be removed);
- At the end of the third step, you should make the hood smooth and level the surface. To level the surface of the hood you will need to use an angle grinder. When you have leveled the surface, start applying putty (a good move would be to use putty with reinforced carbon fiber). We wait until the putty dries and sand the hood again, then prime and paint.
If you compare prices, making a hood by hand can cost you 1,500-2,000 rubles in materials. Well, if you decide to entrust your vehicle to a service station, then in such cases be prepared to pay about 7,000-10,000 rubles.
Inner strength
To improve the performance of a car, it is necessary to modernize it not only from the outside, but also from the inside.
Do-it-yourself engine repair - major restoration and maintenance of an internal combustion engineDIY bumper: how to make a unique polymer bumper for a car at home (125 photos)
Do-it-yourself car painting - preparation for coating and the main stages of high-quality car painting (100 photos)
If a person is planning to make a mighty beast out of his old VAZ, then first of all you need to pay attention to such components as:
- modernization of all power elements;
- tuning the heart of the car - the engine;
- crankshaft replacement;
- replacing pistons;
- camshaft tuning;
- flywheel modernization;
- carburetor tuning;
- gearbox modernization;
- installing a new clutch.
Replacing parts with modern types will allow the car to accelerate to speeds that could only be dreamed of in the old days. In addition, the reliability of the car will increase significantly.
How to remake an old body kit
The front and rear body parts of a VAZ car are being redesigned. To implement this, several methods are used:
Soldering, gluing.
Use adhesives made from high-quality ingredients or a high-power soldering iron
When performing an operation, when installing additional components on a body element, it is important that they have the same type of plastic as the object of modification
Use of technical plasticine, polyurethane foam, polystyrene foam.
These materials are the basis for creating a part of the buffer or a new part using fiberglass. The method has disadvantages. The material is toxic, so it is recommended to work in well-ventilated areas and use gloves and a respirator.
Painting, pasting.
When the color changes, a paint coating is applied to the sanded and primed surface. And when pasting - a special film.
A converted buffer installed on a car significantly changes the appearance of the car body
This vehicle looks fresh, stylish, which attracts attention. Tuning is performed in service centers and auto repair shops, but the price for these services is quite high
Therefore, many motorists carry out bumper modifications themselves.
Salon
Modernizing the interior of a VAZ 2106 involves changing the dashboard (or modifying the existing one), redoing the interior trim and installing new seats for more comfortable ones. For this purpose, seats from Ford, Audi, BMW and other foreign cars are used.
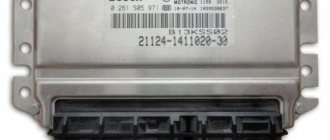
LED lighting is installed on the car dashboard, technical equipment is changed and improved: an on-board computer, a navigator, and a full-fledged multimedia system are installed (this is often a tablet computer with Internet access and connected to the car’s audio system).
The design of the seats and interior trim must be identical, otherwise the design of the interior of the car will be inharmonious.
Tuning VAZ 2113—2115 cars
Front-wheel drive cars VAZ 2113, 2114 and 2115 are usually equipped with a sports suspension. It improves stability and controllability while driving:
- To begin with, we are modifying the front struts, turning them from oil-filled to gas-oil-filled. This is done by pumping gas into the working chamber. Thanks to this, the rod will automatically return to its original position after immersion;
- to protect yourself from the spring flying out while moving, we limit the stroke of the rod;
- standard rods can be replaced with “kailovers” - sports racks. They will make it possible to sit the car lower. This will give it stability. In this case, shortened springs are used, which helps to minimize the level of car roll when cornering;
- the above-described wishbones. They will provide improved car handling, precise suspension tuning and increased castor.
This is how we tune the suspension of models of the 2113-2115 group with our own hands, making it sporty. This improves handling, reduces roll, and increases your safety on the road while the car is moving.
Dashboard
If you approach the matter competently, then tuning the VAZ instrument panel with your own hands is very simple. There are two options here - installing an analogue from a foreign car or removing the panel from a modern “relative”.
To install a new dashboard, you must first get rid of the old panel. For this:
- it is necessary to dismantle the instrument panel;
- remove the glove compartment shelf;
- Unscrew the fasteners that secure the instrument panel to the engine compartment;
- remove the steering column;
- remove the pedal assembly.
Polishing a car with your own hands - a step-by-step master class on how and how to polish a car’s paintwork (70 photos)Polishing headlights with your own hands - how and how to properly polish headlights at home (100 photos)
Replacing thresholds with your own hands - advice from professionals on repairing the bottom and thresholds (120 photos)
After finishing the work, install a new analogue following the reverse sequence.
What can tire wear cause?
The car “pulling” to the side can occur due to a difference in tire pressure or a defect in the rubber parts of one of the struts. This is also possible due to tire wear. Rapid tire wear is directly related to improper operation of the machine. Sharp acceleration and braking, overloads often cause tire wear. But often this situation arises:
- if the wheel alignment angle is violated;
- when the hinge mechanisms are worn;
- when the chassis is unbalanced.
If you know what a large number of suspension parts are intended for, then you can monitor its condition every time you inspect the car on a pit or overpass. Pay close attention to how the protective covers on the ball mechanisms look. Are there any defects on them?
Attention should be paid to the condition of the rubber suspension parts; under the influence of time or excessive loads, they can wear out, and this also leads to frequent replacement of tires
Improved suspension and chassis
For a powerful engine, the car's suspension must also match. The factory suspension will not provide the required stability, unlike a rigid one, and besides, the factory rear suspension contributes to strong skidding at speed, especially in the cold season. Suspension rigidity is achieved by placing rubber cushions under the springs, installing springs from a VAZ 2121 Niva car and replacing standard oil shock absorbers with gas ones. Stability will also be facilitated by replacing the reaction rods with an A-arm, which provides clear vertical suspension travel without lateral displacement.
Lada Priora: strengthening the frame
Lada Priora strengthening
The popular Priora car also needs to modernize the body, despite its modern production. The car frame is not at all as strong as we would like. In addition, such factors as load, external environment, etc. also have a negative impact. What to do in this case is clearer to the owner.
So, tuning the Priora body makes it possible to significantly improve handling. At the same time, if you use ready-made kits sold today in the store specifically for Priora, you can save a lot, because the range of models is very wide.
In car stores today you can purchase the following tuning kits designed specifically for Priora.
| Name | Purpose | Price |
| Lower extension 2801.0300.04 Lada Priora from TechnoMaster | Reduces movement of the front suspension arm bracket. Reduces stresses occurring in the lever bracket and the spar-to-floor connector and stresses occurring on the front end in the area of the right steering gear bracket. | 720 rub. |
| Front strut AR 0140 from AutoProduct | Increasing the rigidity of the front end of the body, reducing stress at the attachment points of the front suspension supports. | 850 rub. |
| Right subframe lever AR 0031 | The right subframe lever AR 0031 / AR10-2902750 is installed on Lada Priora cars (VAZ 2170, 2171, 2172) and their modifications together with a subframe to strengthen the body. | 4280 rub. |
| Drive subframe without protection | Increased rigidity of the body as a whole and suspension mounting points. Improved SA suspension. Protecting the power unit from impacts from below and increasing the rigidity of the subframe assembly. Increase castor by 1.5 degrees. Increasing the vehicle base by 15 mm. You can choose from aluminum (4 mm), galvanized steel (2 mm) protection. Additional support is not included and can be purchased separately. | 8000 rub. |
| Ready rear amplifier AR 0260 for Priora station wagon and hatchback | Increased body rigidity as a whole. Installing the amplifier allows you to increase the torsional rigidity of the body up to 11%. | 2290 rub. |
| Ready front panel amplifier 16-cl. for Priora, VAZ 2110 | Reducing the movements of the steering mechanism, improving vehicle controllability. | 500 rub. |
| Ready rear strut amplifier for Priora, VAZ 2110 | It is used to increase the torsional rigidity of the body up to 11% and the rigidity of the body as a whole, as well as to reduce the movements of the upper mounting points of the rear suspension struts and stress in the body elements. | 2600 rub. |
| Body reinforcement Priora sedan | The body amplifier is designed using mathematical modeling specifically to eliminate the effect of “impressive” behavior. An increase in body rigidity entails improved handling and stability of the vehicle, increased durability of the body and increased passive safety of the vehicle. | 3500 rub. |
| Body reinforcement Priora hatchback and station wagon 5601 | The body amplifier is designed using mathematical modeling specifically to eliminate the effect of “impressive” behavior. An increase in body rigidity entails improved handling and stability of the vehicle, increased durability of the body and increased passive safety of the vehicle. The upper connecting bar is removable, which allows you to use a large luggage compartment even with the amplifier installed. | 3800 rub. |
Do-it-yourself tuning gills or air intakes for the hood of a car
The previous tuning options can be done by any beginner in this matter. A more complex type of modernization is the creation of tuning air intakes or gills.
Indeed, this type of change is more complex than the previous ones, but you can also do it yourself without turning to specialists.
For practical purposes, the gills are placed where the car's air filter is located. If your car's air filter is located in the center, then it is correct to position the air intake in the center of the hood. When the filter is located on the side, the gills are located along the edges of the product for symmetry.
First you need to make markings on the body parts that you are going to tune. Using a grinder, cuts are made in the shape of the letter p. At the cut site, the metal is bent under the hood; it is best that the angle of the air intake is no more than forty-five degrees. Cut metal triangles to size. Using triangles and a welding machine, we close the ends of the hole. We can say that the product is ready for use; all that remains is to sand the welded areas, treat it with a primer and paint.
Fiberglass gills are made a little differently. In the places where you are going to make air intakes, apply plaster or foam, after covering the product with film to protect the paintwork from damage. Wait until the mounting material is completely dry and begin cutting out the air intake. Polish it with sandpaper, impregnate it with several layers of fiberglass and mastic. After drying, you can begin priming and painting the product.
As you can see, there is nothing complicated about tuning a hood with your own hands. The main thing is patience and the desire to achieve results.
Other elements
In addition to the changes already mentioned above, you can also add here:
- replacement of wheel rims;
- installing a spoiler on the trunk of a car;
- tuning of the hood, bumper, skirt, etc.;
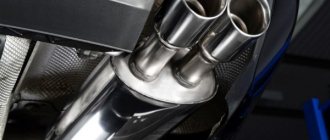
- installation of a powerful muffler;
- grille on the rear window;
- lowering the suspension.