CORRECTOR DEVICE
The headlight hydraulic corrector is a one-piece, one-piece device that is designed to change the position of the light beam by changing the fluid pressure inside the pipes. For cars of this family, the corrector unit has a one-piece design, so it cannot even be repaired, much less independently. If it fails, you need to replace the broken elements with new ones and adjust the headlights to the standard.
Most designs of hydraulic correctors on the VAZ 2114 have the following form:
- Master cylinder, which is mounted under the dashboard;
- Small working cylinders that are attached under the headlights; they are needed to raise the headlights on a VAZ 2114;
- Working fluid that is resistant to low and very high temperatures;
- Pipelines that contain this liquid. Always secured with clamps.
Headlight range control for Lada Granta
Hydrocorrectors first appeared on classic rear-wheel drive VAZs. More modern cars from the Volzhsky plant are also equipped with hydraulic regulators for the direction of the light beam. Although at one time they began to install more reliable electrical correctors. They perform the same functions, but operate thanks to electric motors powered from the on-board network. The Lada Granta is also equipped with a hydraulic headlight leveler from the factory. Let's figure out what can be done if the hydraulic device stops working. Is repair possible, and how to replace it, including an electrical analogue.
OPERATING PRINCIPLE
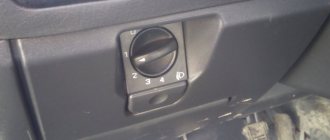
When the driver decides that the headlights need to be adjusted, he turns a special knob inside the car to do this. It controls the pressure in the corrector piping system. Accordingly, when you need the headlights to go down, everything happens as follows:
- The handle turns down;
The switch in the cabin looks like this - The pressure in the system drops;
- The operating rod enters the housing;
- The headlight goes down.
Based on this, we can say that most of the time high pressure is maintained in the working mechanisms; this is necessary to maintain the horizontal position of the headlight.
In winter, or during the transition period, when the temperatures outside and in the engine compartment are very different from each other, pipelines and rubber seals can delaminate, and working fluid can leak out. In this case, the headlight range control will most likely fail, and the working cylinders will jam and require complete replacement.
In terms of calibrating the device, the instructions from any domestic hydrocorrector will do. This is due to the fact that structurally they are all made very similar and you can figure out any of them yourself.
What does a hydraulic corrector consist of and how does it work?
The hydraulic device, thanks to which you can adjust the angle of the light beam from the interior, consists of the following main parts:
In addition, there is a mode switch on the instrument panel, with which the driver changes the pressure in the master cylinder.
The hydraulic corrector system is closed and at the same time sealed (normal). The changed pressure is transmitted through the tubes to the working cylinders. This leads to a change in the position of the pistons and the rods connected to them. They use a special lever mechanism to influence the angle of rotation of the reflector. This is the operating principle of the hydraulic headlight adjuster for the Lada Granta.
The electric corrector differs in that the desired position of the lampshades is ensured by mechanisms powered by on-board electricity. Their operation is not affected by changes in ambient temperature, so they are much more reliable than hydraulic devices. Their only “minus” is the cost, which is several times higher.
Electric headlight corrector for Lada Granta
INDEPENDENT REPAIR
If the hydraulic corrector completely fails, all that can be done is to completely replace it with a new one and that’s it. But if the headlight hydrocorrector does not work, then you can carry out certain manipulations and find out exactly what is the cause of the breakdown, and perhaps you will be able to return them to functionality without wasting money on new components.
So, if the machine has changed its tilt angle, but it is not possible to change the direction of the light beam, then the performance is checked in this way:
- First of all, you need to carefully examine the condition of all the tubes and rubber bands. Even the slightest smudges are unacceptable;
- If no leaks were found or their elimination did not bring results, then you need to examine the condition of each working cylinder. To make it more convenient to adjust the headlights, you need to remove the working cylinders from each headlight. Then the stroke of each rod is measured - under normal conditions it is 6.5 - 7.5 mm;
- If these diagnostic measures did not force the VAZ 2114 headlight hydraulic corrector to work normally, then the breakdown lies in the main unit, and then it is better to simply replace the entire mechanism with a new one.
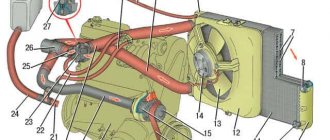
The principle of operation of the VAZ-2110 headlight hydraulic corrector
Its purpose is clear - without leaving the cabin, the driver can change the angle of the light beam relative to the road. The device must work correctly with two headlights at once and have a sufficient range of adjustment - to maximize the angle of the reflector when the rear part of the body is fully loaded, and also reduce the adjustment to zero when the load is minimal.
The principle of operation of the headlight hydrocorrector.
We recommend: Causes and troubleshooting when the VAZ-2110 stove does not heat well
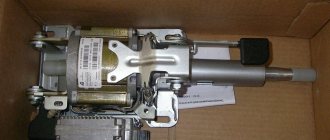
The VAZ-2110 hydraulic corrector, installed as standard, consists of:
- main hydraulic cylinder and switch, both of them are assembled in a single block and installed to the left of the steering wheel on the front panel;
- hydraulic drive system, line - tubes that connect the elements of the system;
- working hydraulic cylinders, actuators that raise or lower the headlight reflector;
- working non-freezing liquid.
Headlight hydraulic corrector assembly.
The low-pressure hydraulic system allows you to change the working pressure and move the rod of the working cylinders within 6–7.5 mm . In theory, this is enough to change the angle of installation of the reflector from minimum to maximum and, accordingly, change the direction of the angle of the light beam.
INSTALLATION OF A NEW DEVICE
If you decide to install a new headlight range control unit, then there are detailed instructions for this as well. We will look at the order in which to remove the old hydraulic corrector and how to adjust the headlights on a VAZ 2114, and simply install the new one exactly the opposite way. So, the step-by-step instructions look like this:
- We find all the clamps that secure the pipelines with the working fluid and remove them by unscrewing the bolts;
- We return to the cabin, where we carefully remove the rotating handle from its seat on the main cylinder;
- We unscrew all the bolts that hold the main cylinder and remove it;
- We remove the working cylinders from the headlights and pull them out through the interior;
Types of lighting equipment
Bosch optics
Both devices have a unit in their design that includes low and high beams, dimensions and direction indicators. That is, there are no fundamental differences between them, but it will be useful for you to know certain nuances.
- Equipment from the domestic manufacturer Kirzhach is characterized by glass sealing, which causes certain difficulties during replacement. Also, the low beam area is equipped with a lens. This makes the flow limited but more targeted compared to its German counterpart.
- In the case of Bosch, the glass is fixed with special latches, and sealing is done using rubber gaskets. They are easier to remove. But there are no lenses for low beam. There is a reflector here, due to which the boundaries of the glow are more blurred.
Many believe that Kirzhach is superior to Bosch optics in many respects. But this opinion can be called controversial.
But when it comes to dismantling and replacement, here German devices are the clear favorite, since they are much easier to disassemble.
DEVELOPING THE CORRECTOR WITH YOUR OWN HANDS
During scheduled maintenance, you may also need to adjust the VAZ 2114 headlights yourself. Most often this happens when the hydraulic corrector stops working properly, but does not fail completely.
The most common reason for such partial failure is the lack of normal engagement of the lever and rod in the working cylinder. Under normal conditions, the end of the rod should be engaged with a lever, the other end of which rests on another rod. The latter acts on the headlight itself, moving it in the desired direction. Simply put, this mechanism resembles a kind of swing, the fulcrum of which is on the adjusting bolt.
Adjusting VAZ headlights with your own hands consists of checking the position of this bolt. If it was screwed all the way, then the end of the lever on one side or the other could simply pop out. Also, the bolt must be set so that it can be lowered and raised with minimal effort for the driver.
Conclusion
The idea of domestic engineers is good. Manually adjusting the headlight range depending on the vehicle load is a great idea. But as usual, the execution let us down. The design turned out to be too delicate, the service life does not exceed 3-5 years, all it takes is a fluid leak somewhere and the VAZ hydraulic corrector refuses to work.
There are alternatives to it, which were mentioned above, they also have their own advantages and disadvantages, but their lifespan is longer, especially for mechanical correctors. There are automatic regulators with body position sensors, where driver intervention is not required. If you are interested, then write about it in the comments, I will devote a separate topic to this device.
Good luck to everyone on the roads! Please like or write negative opinions under this article.
REPLACING THE CORRECTOR WITH A MORE PERFECT one
On cars of the VAZ 2114 series, a standard hydraulic corrector for the position of lighting devices is installed. And new cars already use an electric corrector. Many drivers replace the standard one with a new one in order to improve the headlights of the VAZ 2114. The main difference from the hydraulic one here is the complete absence of a hose with working fluid - electric motors do all the work here. Replacing the VAZ 2114 headlight hydraulic corrector is very easy, since it occupies the proper place of the hydraulic corrector.
Replacement occurs according to the following algorithm:
- We remove the battery terminal so that we do not get an electric shock;
- Having unscrewed the main cylinder under the panel, rotating it counterclockwise, remove the device and its lever;
- We replace the sealing ring of the transition from the cabin to the engine compartment;
- We screw the electrical corrector onto the vacant space;
- From the main device, we attach the negative wire to the body, and attach the positive wire to terminal number 20 of the cable block under the car panel;
- Along the cables we lay the wiring to the executive motors on the headlights;
- We connect the negative terminal of the battery back and check what we got.
Now we know how to independently adjust the headlights on a VAZ 2114 and henceforth there should be no difficulties.
The importance of proper headlight installation
Proper installation and adjustment of lighting devices is no less important. For example, it is better to lower the headlights of a loaded car slightly lower than usual. In a similar way, you can direct the light flux not to the sky, but to the road. This method will avoid dazzling oncoming vehicles and ensure proper illumination of the road.
If the car is not loaded with anything, then the headlights should be raised slightly. Lighting equipment is quite sensitive and difficult to adjust, so this work is best entrusted to qualified specialists who have extensive experience in adjusting headlights.
Correct headlight settings
Is it possible to repair the Lada Granta hydraulic corrector?
If one or both headlights stop responding to turns of the adjustment knob, you need to think that the hydraulic device has failed. There may be several reasons:
Recommended literature on repair and maintenance of Lada Granta:
In the last two cases, both reflectors do not rotate. In most cases, they “fall”, that is, they occupy the lowest position.
Manufacturers of headlight correctors for the VAZ 2114 are very similar to the headlight correctors for the Lada Grant; they also did not provide for the possibility of repairing the closed hydraulic system itself, as well as its individual elements. In this case, you can only replace the device. Attempts to repair the hydraulic corrector still take place. However, these are rather temporary measures (screwing in self-tapping screws instead of a working rod, for example). They make it possible to install the lampshades in one working position. We are not talking about adjustments from the cabin here.
So, if the owner of a Lada Granta wants to have a working headlight adjustment system in his car, he will have to start replacing the hydraulic corrector. Whether to install a hydraulic device again or prefer an electric corrector is a matter for the owner. Both options are possible, so let's consider each.
Lada Granta Ice › Logbook › Replacing the headlight hydraulic corrector.
As often happens, the headlight hydrocorrector stopped working and the headlights began to shine downwards. This problem is not new, why are they still not installing an electric corrector on budget versions? In the future, by the way, I will install an electric one, it works many times longer, and even better.
I bought a hydraulic corrector for Grant at a car shop and installed it in a friend’s garage.
That's why I didn't immediately check its functionality?! Upon arrival, I removed the hydraulic corrector control knob and decided to try how the new one works. It turned out that it was defective, a fairly common problem. One of the cylinders did not respond to any actions. Fortunately, I kept the receipt, and the store is nearby, I returned and exchanged it without any problems. I checked the new one right away, everything is good!
1) First, you need to remove the front panel covering the fuse box; it can be easily removed and secured with clips.
2) Then, you need to unscrew the nut 19 to remove the main cylinder of the hydraulic corrector.