By listing the functional tasks of oil, we will try to determine its actual role in the fate of transport. It always supports:
- Keep engine parts clean;
- Lightweight and excellent pumping in case of cold engine start;
- Heat removal from heated engine parts; reliability of its operation at high temperatures in the area of the cylinder-piston group;
- Reliable lubrication of power unit parts;
- Ensuring the neutralization of corrosive agents accumulated during engine operation.
To give the necessary performance characteristics or improve existing ones, functional additives are used, which are added directly to the oil.
How much oil should be poured into the engine
It is impossible to give a definite answer to this question. Vehicles of different manufacturers and brands have their own lubrication system design. In addition to the crankcase, the oil fluid is located in the pipeline, filter, crankshaft, and other components. How many liters of oil you need to pour into your own engine can be found in the operating manual. This is true when you need to fill the lubricant for the first time. The manufacturer indicates the proper filling rate if the power unit is hollow, just assembled.
After draining the oil solution from the system, some of it remains not drained. This is 300-500 grams of lubricant. It is possible to determine how many liters of oil to pour into a car engine by following the recommendations developed for this. Engines of domestic cars with a volume of 1.8 to 2.4 liters can contain from 3.5 to 4.0 liters of oil fluid. The same imported power units will contain from 4.0 to 4.3 liters of lubricant. To determine how much oil is in the engine, you need to use a dipstick and perform several steps:
- You must initially pour 3.5-3.8 liters of lubricant into the filler neck.
- Wait 2-3 minutes and check the level of the lubricant solution with a dipstick.
- If the value is insufficient, then you need to add 100-200 grams and check the degree of filling again.
The procedure must be repeated until the desired filling level is achieved. When pouring lubricant, you must remember that it is better to add little by little than to immediately overflow. Pumping back the lubricant from the system is a very problematic task. If too much lubricant enters, it will flood the engine parts and components near it. This will lead to foaming of the oil and heavy operation of the power unit. If the filling indicator is less than normal, the rubbing components and parts will quickly wear out.
Step-by-step instruction
To change the oil in the Gazelle 405 yourself, you should follow the instructions and follow generally accepted safety rules.
The engine is first warmed up to operating temperatures. This is necessary in order to give the lubricant the desired fluidity. This way it will be able to fully exit the crankcase when drained.
It is enough to drive a few kilometers or run the engine at idle speed for 5–10 minutes. When the car is warmed up, start working.
- Remove the negative terminal from the battery, place chocks under the wheels, and securely fix the car if you are working with a jack. Personal safety should never be forgotten.
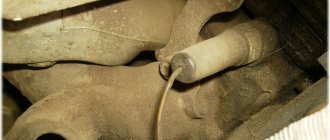
- The engine oil sump is located under the bottom of the car. It has a drain plug, to remove which you will need a 24 mm wrench.
- Place an empty container under the drain hole where the old used oil will be drained. About 6 liters should come out, so initially take a container of a suitable volume. On a warm engine, the oil leaves the system in 5 - 7 minutes. If it is thicker, it is better to wait 10 - 15 minutes. When the oil has drained, screw the drain plug back on. Make sure it is not deformed or worn. Otherwise, replacement is required.
- The oil filter on the 405 Gazelle is not located in the most convenient place. Therefore, it will be easier for you to work if you remove the engine splash guard. Some try to dismantle the filter through the engine compartment, but to do this you need to have unique dexterity and resourcefulness. Don’t create unnecessary problems for yourself, remove the splash guard and dismantle the filter.
- Sometimes the filter is tightly tightened, making it impossible to remove it manually. Use a special puller. If it is not available, use a long and strong screwdriver or similar tools, pierce through the old filter and turn it, using the screwdriver as a lever.
- Remove the new filter from the box. Pour a small amount of lubricant inside its body. Also lubricate the sealing gasket of the filter device. The filter should be filled with oil to approximately 50% of its volume.
- The filter can only be tightened by hand. You should not use a puller or other tools. Otherwise, there is a risk of damaging the device. Tighten until the filter gasket makes contact with the cylinder block. After this, hand tighten the element 3/4 turn. This is enough for the device to fit tightly into place and not cause oil leakage.
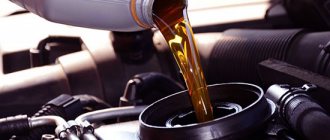
- When all the work under the car is completed, go to the engine compartment of your Gazelle 405. Unscrew the filler plug, insert a funnel into the hole and fill in the required amount of oil.
- Check the level with a dipstick, waiting a few minutes after filling. Close the filler hole and replace the splash guard.
- Start the Gazelle 405 engine, let it idle for several minutes. At the same time, check that there is no fresh puddle of oil under the engine oil sump or signs of leakage. If there are any, tighten poorly sealed connections. Oil may be leaking through the drain hole or filter.
- Stop the engine. Wait 5 - 7 minutes for all the oil to drain back into the crankcase. Now reinsert the dipstick and check the level. If the dipstick shows low oil, add the required amount.
This completes the work of independently replacing the engine lubricant on the Gazelle 405 car. This is a fairly simple procedure that does not require specialized equipment or expensive tools.
Many cite the main difficulties as correct selection of oil and timely change of fluid in the crankcase of the power plant. But now you know all the basic recommendations, and therefore, without any problems, you will be able to purchase high-quality lubricant and maintain the performance of the Gazelle 405 engine.
Determine oil level - methods
To find out the amount of oil in a car engine, several requirements must be met. They are mandatory:
- the car must be placed on a level surface;
- the power unit must be cool. If the check is carried out after stopping the vehicle, then you must wait 15-20 minutes. During this time, the temperature of the starting unit will decrease, the pressure in the lubrication system will drop, and the oil solution will drain into the crankcase;
- The lubricant level must be measured using a standard dipstick.
There are marks on the surface of the probe: min and max. They indicate the minimum and maximum permissible filling volume of oil in a car engine. The process of determining the lubricant level consists of the following points:
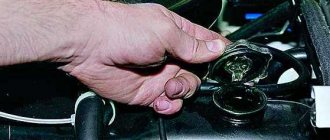
- The dipstick must be removed from its regular place and the remaining lubricant must be wiped off with a clean rag.
- Install the measuring rod in its original place.
- Remove the gauge again and inspect the oil layer. It should be located between the min and max marks.
- If the lubricant layer is below the minimum mark, then an oil solution must be added to the lubrication system.
- If the lubricant level is above the maximum mark, excess lubricant must be drained from the system.
Nowadays, almost all cars are equipped with computer warning systems for the presence of oil solution and its consumption. It is not recommended to completely trust computer data. Sometimes, especially before and after a long trip, you need to check the lubricant level in the power plant yourself.
How to mix
If you do not have a special measuring canister with divisions, which are included in the kit of every trimmer worthy of attention, or such a container is lost, then use any suitable container. Better glass or metal. Plastic can also be used, but you need to choose a bottle with hard walls.
The capacity of the vessel must be a multiple of 1 liter. You can take a 1.5 liter bottle, but practice shows that this is not entirely convenient. You also need a medical syringe, preferably 20 - 50 milliliters. First, gasoline is poured into the container, then a precisely measured amount of oil (by volume) is added. The procedure cannot be changed.
If you have “pre mix” oil, then you need to close the bottle or canister with a lid and turn it upside down several times and shake vigorously. If the oil is “self mix”, then it will dissolve on its own. The prepared mixture must be used throughout the day. If you know how much fuel a trimmer consumes for a certain amount of work (or time), then calculating the amount of mixture is not difficult. Otherwise, before each refueling, dilute the new fuel so that a minimum amount remains until the end of the work.
Intervals when you need to replace
The service book for the vehicle specifies the mileage after which the lubricant solution must be replaced. In the absence of intense operating conditions, driving on the highway outside the city, the mileage between lubricant changes can be up to 15,000 km. Operating vehicles in city traffic will reduce mileage to 9000-11000 km. But these data are not completely accurate, since the condition of the lubricant is influenced by several factors, which include:
- Type and quality condition of the fuel being filled.
- Power plant volume.
- The type of lubricant that was previously filled and its condition.
- The number of hours worked by the engine.
- Technical condition of the vehicle.
- Vehicle operating conditions and power plant operating modes.
These factors can change the quality of the lubricant. Loss of its characteristics by the lubricant will lead to rapid wear of the power plant. In such a situation, an analysis of the oil solution carried out in laboratory conditions can give an accurate answer about the quality of the lubricant and the need to replace it.
The need for replacement according to engine hours
The initial data is the stable average speed of the vehicle in the city and the manufacturer's recommendations for changing the lubricant. Let's say the speed in the city is 40 km/h, and the factory recommendations for replacement are 15,000 km.
To calculate engine hours, you need to divide the distance by the speed limit. In this situation, 15000/40=375 m/h. The obtained value means that after 375 operating hours of the power plant it is necessary to change the oil.
The API international standard has developed a summary table for replacing oils, depending on their type and service life.
| Type of oil solution | Operating hours |
| Mineral | 130-150 |
| SyntheticARI SJ/SHAPI SL/SMPolyalphaolefinsEsters | 230-250320-350370-400430-450 |
| Semi-synthetic | 230-250 |
Need for replacement due to fuel consumption
The initial data should be fuel consumption per 100 km of movement according to passport data and actual. For example, according to the passport, consumption is 9 liters per 100 km, but the actual consumption is 11 liters. According to the passport, the oil change should be carried out every 15,000 km of vehicle movement.
Fuel consumption is calculated using the proportional method for passport and actual data separately. For passport data: 15000x9/100=1350 liters. For actual data: 15000x11/100=1650 liters.
The actual distance through which new oil must be filled is calculated by a similar proportion: 1350x15000/1650= 12270 km.
Each method can be used for any vehicle. It is only necessary to record the data at the moment of pouring lubricant into the motor.
Let's sum it up
In order to determine how much oil to pour into a car engine, you must follow several recommendations:
- Choose a car oil for the vehicle that will be constant throughout its operation. The lubricant must be selected taking into account the operating conditions of the vehicle.
- If the vehicle is actively used, check the oil fill level using a dipstick at least once every 3-4 days.
- Monitor the interval between runs when replacing the lubricant.
- Fill the engine with lubricant in accordance with technology. Do not underfill or overfill the solution.
- If you lack experience, knowledge or doubt, contact a service station that has the necessary equipment. Specialists will carry out the necessary work on the engine, regardless of whether it is diesel or gasoline.
Compliance with the recommendations guarantees long-term operation of the power unit.
Send your questions
Whether you're an auto maintenance expert or still learning the basics of maintaining your vehicle, you probably know that oil is the lifeblood that keeps your engine running smoothly. Just like your blood supports your heart, your car's engine requires oil to run.
So what is this magic number, and how important is it that you get it exactly right?
To explain how much oil your car will need during a change, why it needs that amount, how you can know for sure you're measuring the ideal number of quarts, and what can happen to your engine if you put in too much or too little.