A car's paintwork doesn't last forever. Unfortunately, even the highest quality layer of paint develops problems over time, begins to crack and sometimes cannot withstand the stress of washing a car. Many car owners begin to notice chips of paint appearing on the bumper after washing. The problem is that plastic is a flexible material, and most paintwork requires a rigid surface to function properly. Therefore, an unpleasant chip often forms on plastic bumpers. In the future, this chip will only grow. Its appearance indicates that it is time to repaint the bumper. Half measures are not suitable in this case for a number of reasons, which we will discuss below in the publication. It is worth noting that low-quality paint can chip already in the second month after applying the paintwork.
However, other factors also influence the integrity of the coating. For example, the professionalism of the person who did the painting. This is an important criterion for the quality of paintwork, which is often unavailable even at expensive service stations. The problem is that modern specialists do not always have sufficient experience to correctly apply all types of paint on the surface of a car. It is especially important to take these features into account when painting the bumper. Often the entire car is left unprotected simply due to the lack of quality processes when painting the car. There are many rules for working with plastic parts, and following these rules turns out to be the most important thing when performing painting work. Let's look at the causes of problems with chips on the bumper, as well as the possibilities of eliminating unpleasant consequences.
The main reasons for the appearance of chips on the bumper in a car
Plastic parts cannot be painted as well as metal body parts. When painting at a factory, there are a number of technologies that should be followed before applying the paint directly. If the paintwork was restored at private stations, problems cannot be avoided. Specialists will certainly not be able to perform all tasks exclusively the way they are done at the factory. Therefore, there are several main reasons for the appearance of chips on a plastic bumper:
- too much wear of the factory paint, the car is quite old, which causes big problems with body parts, including plastic ones;
- physical damage to the integrity of the paint due to stones, troubles during parking, minor accidents, and then the resulting chip grows at car washes and simply when driving;
- poor-quality painting is one of the main factors in paint chipping on plastic parts; the technology for applying materials to plastic is not followed;
- the chip appeared at the car wash due to the unprofessional actions of the employees, the washer pointed the gun at the bumper and then pressed the power button, the pressure knocked off a piece of paint;
- Deformations of the plastic appeared after prolonged exposure to the sun, the wavy surface caused cracking of the paintwork and the appearance of chips.
Such troubles can happen to any car. So you should use the best quality troubleshooting solutions. Many resort to the cheapest methods of repairing such unpleasant breakdowns, and often find themselves back with nothing. So you shouldn’t skimp on body repairs, otherwise you may end up with the same problems again just a few days after the important work is completed.
Types of damage
The repair method depends, among other things, on the nature of the damage to the bumper. There are several main types of defects:
- scratches;
- cracks;
- dents;
- holes and chips.
Scratches are usually simply painted over. Cracks, dents and holes require more complex repairs, since the integrity of the product must be restored. The material of the bumper also plays a role here.
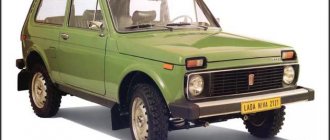
Thus, it is easiest to repair a VAZ bumper yourself, since it is made of ordinary plastic.
Bumpers of foreign cars are often made of special plastics, but they can also be repaired if desired.
Preparatory work
To repair bumpers with your own hands at home, you first need to make preparations, including the following steps:
- Removing the bumper. Work carefully to avoid damaging the part further.
- Clean the part, use detergent chemicals if necessary.
- Cleaning up damage. It is necessary to remove the paintwork and factory primer from both sides of the damaged area.
- Determining the type of plastic.
To determine the type of plastic, take a closer look at the inner surface of the product. It should be marked:
- ABS, PA, GF15 or GF30 - high quality plastic, resistant to temperature influences;
- PUR – polyurethane-based material, has less strength;
- PP, PPT or EPDM are inexpensive plastics based on polypropylene and ethylene diene.
If there are no markings, fiberglass is most likely used to make the bumper.
Restoration with a soldering iron
Self-repair of the front bumper (the method is also suitable for the rear bumper) can be done with a regular electric soldering iron. The disadvantage of the technology is the reduction in the thickness of the material in the damage zone.
For repairs you need furniture staplers, adhesive tape, a soldering iron and a grinder with sanding equipment. Repair technology:
- Drill holes at both ends of the crack to prevent it from getting larger.
- Connect the parts tightly and secure from the outside with adhesive tape.
- Smoothly move the heated soldering iron along the crack from the reverse side.
- After several passes, reinforce the seam with staples from a stapler. Simply fuse the staples across the seam. Fuse plastic on top (you can take a separate piece of plastic) to protect the brackets from corrosion.
- Repeat the same procedure on the outside, but without using staples.
- Sand the seam.
To give the area aesthetics and hide the defect, after sanding the bumper should be painted.
Fusing electrodes
The method of fusing electrodes is characterized by increased reliability. But it is not always easy to find the right material. Required tools:
- flat configuration electrodes;
- construction hair dryer with a small diameter nozzle (4-10 mm).
The main thing is to use suitable electrodes. They are often sold at auto parts and similar stores. Ideally, you can find a similar old bumper from which you can take some of the material.
Check material compatibility. Weld one electrode strip on the back side. If it is difficult or impossible to tear off the part after hardening, this material is suitable. Surfacing of material onto the defective area. Usually the procedure starts from the middle, which is especially important for large cracks.
In the photo of a bumper repaired by yourself, you can clearly see what the final result looks like. If the technology is followed, it is possible to restore not only the strength, but also the original appearance of the part.
Why shouldn't you touch up chipped paint on your bumper?
You can only touch up a chip if you know for sure that it is mechanical damage. Otherwise, such actions will not lead to a good result. The problem is that the appearance of chips is a problem with paintwork that needs to be solved efficiently and radically. If you simply touch up the problem area, you will not solve the problem in this way. But if the damage is mechanical, it is worth remembering the bumper touch-up technology:
- very small chips can be painted over with a match, a sponge or a small artistic brush; this is done quite simply, but often the quality suffers;
- if the chip is larger, you will have to use a sponge or other objects with a larger area of contact with the metal, this is an important point for every car;
- very large damages are limited with masking tape, cleaned and washed, then painting is done using a spray gun or a can;
- if there is direct damage to the bumper, they need to be eliminated; you can align the part using heat and physical influence with little force for alignment;
- If, after the damage, a hole or torn tear has formed, the repair should be entrusted to specialists, and it is best to simply buy a new bumper.
There is no point in painting over chips that appear without good reason. After some time, the paint will chip again and the result of such an action will not be the most pleasant sight. It is worth remembering that repairing body parts has its own characteristics and important features. And these features must be observed to obtain the desired result. Get important ideas for performing decent repairs on plastic body parts.
How to remove scratches on a plastic bumper with your own hands
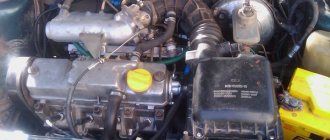
General purpose passenger cars use dampers that are made of high-strength plastic.
Plastic bumper
The main role of this device is to decorate the design of the car's appearance. Most machines use impact-resistant thermoplastic (ABS plastic) as a passive protection element. But there are dampers made from polypropylene, polyurethane and fiberglass. This can be indicated by the markings that are applied to their inner surface. The plastic is lightweight, easy to stamp, and holds the paintwork well. The protective functions of the bumper play a secondary role. They appear only in low-speed collisions:
- as a result of maneuvering in a confined space when parking;
- when driving over rough terrain.
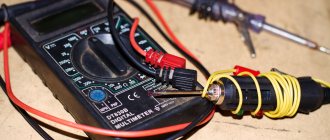
Diagnosis and subsequent repair of bumper damage
In Russia, male car owners are jacks of all trades. For them, removing scratches from a plastic bumper is a feasible, somewhat familiar, and not very difficult task. Life itself forces you to resort to such tricks - not everyone has enough money to go to a car service center on every occasion.
Scratches and scuffs on the bumper (bottom)
But first you need to assess the scale of the damage in order to choose the right strategy for your actions. Having carefully studied the defects of the bumper, you need to classify them into one of the points of the accepted classification:
- Slightly noticeable, shallow abrasions and scratches do not require removing the bumper and painting. They do not cause any harm to the plastic, but they cause frustration to the owner of the car due to the spoiled appearance. This flaw can be corrected by polishing the area directly on the car.
- Scratches to the depth of the paintwork and small cracks are the result of minor accidents and inept parking. In this case, special restoration methods are used - heating, wax pencil, local or complete painting - of the bumper. Minor defects are corrected on site. The damage is more serious on the removed buffer.
- Deep scratches and dents are caused by violent collisions. Here you will need to putty the damage on the removed bumper. In this case, a special technique is used to restore the original state of the plastic part.
- Destruction of the integrity of the damper with the formation of ruptures, breaks, and through cracks most often requires the purchase of a new part. When repairs are possible, welding is used. But this work can only be done in a car service center, so such defects will not be considered in this article.
We recommend: Gap size on spark plugs, its measurement and adjustment
Do-it-yourself local polishing of small scratches and abrasions
Wash, clean, polish
The entire process of getting rid of a flaw is divided into two stages:
- polishing with removal of the thinnest layer of paintwork (paint and varnish coating) of plastic;
- restoration of paintwork using wax polishes without the use of abrasives.
The procedure is as follows:
- clean, wash and degrease the defective area with a solvent;
- polish the scratches with fine-grained sandpaper and pour plenty of water until they disappear completely;
- treat damaged paintwork with felt, without abrasive wax pastes (in difficult cases, you can use tooth powder);
- Wipe dry with a woolen cloth.
Removing deep scratches with a hair dryer
Heating a damaged area of the bumper with a hair dryer
When heated, the plastic becomes fluid. This property is used to save the bumper from surface damage in the form of deep marks from sharp objects. This method can only be used for unpainted products. High temperature will destroy the paintwork and instead of benefit, harm will result. Using a hair dryer, carefully gradually warm up a significant area, including the area with scratches. This process should go slowly, evenly, consistently. The danger here is that plastic under the influence of high temperature can behave unpredictably: instead of tightening defective marks, its surface will “float”. In this case, depressions are formed that will be very difficult to eliminate in the future. Attentiveness, accuracy, and slowness will help you stop at a critical moment.
Repairing scratches and chips with a wax pencil
This method can correct the defect only of such marks, the depth of which extends to the layer of varnish, paint and primer of the bumper. Wax pencil is a universal product consisting of polymer synthesis. They create a strong protective layer that is not inferior in strength and uniformity to the paintwork of the bumper. Wax pencil has the following advantages:
- its composition is durable, which is why it easily withstands several dozen car washes using car shampoos;
- it is easy to use, so an inexperienced driver can easily use it;
- it will not harm any type of primer and paintwork that was used when the bumper was painted at the factory.
Wax pencils come in two types:
Marker. Reminds me of a regular felt-tip pen. They just need to paint over a scratch or chip. The amount of substance released depends on the force of pressing. The contents of the marker are similar in consistency to the composition of the paintwork. Colorless wax pencil is used for any color of paintwork.
Corrector. Consists of a bottle and a brush. Requires individual selection of a suitable pencil for a specific color of the bumper paintwork. When using a brush, an area with undamaged coating may also be captured. In this case, it is necessary that the colors of the paintwork and the corrector match 100%!
Painting over a scratch with a wax pencil
For cases where only the paintwork is damaged, a colorless correction pencil can also be used. The paint poured into it is colorless, so there will be no negative consequences from its use. In a situation where the primer layer is damaged, a colorless wax pencil will not be able to help eliminate the defect.
Procedure for using a wax pencil:
- the damaged area of the bumper is thoroughly washed, degreased and dried;
- A pencil should be drawn over the scratch gradually, evenly, sequentially;
- deep chips are painted over in several steps;
- After finishing work, you must remove the remaining contents of the pencil with a paper towel or napkin.
Elimination of scratches, chips and abrasions by painting
If the area of the defective area of the bumper is significant, complete painting of the entire product will be required after eliminating the defects. In such cases, the buffer is removed from the car. It is thoroughly cleaned of dirt and washed. The problem area is sanded using a small grinder, as well as the use of flexible abrasive wheels: emery cloths, tapes, petals, brushes. This method can remove scratches whose depth is limited by damage to the primer. Then the cleaned area is washed, degreased, and primed. Then the entire surface of the bumper is painted and then varnished. After drying, the damper regains its original appearance.
Video: how to remove scratches on a bumper with your own hands?
Filling deep scratches
Bumper putty
Serious signs of damage affecting the plastic material can only be eliminated with putty. This technology is based on the use of putties, primers and enamels of the same polymer base. This approach creates a durable, uniform layer of new paintwork that will not swell, peel or peel. The putty is applied in several stages. Each layer is dried. The quality of the bumper repair and the applied paintwork depends on the thoroughness of this operation. The putty is sanded with a soft abrasive material.
We recommend: How to determine air leaks in the intake manifold?
To the touch, the area where defects have been eliminated should be indistinguishable from adjacent undamaged areas. This process requires skill, perseverance, and diligence. Then the area with the defects eliminated is degreased, primed, and painted. The top is varnished. This method can be used to get rid of deep scratches, chips, and dents on the bumper, both installed on the car and removed from it. It all depends on the location of the damage and the area.
A scratched bumper is not the biggest evil in a new car. It is located below and its task is to absorb traces of pebbles, branches and other hard objects found on our roads. Even a novice driver who is inexperienced in plumbing or painting can eliminate these defects on his own. The main thing is to start and finish the work. Then the bumper restored with your own hands will again delight you with its original appearance.
How to prepare a bumper for full painting?
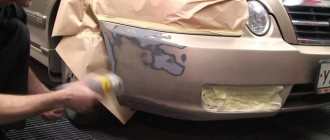
The best solution to this problem will be to fully paint the bumper using high-quality materials and technologies. If the chips appeared on their own, they may just appear again, so there is no point in painting over them. It is worthwhile to completely paint the bumper using fairly simple but effective technologies. Among the important actions, it is worth highlighting the stages of plastic preparation:
- it is best to remove the bumper from the car to avoid troubles when painting it, and then take the part to the garage, where this part of the car will be painted;
- the first stages of the preparation process can be performed on the street - this is washing off the old paint, removing the layer of old paintwork completely down to the black plastic of the body base;
- the next step will be matting the plastic if it has a glossy surface, often new bumpers are not matted before painting, and they soon show chips;
- then the surface of the part is degreased with a solvent and installed directly on the place where painting will take place in a garage or other room;
- after the solvent has dried, a layer of primer is applied, which may have several balls; this process must be carried out professionally and very carefully.
If the primer is not applied, the paint will not be able to adhere to the plastic. In this case, there will be problems with the integrity of the paintwork. However, these problems can be solved quite easily by first applying a primer before painting. The quality of the primer should be quite high, since this material protects the paintwork from destruction. Therefore, this process should be treated with an understanding of its importance.
Features of metal bumper repair
Body kits made of metal are quite rare on modern cars. In terms of damage, they differ from plastic in that deep defects must be repaired as soon as possible. Otherwise, the metal will be affected by corrosion, which over time penetrates under the layer of paintwork, causing the latter to swell and begin to crumble.
Removing scratches from a metal bumper is done using the technology used for plastic body kits. Small shallow grooves are removed with a wax marker and polishing, and deeper cracks and chips are removed by touching up. But if the scratch has penetrated to the very base, then the processing technology is complemented by another operation - removing corrosion. It is done using a rust converter liquid, followed by cleaning the damaged area.
Note. Different compositions are used for priming metal and plastic surfaces; this must be taken into account when purchasing materials.
The deeper and more extensive the defect in the bumper coating, the more difficult it is to deal with it at home. Therefore, you should not get to work when a body element is covered with dents or requires complete painting. At the same time, one must understand that minor damage is not removed without leaving a trace, and the painted area, to one degree or another, stands out against the background of the old coating. Therefore, your task is to remove scratches and do it as efficiently as possible, so that the difference goes unnoticed during a quick inspection of the car.
Directly painting the bumper - important conditions and features
Already when performing painting work at the priming stage, a number of difficulties arise. Streaks of material, drops and dust do not give rest to the performer of the process. If you are painting a part in a residential garage, there is no guarantee that the process will be reasonably successful. Dust will still settle on the paint. However, drips and drips can be avoided. To do this, it is necessary to fulfill the following important conditions for painting work:
- paint should be selected based on quality, and not low price; it is better to choose a good material with a high cost that will not let you down in the future;
- painting is carried out in several layers - specialists apply up to six layers of material for more reliable coating service, as well as for the absence of chips;
- it is important to ensure a completely uniform execution of the painting job; the gun must be moved smoothly over the part at a distance of about 12-15 centimeters;
- after painting, you should leave the part in the prepared room for several hours, then check the quality of the paintwork; if necessary, some places can still be washed off with a solvent;
- The last stage will be to completely dry the paint within 24 hours and install the element in the same place; this will allow you to obtain the required quality of the part without any difficulties.
With such features, the bumper will always be in perfect appearance and will remind you of the important visual features of the car. However, there are types of plastic that are incredibly difficult to paint. A material that is too thin is overly elastic and causes paint to simply not adhere to it. Often such bumpers are covered with film or other colored materials to achieve success. We invite you to watch the bumper painting process in the following video:
Let's sum it up
Painting plastic parts is not that easy. Local bumper repair turns out to be quite a complex process with a lot of unknowns. Therefore, in most situations it is better to trust full-fledged high-quality painting. Especially if the chips are large and did not appear from an accident. If the chip is caused by stones flying out from under the wheels of oncoming cars, you will have to do a high-quality painting of the chip itself and look at the behavior of this place. Often, owners immediately decide to repaint the entire bumper if we are talking about the unpleasant appearance of the product.
Local body repairs are always visible to the naked eye, and this really irritates many car owners. Therefore, motorists often prefer to completely repair the bumper. But keep in mind that ordering such a service from specialists can be expensive. It is also possible to repair the paint on the bumper yourself, but to do this you need to have a compressor, a paint gun and a place where you can apply the paint material. So it is not always economically profitable. Have you ever encountered unpleasant chips on your car bumper?