Choosing the right location to install the radar detector
stop-radar.com
Experienced
You bought a radar detector and now want to start using it.
Don't make the most common mistake of simply placing it on your dashboard before you hit the road. If you use this device without knowing exactly how it works and what information it conveys, it may not serve you well. First installation rule
states: The radar detector must be mounted in a place where the road ahead is clearly visible. It should always be in your field of vision, but you should not be distracted from control. You need to be able to put the radar detector somewhere, for example, to hide it from thieves, but what if the contacts accidentally become disconnected and the detector turns off without you noticing? Think about how much risk you expose yourself to every time you take your eyes off the road and peer into the radar detector screen.
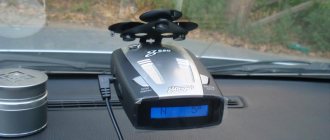
In most cases, the radar is hung next to the rearview mirror. Actually, this is not a bad idea. After all, television and radio transmitters are installed on high towers so that the signal spreads as far as possible. A long radio antenna on a traffic police car, for example, also contributes to good radio signal reception. Yes, but police radar is fundamentally different from all the equipment with which our favorite radio stations broadcast.
A distinctive feature of radio equipment is that it transmits a signal at 360 degrees. But the radar beam goes straight, it is very narrow, only 3-9 degrees, if we are talking about certain models of K-band radars. And this directed concentrated beam scatters at a distance, bouncing off any metal surfaces that come in its way. In all the time I've been testing radar detectors, I've never seen a single radar whose range is truly significant.
would increase when moving the device from the passenger side of the dashboard to the upper area of the windshield.
There is another disadvantage when installing the detector at a height: it begins to produce serious errors when detecting a laser beam. Always remember one fact. A laser beam can be detected by a detector from a distance of 60 m if the detection zone of the detector is a circle with a diameter of about 1 m. The beam is so dense, so thin that if it is aimed at a front license plate (a favorite target of police officers), many detectors are simply not able to detect it. Remember: the larger the vehicle, the further away the radar detector will be from the metal plate of the license plate, and the less efficient it will be at detecting the laser beam.
Raise it even higher, and the increased distance to the front registration number will confuse even the best radar detectors. Carefully study the results of the radar test, paying special attention to such a parameter as the radar field of effect. Of fundamental importance is the ability of the device to respond already at the edge of the laser beam. If the detector's field of action, for example, is, on average, about 70 cm, then in the vast majority of cases (unless you are riding a skateboard, of course), the laser beam cannot be detected until it is aimed directly at the head. " Such detectors can have a good maximum detection range, but at an even greater range the laser beam is scattered even more. The spread may be more than 6 meters. However, at a distance of 300 m or less, the narrow beam will hit the target without even disturbing the detector.
What if you install the detector on the windshield, somewhere in the middle? This is an acceptable option, but it also has disadvantages. First of all, you advertise the fact that you have a radar detector. And many traffic police inspectors can’t stand them. And in those countries where it is prohibited, they have instruments and methods in their arsenal that they can use to determine the presence of a working device in a car.
Here is one of them, time-tested, allowing you to easily detect someone who uses the detector in the dark. The police follow the speeding violator and then turn on their radar. Even if the driver is smart enough to not slam on the brakes immediately after the warning signal from his radar detector, a police officer may notice his warning lights displayed on the screen of the device inside the car. (If the detector has a very large screen, it can be seen from several tens of meters behind the car).
Another thing that indicates that you have a radar detector is the behavior of other drivers. If you are driving at speeds above 130-140 km/h, some drivers who do not have a radar detector will notice that you have one and will tail you. You will pave the way for them. It gets on your nerves and is dangerous. If you suddenly brake after receiving a signal from the detector, the likelihood that the idiot driving behind will hit you in the rear bumper increases dramatically. My advice: mount the radar as low as possible on the windshield or place it on the dashboard.
In this position, it will function well and will not be so noticeable to others.
Remember:
The very small, literally pinpoint width of the laser beam means that the beam can reach the front registration number without hitting the radar detector located high on the windshield of the car. As a result, the radar detector will not issue any warning.
And place it like this
so that you can reach the control buttons. In particular, make sure that you can reach the volume control and operating mode (City/Highway) buttons. The mute button should also be within reach. On models that do not have such a button (and they are quite rare these days), you need to provide quick access to the buttons to turn off sound alerts in case you enter an area where third-party or false signal sources are active. Nothing is more annoying than persistent sound signals emanating from some source of radiation in the roadside area. Or the radar detector starts beeping continuously while you are stuck in a traffic jam.
Don't forget about safety precautions. Since the detector attached to the windshield or rearview mirror is not firmly glued to the surface, it may become loose over time. A device that falls while driving can cause injury to the driver or passenger. Also, during a sudden stop, the passenger runs the risk of hitting the detector located on the windshield. Don't forget this when driving.
Design features of the radar detector
Radar detectors differ according to the type of design. Now on sale you can find:
- ordinary detectors (which are a separate device in a monoblock housing),
- devices for separate installation (consisting of several blocks),
- detectors built into some device (for example, a car video recorder or rearview mirror).
The 2012 radar detector test showed that ordinary radar detectors with a monoblock design are the most popular. They are easy to use and can be installed in any car in a matter of seconds. They are quite compact in size—about the size of a pack of cigarettes, or a little larger. Such a device will definitely not take up a large amount of space on the windshield or dashboard.
Radar detectors combined with another automotive device are less popular among car enthusiasts. There are devices mounted in the rearview mirror in the cabin, in the car video recorder, etc. Of course, such solutions save space in the car, but such savings often lead to a significant loss in the quality and characteristics of the purchased device. For example, not a single DVR combined with a radar detector has FULL HD resolution yet.
Devices of the third group - radar detectors intended for separate installation - require a trip to the installation center, since their installation is quite complex and requires a qualified specialist. This device is mounted once and is never removed, remaining in the car all the time.
If you are looking for and want to purchase a radar detector, first you need to decide which device design will be most optimal.
How to properly install and configure a radar detector
Road traffic in Russia is a constant confrontation between traffic police officers and motorists. The former control traffic flows on roads, use traffic radars and automatic video recording cameras, and consider fines for traffic violators to be the main way to ensure safety. The latter seek to avoid punishment, deceive control systems and use anti-radars and radar detectors for this.
How effective are the means of combating traffic police radars, how to choose, install, configure and use?
Design features, manufacturers and price
According to design features, it is customary to distinguish:
- Multifunctional devices that combine several devices at once. For example, a video recorder and a radar detector.
- Detectors consisting of several components installed in different parts of the car. Such detectors are installed once and for all, and therefore are not very popular among car owners.
- Monoblock devices are the most popular devices, representing a small block that can be placed either on the glass or dashboard, or behind the interior rearview mirror.
Also, having decided to acquire a radar detector, the driver must decide on the available budget, since depending on the functionality, type, dimensions and material of the case, the price of the device also changes, which can reach $400.
PlayMe has proven itself well in the Russian radar detector market
The best products on the market have proven themselves to be products from PlayMe, Street Storm, Cobra and Whisler, which, although a little more expensive than their main competitors, have the best price/quality ratio. If your budget is limited, you can take a closer look at the products of Karkam, Inspector, ParkCity and Neoline.
Operating principle of a radar detector
Radar detectors are the previous generation of means of combating radars and video cameras on the roads, which are used by State Traffic Inspectorate employees. These are active devices that create frequency interference and prevent police radars from accurately detecting speeding violations. They operate in a wide range of frequencies and disrupt the operation of not only traffic police equipment, but also surrounding frequency devices (including ABS systems and GPS equipment). Therefore, these devices are dangerous and prohibited for use in the Russian Federation.
Installing a radar detector in a car
The location and position of the radar detector are fundamentally important, since direct visibility and the absence of obstacles significantly improve its accuracy and functionality, and also reduce the number of false alarms.
- If your radar has a monoblock design, it can be installed on the front panel in the cabin - in front of the windshield.
- If the design is combined, then only the radar indicator can be placed on the dashboard, and the receiving module can be hidden under the panel.
The front part of the device should be turned towards the driver, with the receiver facing forward, exactly as the car is moving. It would be optimal to install the device together with the DVR in the middle of the windshield of the car or on the rear view mirror pillar: at its upper edge (then it will be able to receive signals when driving on hilly terrain). Radars usually have their own mounting: brackets with latches, suction cups or Velcro. It is important that when installing a radar detector, the view is not obstructed by the power cord from the cigarette lighter, which will distract attention when moving.
Any obstacles in front should be removed. Including the need to change the athermal glass and metallic tinting on the windshield, which screens the signals (the error rate increases by 10-60%).
However, the correct location of the radar detector in the car interior is only the first stage. Any equipment of this type will only work if it is configured correctly.
Types of radars. What types of radar detectors are there?
Despite the huge variety of devices on sale, all radar detectors, without exception, have the same operating algorithm. They pick up a signal of a certain frequency, characteristic of police radars, and signal the driver that he is being “caught.” Due to the fact that the radar signal is quite powerful, radar detectors are able to detect it at a distance of up to 1 kilometer, and therefore drivers have enough time to slow down to an acceptable speed.
Currently, all devices of this class on sale can be divided into several conditional groups.
Radar detectors made in a monoblock form factor
They are a compact device, the radar part of which, the speaker and the display panel, together with the adjustment buttons, are enclosed in a compact, miniature housing. As a rule, such devices are almost always powered from a cigarette lighter and are mounted on special suction cups on the windshield or on the panel using a special mat.
Advantages
- Compact dimensions;
- High functionality;
- Affordable price tag;
- Easy to install, configure and operate;
- The latest radars and photographic cameras do not “catch” them;
- It has to be dismantled upon entering most EU countries where the use of radar detectors is prohibited by law;
- Do not work in cars equipped with a thermal windshield;
Spaced Radar Detector
A device consisting of two separate elements - the radar part and the control unit. The first is mounted in the engine compartment of the car, the second is installed in a convenient place in the cabin
Such devices are distinguished by excellent functionality and miniature size; they do not hang in plain sight and do not attract the attention of law enforcement agencies and thieves.
Advantages
- High functionality;
- Allows installation in cars equipped with athermal windows;
- Do not attract attention;
- Compact dimensions;
- High price;
- Labor-intensive installation, installation and configuration;
Signature radar detectors
New products that have appeared on the market relatively recently and have won many praises from drivers who have tried them. The principle of their operation is to work on the principle of signatures - certain parameters of the input signal characteristic of certain radiations. Traditional radar detectors react to all signals in a row, forcing the driver to be constantly on edge. Their signature-based counterparts reject false signals (store windows, automatic doors, video surveillance) and voice only those signatures that are typical for police devices. Each operation of such a device means one thing - you are “caught” at speed.
Advantages
- Compact and very functional;
- Thanks to the developed radar part, they are able to filter the radar signal even against the background of powerful and intense interference;
- Constantly updated signature databases;
- Significantly reduce the likelihood of false positives;
- High price;
- The need to constantly update signature databases;
- Slower response due to the need to verify signatures with the incoming signal;
Unique devices, the functionality of which consists not only of a radar part and a radio module, but also of a highly sensitive GPS receiver that tracks the location of the car. The latter significantly expands the functionality of the device due to the ability to use databases of stationary cameras, which the radio module cannot “catch” in principle, since they most often “shoot” in the back. When approaching them, the radar detector will warn you in advance and suggest reducing the speed of your car.
Advantages
- Functionality;
- Constant updating of databases and inclusion of new, recently installed radars and cameras;
- Ease of use;
- Easy installation and operation;
- They detect all known types of radars, including modern stationary ones (“Strelka”, “Avtouragan”);
Procedure for setting up the radar detector
First of all, it is necessary to update the signature databases (signals from traffic police radar equipment and extraneous frequency “noise”). To do this, you need to download the file with the latest device firmware to your PC, connect the radar detector to it via a USB port, download and run the installer, then download the database from the specified path into the device and update the program.
Next, the radar is configured internally by going to the Menu, where the Menu and Dim buttons are used to switch between settings, and the Mute and City buttons are used to select parameters within each setting. The device is configured in the following sequence:
- language selection (English/Russian);
- selection of an algorithm for processing GPS points (ATO) from the database (entry point into the radar zone and its location point). At the same time, ATO = OFF (ATO = 0) is the starting detection mode, depending on the speed of the car;
- selecting a greeting mode on the display (““, “Hello!”, “Welcome”);
- voice mode selection – voice notification enabled/disabled;
- Test selection (self-test enabled/disabled);
- selection (enabling/disabling operating frequency modes):
- X – signals in the range 10.525 GHz-50 MHz;
- Ku – signals in the range 13.450 GHz-50 MHz;
- Ka – signals in the range 34.7 GHz-1300 MHz;
- St – signals from the Strelka radar complex.
- selecting a brightness mode (“Auto” – automatic regulation, “Brightness” – bright/muted, “My” – according to the brightness scale in the menu);
- selection of mode signal sound: X, K, Ka, Ku, L (laser), G (GPS point detection), St (for the Strelka complex);
- selecting the operating mode of the GPS module (on/off);
- time zone selection (MNS, MSK, UZB, EKT, OMS, KRA, IRK, YAKU, VLA, MAG, KLG);
- selection of speed units (km/h or m/h);
- maximum speed selection (OSPD) with voice warning when exceeded;
- automatic shutdown of the warning sound signal (AMSPD) when the speed decreases below the set level on the police radar (“0” - notify at any speed);
- switching to the “City” mode (ACSPD) at a speed below the selected level (“0” - do not switch);
- switching to the “Track” mode (ATSPD) and reducing sensitivity to medium at a speed below the selected level (“0” - do not switch);
- disable notification (AOSPD) about the reception of traffic police radars at speeds below the selected level (“0” - notify at any speed);
- selection of maximum speed for the entire journey (MSPD);
- selection of overspeed limit (OSL) with voice notification;
- TM – distance traveled;
- TT – travel time
- Clock – time in 12 or 24 hour format.
You can also configure the options for selecting GPS points: DEL.UP (“2” — deleting all points within a radius of up to 200 m, “4” — within a radius of 400 m, “6” — within a radius of 600 m, “A” — all points) as well as deleting erroneous DEL.FZ points (“2” - within a radius of 200 m, “4” - 400 m, “6” - 600 m, “A” - all points).
What settings are most important in a radar detector?
The most important things in a radar detector are the settings of the frequency ranges for receiving signals from a wide range of traffic police radars. If your device model is capable of receiving all frequency bands (X, K, Ka, Ku, laser, GPS and signals from the Strelka complex), it will work more reliably and will not miss the police scanning signal.
In addition, it is important that the device can switch to different operating modes taking into account the processing of data from different signature databases:
- “Track” - a mode in which the radar picks up all unmodulated frequency signals in all ranges (this mode is good when moving outside the city);
- “IQ” (“Intelligent Interference”) - a mode in which the device detects microwave emitters whose signatures are not in the databases and cuts off extraneous noise (convenient when a large number of devices around are emitting frequency signals);
- “City” is a mode in which the device immediately selects only police radar signals, ignoring extraneous noise (convenient when driving in populated areas).
It is important to understand that the equipment of traffic police officers is constantly being improved and updated, and there are no universal anti-radar means to combat them. Therefore, the possibility of erroneous operation of radar detectors should not be excluded, as well as the rare inability to “recognize” a police radar.
The correct operation of radars depends on the complexity, power, multi-frequency reception of signals and the method of installing police equipment (in the face, back or at an angle), the terrain (hills, winding road, lack of reflective elements), traffic density on the road and weather conditions.
Thus, correct installation and correct configuration of radar detectors are extremely important for the correct operation of them and reducing the frequency of false alarms. To do this, you should choose high-quality and proven equipment, configure it in accordance with the manufacturers’ recommendations, properly test it and use it in road traffic.
But, in any case, ideal equipment does not exist. You will be able to maximize notification of speed radars and video cameras on the road, but you will not see them all for various objective and subjective reasons. Therefore, the safest way to avoid getting fined by traffic police inspectors is still to comply with traffic rules.
What makes a good radar detector?
Firstly, those who are able to determine the maximum number of different radars (preferably all), that is, operating in all main ranges. If you can’t rely on him, he’s worthless. Actually, this metaphor is not without meaning: the cheapest detectors are indeed very inexpensive, but they do not detect all speedguns.
Another important point: if the detector is often mistaken and “sees” radars where there are none, the value of such a device is also close to zero
Very soon you will simply stop paying attention to its signals, and as a result you will ignore a truly relevant warning. Of course, the detectors beep for a reason: they pick up signals, for example, from automatic sliding door systems
To eliminate false positives, manufacturers enter so-called signatures into the device’s memory.
The fact is that police radars operate with certain characteristics: they may have unique length, power, and number of radiation pulses. That is, everyone has their own “handwriting” - or, in other words, signatures. Modern radar detectors can not only detect radiation, but also determine the model of the device. Accordingly, if the detector catches some kind of signature, it understands for sure that this is not an automatic door. Therefore, the best choice is a signature radar detector. For example, here’s a Neoline X-COP 7500s:
An important option for a good radar detector is the presence of a GPS sensor. It performs two functions at once. First of all, the device determines its location and compares it with a map of stationary speed posts, which is usually in its memory. By the way, some of them do not have a radiation source at all. For example, Avtodoria takes pictures of a car on different sections of the road, and then calculates the average speed: if it is higher than the permitted speed, the car owner is issued a fine. Such posts are also “calculated” by the radar using GPS. This inexpensive SHO-ME Signature Excellent has a database of stationary radars in its memory.
How to configure the Cobra TM radar detector correctly?
Before you begin setting up the Cobra TM radar detector, you must correctly install this device, ensuring its correct operation. The detector should be installed parallel to the road. You may have to bend the bracket slightly once to position the unit horizontally. It is better to install the device in the middle of the windshield of the car as high as possible, so that in places with height differences the detector is triggered as early as possible. Keep in mind that tinting can degrade the sensitivity of the device by 10-20 percent. Thus, if you have a tint strip glued to the top of the windshield, it is better to install the device lower. Also note that athermal glass with a violet tint reduces the sensitivity of any radar detector by 40-60 percent.
Where to install the radar detector?
Before we move on to properly setting up the radar detector, let's discuss where it should be located. If you don’t want to get a fine, remember that the gadget should not obstruct the driver’s view. This applies to any auxiliary automotive equipment. By the way, the fine for this violation is 500 rubles.
To correctly detect cameras and radars, it is advisable to install the radar detector on the windshield (near the rear view mirror) or on the dashboard (in the central part). Here are the general rules for choosing the ideal installation location:
- The gadget must be positioned strictly parallel to the road and as high as possible, therefore, most often it is mounted on the windshield;
- Other devices should not interfere with the radar detector’s ability to easily “catch” other people’s radio waves or radiation;
- Make sure that there are no metal objects or equipment near the radar detector (to prevent signal distortion);
- The device should not be within the range of windshield wiper blades, sun strips and other windshield tuning elements;
- Installation is carried out using fastening components from the original equipment of the device;
- Do not use two radar detectors in one car at the same time.
Please note that tinting, as well as violet athermal glass, significantly impair the sensitivity of the radar detector, which affects the quality of camera detection.
How to set up a radar detector?
It is customary to configure the radar detector once, after which the selected parameters are saved in memory. Today in our country there are mainly two bands used in which police radars operate:
- X - the Sokol type radar operates in this range, which has long been discontinued, but in some regions they are still found.
- K-band – this is where modern speed meters operate.
- Separately, we can distinguish laser radars, which do not operate in any specific range, but operate at the expense of the light wavelength, which is measured in nanometers.
There are other frequency ranges:
These ranges are not yet used in our country, so we recommend turning them off. First of all, this will reduce the frequency of false positives. Regardless of the fact that there is no measuring equipment in such ranges in our country, triggering from other sources cannot be ruled out. The speed of the gadget's processor also increases, since it will work to recognize only certain ranges.
It should be noted that in the new Cobra radar detectors, the Ka band is enabled by default and cannot be turned off. X-band is enabled in the settings and you can disable it if necessary. Frequency ranges not used in our country are disabled by default. In other words, modern models of Cobra radar detectors are configured for use in Russia. In the factory settings, the Highway driving mode is selected - it is optimal in many cases.
In the urban mode of operation in the Cobra RU 935, 945, 955 and 745, 755 and 775 ST radar detector models, the signal strength of one and two is not announced, so we do not recommend using the mode in unfamiliar areas. City and City Max are good for cities where the cops are mostly armed with Marksmen.
Radar detector and its differences from antiradar
A radar detector is an active device that creates noise and distorts frequencies in the same ranges in which police radars operate. As a result, the radar either cannot record the speed of a moving car at all or displays a distorted, underestimated value. The use of radar detectors in Russia, as in all European countries, is prohibited by law, so if a driver is caught with such a device on board, firstly, he will lose the device, and secondly, he will receive an impressive fine.
The radar detector detects and warns the driver of a stationary or mobile speed meter ahead
Unlike a radar detector, a radar detector is a passive device whose task is to detect and warn the driver about a stationary or mobile speed meter ahead. That is, this is a device that does not suppress or distort signals, but only acts as a receiver. Such devices are absolutely legal in Russia and some neighboring countries, but traveling to Europe with them is strictly not recommended - you risk not only getting a fine or losing your car, but also earning a very real prison sentence.
How to use?
For the convenience of using the detector and getting the maximum result from it, you will need to get used to the gadget over a certain period of time and learn to correctly recognize information. For example, the appearance of a short and weak signal in the K-band almost certainly indicates a false positive. In this case, a stable signal almost certainly indicates radar detection.
Do not forget that in addition to police radars, other equipment operating in the above ranges has weaker radiation that the detector can trigger. These could be sensors for opening sliding doors at gas stations or in stores, power lines, cruise control in cars, cell towers, satellite dishes, etc.
To reduce the frequency of unnecessary triggering, we recommend doing the following:
- Disable bands that are not used in our country.
- Switch between City and Highway modes. In the first case, the received signals are coarsened and the number of false positives is reduced. In this case, the sensitivity of the sensor decreases.
To increase comfort, you can use the IntelliMute option, which is not available on all radar detectors. Setting the function makes it possible to muffle the functioning of the gadget at low speeds. These are the cases when using a detector turns out to be irrelevant. Let's say you're stuck in traffic or pulling into a shopping center where there are door sensors and you just can't speed in the parking lot.
What determines the operating range?
Please note that the detection range of the radar detector largely depends on factors such as:
- geography of the area (winding or hilly road, lack of reflective objects and surfaces);
- type of police radar used (high, medium, low power); radar installation method (in the back, at an angle, in the face);
- weather, traffic on the road.
It is impossible to determine in advance the maximum range of the antiradar, since in each specific case the combination of factors influencing the range may be different.
Also, you should not use two radar detectors at the same time, since the heterodyne background of one device can interfere with the operation of the other.
Do not bring the radar detector close to a functioning police radar - up to five meters. This is not normal for its use and the detector board may simply be damaged.
Where and how to install correctly
For the gadget to work effectively, you need to install it correctly. It is recommended to place it either on the windshield or on the dashboard of the car. There is no difference, you can install it wherever it is convenient. In this case, the main requirement must be met - the radar detector should not block the view of the road.
There is one more rule - you need to install the device in the car parallel to the road.
In addition, the installation of the radar detector must be such that it can easily detect electromagnetic radiation.
Most often, the device is installed near the rearview mirror, but away from windshield wiper blades, sun strips and other metal parts (this can cause distorted results).
You can install the radar without using any special tools. It comes complete with suction cups
Where and how to install and connect the radar detector
As user experience shows, radar detectors are most often installed on the windshield, with the most common mounting location being the area around the rearview mirror, as well as the extreme upper corner of the glass (behind the sun visor), where the device does not obstruct or reduce the view of the road .
Standard suction cups are most often used for fastening, since they do not leave any marks after use and allow you to easily change the location of the device if necessary. Sometimes detectors are installed on the dashboard, where they are attached using a special adhesive tape, but this method is less common, since during dismantling there may be traces left after the tape, which are very problematic to get rid of.
How to connect
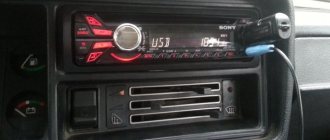
You can connect the radar detector yourself. The simplest option is to connect through the cigarette lighter. But this method has disadvantages, for example, the power cable will always be visible.
If this is essential, then hidden installation is also possible. In this case, you can do without a cigarette lighter. To do this, the radar detector must be connected either to the ignition or to the lampshade. When choosing the second option, you need to prepare the following tools and materials:
Now you can start working directly (it is advisable to have the connection diagram at hand):
- Remove the lamp housing, then disassemble it to get to the hardware.
- Strip the cables of the device, which must first be stretched under the ceiling upholstery, and then connect to the corresponding “minus” and “plus” of the lampshade.
- Reinstall the lampshade.
You can also connect the radar detector to the ignition yourself, but it’s a little more difficult to do:
- Install the gadget (in this case, it is better on the windshield).
- Remove the upholstery from the side pillar and, if necessary, from the threshold.
- Pull the power wire through the channel that is in the rack, then bring it out at the bottom of the dashboard and route it to the block.
- Now you can put the upholstery back in place, and then connect the wires to the block, or rather to the 12-volt cable through the fuse.
- After this, the block must be hidden, and then the threshold trim must be installed back.
Video: installation of a radar detector, video recorder in a Citroen C4 sedan
https://youtube.com/watch?v=t8R141r3iFQ
The fastest and easiest way to connect a radar detector is to connect it through the cigarette lighter, but in this case the driver will have to put up with the power cable being constantly visible. Drivers who want to hide the power cord resort to more sophisticated connection methods, including connecting to the lampshade and directly to the ignition.
To connect to the lampshade you will need a screwdriver, electrical tape and a fuse. The connection process is extremely simple and does not require any special skills:
- We attach the radar detector in the required place.
- Remove the lamp cover.
- We disassemble/remove the lampshade to gain access to its filling.
- We find the “plus” and “minus” wires, after which we connect to them a pre-stripped radar detector cable, which can be pulled under the headliner.
- We install the lampshade and cover in place.
The process of connecting to the ignition is a little more complicated and requires the following tools: electrical tape, a screwdriver, a multimeter and a fuse with a knife that will be used to strip the contacts.
- First of all, we attach the radar detector in the required place.
- We remove the upholstery of the side pillar and threshold, for which you can use a flat screwdriver.
- We pass the power cord through the channel in the side pillar, bring it out at the bottom of the dashboard and connect it to the block.
- After this, you can reinstall the side pillar trim and begin connecting the wires to the block, having previously identified the 12-volt cable with a multimeter.
- We solder and insulate one of the wires of the radar detector power cord to the 12-volt cable, using a fused connection.
- We hide the block and install the threshold trim in place.
How to setup
The radar detector must be configured only once, as a result of which the selected parameters are saved in memory.
Police speed control devices operate in 2 ranges:
- range “x” (typical for Sokol radars - it has already been discontinued, but is still used in some regions);
- range “k” - all modern speed meters operate in this range.
This gradation does not apply to the laser meter. It does not work in any one range. Its functionality is based on changing the wavelength of light.
How to configure for proper camera detection?
Now let's look at how to set up a radar detector correctly, because the detection efficiency of traffic police cameras directly depends on this.
By the way, so far we have considered issues related to the operation of a stationary radar detector. However, mobile applications with a detector option have also become widespread among modern drivers. They have a slightly different principle of operation - they search for cameras via GPS, therefore they do not pick up police radars. However, they undoubtedly have their benefit in detecting tracking components on the road, so we will also tell you how to set up free radar detectors on your phone.
How to set up a separate gadget?
The radar detector is usually configured once, after which the settings are saved in memory. The exception is if you had to perform a factory reset. After this procedure, the device will need to be configured again.
- The first step is to configure the radar detector in Russian or English (if there are any in the Menu). See the instructions for using the gadget for the algorithm.
- The next step is to configure frequency ranges, in particular, disable unnecessary ones. In Russia today, almost all speed meters and cameras operate in the K-band. Radars operating in the X-band are considered relics of the past, but they have been taken out of service almost everywhere (but, just in case, do not turn them off). Laser cameras and hand-held meters (which perform calculations based on the wavelength of light reflected from the vehicle being tested) are also common, so make sure the Laser range is active. The remaining frequency ranges (Ka, L, POP, VG-2) can be disabled. The exception is if you live in a large metropolis, because who knows what sophisticated cameras have been introduced here? Disabling some ranges will significantly increase the accuracy of camera detection and reduce the percentage of false alarms.
- Next, do not forget to set the sound on the radar detector so as not to miss the alert signal;
- Adjust the display brightness and detection sensitivity (do not turn it up too much so that the gadget does not squeak at any sources of radio waves and taxi drivers’ radios);
- Select the optimal distance to the police radar or camera (it is advisable to set the distance to 1000 m and further).
Let's take a closer look at the operating modes of the radar detector, which are also important to configure:
- Instant On. Constant “combat” readiness mode without emitting a radio signal;
- POP. Configured to detect Iskra radars (pulse determination of target speed);
- Highway or City. In the first, the gadget works with maximum bias, in the second, it sorts radiation sources in order to reduce the percentage of false detections.
How to set up the utility on a smartphone?
Next, we’ll find out how to set up the “Radar Detector” application on your smartphone. As a rule, all options here are configured by default. The user can only download the utility and allow it to detect cameras in the background.
Such programs operate on the basis of GPS data, which is received via satellite navigation. Therefore, it is important to configure the parameters related to its smooth operation:
- In the utility, in the “Confidentiality” block (“Security” or another synonym, depends on the application), check the boxes in all subsections of the “Geodata” item;
- Don't forget to give the program access to detect your location;
- Optionally, allow the application to update the database of cameras and speed meters on its own (or remember to periodically do this manually);
- Don't forget to activate the GPS module on your smartphone;
- Adjust the volume and quality of sound notifications not only in the application, but also in the phone settings.
Choose a program with a high rating and good reviews to install. Many utilities allow you to independently add cameras and traffic police posts, although most often only in Pro modes. Paid versions often contain other additional features. Carefully read the description and recommendations for installing the application on an iPhone or Android - they will help you configure all the options correctly.
How to use a radar detector?
Instructions for use are included with each radar detector. Features depend on the model, but there are general recommendations. People who constantly use the detector can read the symbols on the display and understand the sound signal without prompting:
- if you turn on the device in the “City” mode, the letter “C” will appear on the display and will light up in yellow;
- green letters “K/Ka” and red “X” indicate the corresponding mode;
- “L” will warn about laser radar;
- The red numbers indicate the detection strength of the radar.
You also need to pay attention to the sound signal. For example, when operating in the K-band, a weak, short-lived signal may indicate a false alarm.